SharePoint (2003 thru Online): 2019

Thursday, December 19, 2019

Updated Feature: Email notifications for comments and @mentions in Word, PowerPoint, and Excel

MSFT will be updating email notifications for comments and @mentions in Excel, PowerPoint, and Word.
We'll be gradually rolling this out in mid-January 2020
The roll out will be completed worldwide by the end of February 2020

This message is associated with Office 365 Roadmap ID 51538.

How does this affect me?
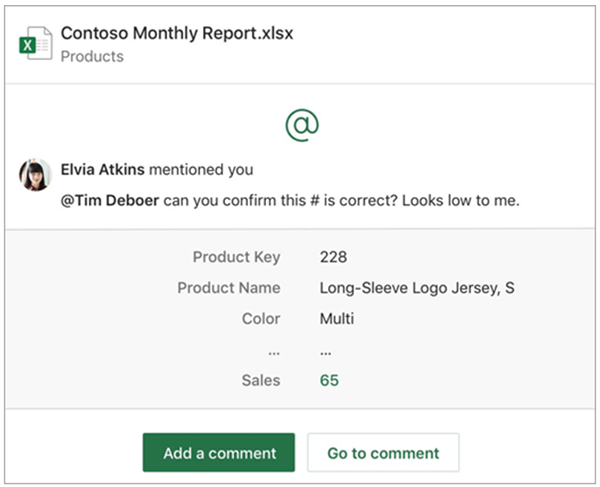
Currently, when a user comments on a document, presentation, or spreadsheet and adds the @ sign with someone's name (an @mention), that person may receive an email with a link to that comment. By clicking on the link, the mentioned person opens the document comment and enters that conversation.

With this update, when a user gets an email notification that someone has @mentioned them or who has replied to their comment, the email may now show both the comment thread and the surrounding document context without requiring them to open the document. In addition, users who receive the email will be able to reply to the comment without needing to open the document.

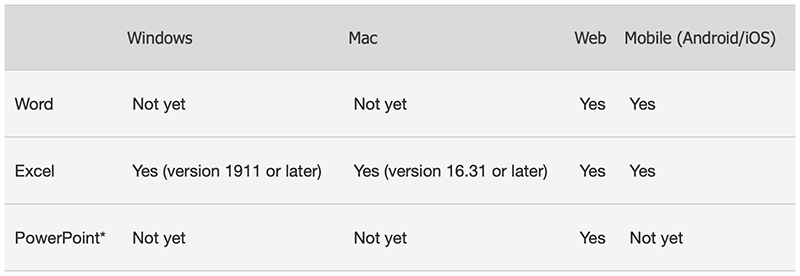
This update applies to these versions of Excel: Windows (version 1911 or later), Mac (version 16.31 or later), mobile, and web.
For Word, this update applies only to mobile and web versions.
For PowerPoint, this update applies only to the web version.
We will add additional support for PowerPoint and Word in 2020 and will notify you of those updates at that time.


Sometimes users may get email notifications that do not include the comment thread, context, or ability to reply from the email. This can happen:
When the file is marked sensitive via rules supporting Data Loss Prevention;

If the file is Rights Protected; or
Kathy > is there a better link?

If the person who left the comment is using a version of Office that does not yet support this feature.

Additional information

Wednesday, December 18, 2019

Updated Feature: Image resizing in the modern SharePoint experience

MSFT is introducing the ability to resize an image in the modern SharePoint experience. 
We'll be gradually rolling this out to Targeted Release customers in early January 2020.
The roll out will be complete by the beginning of February 2020.

This message is associated with Office 365 Roadmap ID 57812.

How does this affect me?
The modern SharePoint site is comprised of web parts, the building blocks of the page. The Image web part lets an editor insert an image on a page, whether from their SharePoint site, their computer, or an external web location.

With this update, page editors will also be able to resize images in the image web part.


What do I need to do to prepare for this change?
There is no action you need to take to prepare for this change, but you might consider updating your user training and notifying your help desk.

Tuesday, December 17, 2019

Updated Feature: Exchange Online - FindTime, updating back-end service

MSFT is updating how FindTime stores polling data.

• MSFT will be gradually rolling this out to targeted release customers in mid-December 2019.
• The rollout will be completed by the end of March 2020.

This message is associated with Microsoft Office 365 Roadmap ID 58210.

How does this affect me?

FindTime is an Outlook add-in that helps your users quickly find time to meet with others by simplifying group scheduling via a poll. Customers have asked that FindTime store application data at the organization’s location. To address this, the new FindTime service will now store collected data in the meeting organizer’s Exchange mailbox.

The new FindTime service will be supported in Outlook on the web, Outlook for Windows 2016 version 2016.0.7828.100 and above, and Outlook for Mac 2016.

What do I need to do to prepare for this change?

If you have not enabled FindTime for your organization, this update does not apply to you.

If you have enabled FindTime for your organization:

• For your users who have a supported version of Outlook, their FindTime polling data will be stored in their Exchange mailbox.

• For your users who have a non-supported version of Outlook, their FindTime polling data will be stored in a North America server.


Install FindTime for everyone in my organization

As a tenant admin, you can install Office apps for your Office 365 users using the Exchange admin portal.

1. In the EAC, navigate to Organization > add-ins.

2.  Click 
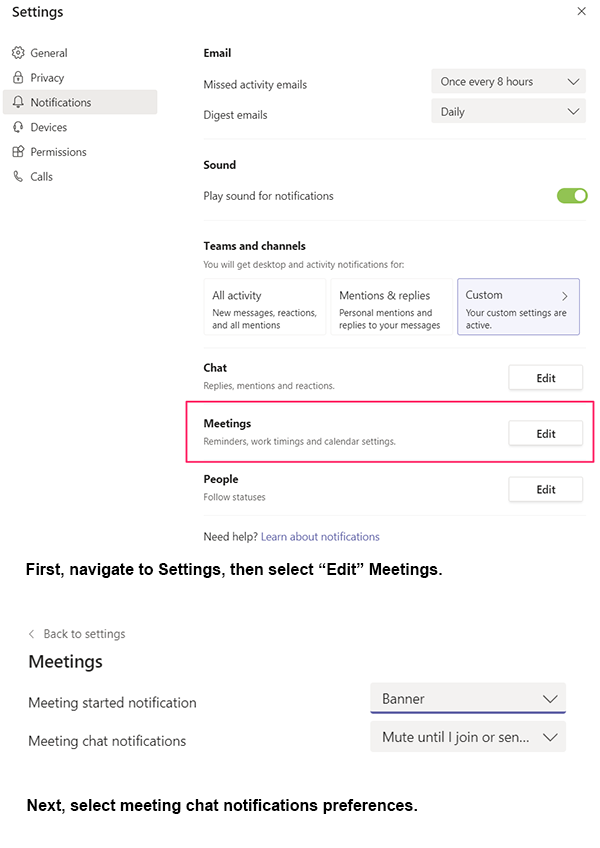
, and then choose the right option.

Add from the AppSource

Note: Access to the AppSource isn’t supported for mailboxes or organizations in specific regions. If you don’t see Add from the AppSource as an option in the Exchange admin center under Organization > add-ins >  Icon, you may be able to install an App for Outlook from a URL or file location. For more information, contact your service provider.

Add from URL. In URL, enter the full URL for the app manifest file that you want to install.


Add from file. Select Browse, and then navigate to the location of the app manifest file that you want to install.
We go with 'Add from the AppSource' option. 

This opens a new tab redirecting to MSFT appsource site, select the app you want to install (look for FindTime app), 


and then click GET IT NOW.
 Click 'Continue'
 Click 'Yes'
 You will see the FindTime icon under Home tab of the Mailbox and under Message tab of the opened e-mail.
Click on  Reply with Meeting Poll - FindTime icon, Click on 'Link Now'

Sign in for the first time
Once connected, select the Meeting time(s) and Click 'Next'
 

Update the Location and click on 'Insert to email'
You will see the email as shown below.

Wednesday, December 4, 2019

New Feature: Meeting chat notifications

MSFT are enabling meeting chat notifications for Teams. They will be gradually rolling this out in early December 2019.The rollout will be completed by mid-December.

This message is associated with Microsoft 365 Roadmap ID 54637.

How does this affect me?

By default, meeting chats will be muted until a user either sends a message in the chat or joins the online meeting.
Users who have joined a meeting, whether or not they have sent a message in the meeting chat, will receive notifications of chat messages for that meeting unless they have modified their settings.
Users who send a message in a meeting chat will receive notifications for chat messages for that meeting unless they have modified their settings.

Users can change the default setting:
In the web browser or desktop client, users should tap their profile picture at the top right of the app, select Settings > Notifications.

In the mobile client, users should access the "Hamburger" menu and choose Settings > Notifications.
Then navigate to the meetings section and open the menu for Meeting chat notifications.


What do I need to do to prepare for this change?

There is nothing you need to do to prepare for this change, but you may consider updating your user training and notifying your help desk.

Wednesday, November 13, 2019

LookBook for SharePoint Online sites

Recently MSFT released LookBook to make SharePoint admins and users get inspired with these designs or add them to your tenant to start building your next stunning site with them. This also includes SharePoint Themes Designer to Design beautiful and performant sites, pages, and web parts with SharePoint in Office 365.

In this episode, we will work on applying new branding site from LookBook.

Click on the https://lookbook.microsoft.com/ link.  
On top Navigation, go to View the designs to view a bunch of available designs. Below screenshot shows the existing branding templates.

Picked 'Mark8 Project team' site under Team.
Click on "Add to your tenant". You will see the below message if you have SharePoint admin role.  You need Tenant admin role.
Tenant admin means Global admin.
Checkbox the Consent on behalf of your organization and Click Accept
Change Site Title or Site URL if needed and click on Provision
Click on Confirm, and watch the Provisioning Status.


Sometimes, it might take more than 5 mins. No worries, you will receive an email notification (as shown below).
Click on Open site >. You can also view/open the site thru Active Sites.
The new created Site looks the same as the preview in the LookBook site.

Tuesday, November 12, 2019

File hover card feature in O365/SPO

MSFT introduced an Office 365 file hover card feature: people who viewed files.

We'll be gradually rolling this out to Targeted Release customers in mid-November 2019.
The roll out will be completed by the end of February 2020.

This message is associated with Microsoft 365 Roadmap ID 56515.

How does this affect me?
This new file card feature will show you who has viewed your files and pages in SharePoint. When someone views a file you own or a page or news article that you have authored, SharePoint displays that people information and profile image of the viewer in the file hover card.


This information is available only to people who themselves have access to a file and only when the SharePoint site owner has enabled this feature. Users who cannot access the file will not see this data.

This feature exists alongside file details and actions like Inside Look and Activity.

What do I need to do to prepare for this change?
Tenant level: There are administrative controls to enable and disable at the tenant level. This setting is default On at the tenant level.

To disable the feature for all SharePoint sites in the tenant, admins will need to change the control by visiting the SharePoint admin center and navigating to the Sharing settings.

SharePoint site level: The administrative controls for each SharePoint site are default Off. This toggle is accessible in the Manage Site Features settings.

Viewer information will only appear if a SharePoint site owner changes the default setting to Active.


Tenant and SP setting options


Note: Microsoft recommends enabling the file viewers feature on sites where users are expected to be collaborating frequently and not on communication sites or sites with potentially sensitive information.

Tuesday, October 15, 2019

Sharing Reports for OneDrive

When you run the sharing report on file and folder sharing in OneDrive, the CSV file is saved to a location of your choosing in the OneDrive. 
NOTE: If you don't want site members to see the report, consider creating a folder with different permissions where only site owners can access the report.

Steps to Run the Sharing report.

Open the site where you want to run the report.
On the Settings menu, click OneDrive settings.
Under More Settings, Manage access section, click Run sharing report.

Create a New > Folder (here we created MyShareReport Folder), select the Folder and click Save, and then click Run sharing report again.

The report may take some time to run depending on the size of the site.
When the report is finished running you will receive an email with a link to the report.
Go to MyShareReport Folder, inside, you will see the saved sharing report in CSV format.

CSV format

For items shared with direct access, the report contains one row for each user / item combination. SharePoint groups are shown in the report, but not individual users inside them.

For items shared with a link, the report contains a row for each signed-in user who has used the link or has been sent the link through the sharing dialog box. Links emailed directly that haven't been clicked, and Anyone links are not included in the report.
The report contains the following columns:
Resource Path - The relative URL of the item
Item Type - The type of item (web, folder, file, etc.)
Permission - The permission level the user has on this item
User Name - Friendly name of the user or group that has access to this item. If this is a sharing link, the user name is SharingLink
User E-mail - The email address of the user who has access to this item. This is blank for SharePoint groups.
User or Group Type - The type of user or group: Member (internal), Guest (external), SharePoint group, Security group or Office 365 group. (Note that Member refers to a member in the directory, not a member of the site.)
Link ID - The GUID of the sharing link if user name is Sharing Link
Link Type - The type of link (Anonymous, Company, Specific People) if user name is Sharing Link
AccessViaLinkID - The Link ID used to access the item if a user's permission to an item is via a link.

Tuesday, September 24, 2019

Global reader (Azure role)


MSFT are introducing a new Azure Active Directory (AD) role called global reader.
MSFT  started the roll out and will be completed worldwide in October, 2019. 

Global reader is the read-only counterpart to global administrator. Users in this role can read settings and administrative information across Microsoft 365 services but cannot take management actions.

It is available in my tenant (below screenshot).


MSFT created the global reader role to help reduce the number of global administrators in your organization. Because global administrator accounts are powerful and vulnerable to attack, MSFT recommend that you have fewer than five global administrators.
Assign global reader instead of global administrator for planning, audits, or investigations.
Use global reader in combination with other limited admin roles like Exchange administrator to make it easier to get work done without the invoking the global administrator role.

Global reader works with the new Microsoft 365 admin center, Exchange admin center, Teams admin center, Security center, Compliance center, Azure AD admin center, and Device Management admin center.

Note: At public preview launch, global reader does not work with SharePoint, Privileged Access Management, Customer Lockbox, sensitivity labels, or the following features within Teams: Teams Lifecycle, Reporting & Call Analytics, IP Phone Device Management, and App Catalog. All of these services will work with global reader in the future.

This role will be added advantage for SharePoint Online admins to understand the integrations between features in M365/o365.
To get the most value from this new feature, we suggest that you identify the admins in your organization who should have the global reader role assigned to them. For example:
Remove the global admin role and assign global reader, and any other essential limited roles, to individuals and admins who can complete their tasks with only the global reader role or the role in combination with limited admin roles like Exchange admin or user admin.
Assign the global reader role to individuals in your organization who don’t have admin center access today and are dependent on coworkers for getting the administrative information they need for their work.

Monday, September 9, 2019

Cumulative Updates in your SharePoint Farm


For SharePoint Online, view here

Farm Build Version via SharePoint Management Shell.
Open SharePoint Management Shell as administrator.

Run the Cmdlet’  Get-SPFarm.BuildVersion

SharePoint Farm Build Version via Central Administration.
Go to Central Administration > System Settings > Manage Servers in this farm.

Under Farm Information > Check the Configuration database version = farm patch level of the farm (Build Farm Version).

Get the Products and Patches build numbers that already installed on the farm.
Go to Upgrade and Migration > Check product and patch installation status.

You could check all the installed products in the whole farm or on a specific server.

Check the install status and version columns for all installed Products/Patches.


Get the Database build number on the farm.
Central Administration > Upgrade and Migration > Review Database Status.

Manage Database Upgrade Status > Click on Content Database name.

Get the database Schema Versions.

Get the Farm Build Version via SQL Server.
Open SQL Server Management Studio.
Open the Content Database > Versions Table. 

SELECT TOP 10 [VersionId]
      ,[Version]
      ,[Id]
      ,[TimeStamp]
FROM [SharePoint_Config].[dbo].[Versions]


The Farm build number is the corresponding value of versionID start with ‘0000000-000’ that is ‘15.0.4569.1000‘.
The version table also shows the Database Sequence build number that is ‘15.0.14.0‘ & ‘15.0.146.0‘.

After you get the farm build version, you’ll be able to get its corresponding release.by browsing the below links based on your SharePoint version.
For SharePoint 2010 Build Version Number.
SharePoint 2010 Build Numbers (Cube Sheet).
SharePoint Server 2010 Build Numbers
For SharePoint 2013 Build Version Numbers.
SharePoint 2013 Build Numbers (Cube Sheet).
SharePoint Server 2013 Build Numbers
For SharePoint 2010/2013/2016 Build Version Numbers.
Build Numbers Blog.

Then search for the corresponding release with the farm build number as shown below:

In my case, the related release of my farm build number ‘15.0.4569.1000’ was SharePoint 2013 Service Pack 1.