Usually, we have Theme colors changing the entire theme of the site including document libraries, lists and Calendars. Here we have an option to add a little CSS script to change the colors of the default Calendar without adding new Views and using Overlay of Calendars.
The default color of the Calendar.
Go to Calendar page > Click on Wheel icon > Edit Page > Add Web Part > Media and Content > Content Editor > Add
The Content Editor Web part was added to the Calendar Page. Click on 'Click here to add new content'.
It will show new Tool bar Menus on top side. Under Format Text > Click on 'Edit Source'
<style type="text/css">
.ms-acal-item {
BORDER: #C0362C; BACKGROUND-COLOR: #C0362C
}
.ms-acal-default-hover {
BORDER: #C0362C; BACKGROUND-COLOR: #C3B7AC
}
.ms-acal-apanel-item {
BORDER: #C0362C; BACKGROUND-COLOR: #C3B7AC
}
</style>
Copy, paste the above CSS Code into the HTML Source Window, Click OK. You will observe the entries color change in the Calendar.
Use the below Command to install PnP PowerShell Module.
Install-Module PnP.PowerShell
Once the PnP PowerShell Module is installed successfully, we need to run the below command to register Azure AD Application and Grant Access to the Office 365 tenant by Accepting the Consent on behalf of your organization.
SharePoint Online: “Delete this Document Library” is missing!
While migration to SharePoint Online, from SharePoint 2007, 2010 & 2013 versions, there is a chance to copy over the lists and Libraries created by "This system library was created by the Publishing feature" where you don't see option to delete those lists or libraries.
We can achieve that by using the below Powershell Script.
In the below PowerShell Script, we targeted Form Templates Library technically called as FormServerTemplates.
The above is the screenshot before running the Script.
The most common method of authenticating sign-in thru Passwords became most vulnerable with easy passwords and same passwords for multiple sign-ins to different services.
Multi-factor authentication (MFA) provides an additional level of security for sign-ins, which uses both a password (which should be strong) and an additional verification method like smart phone or biometric attribute.
The additional verification method is not employed until after the user's password has been verified. With MFA, even if a strong user password is compromised, the attacker does not have your smart phone or your fingerprint to complete the sign-in.
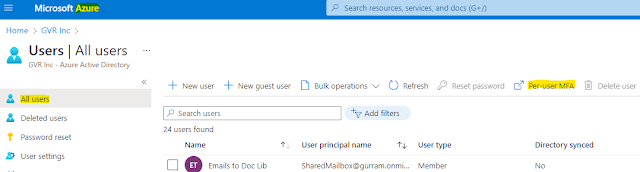
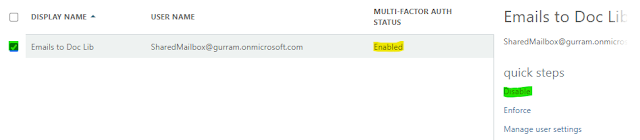
In few cases we need to disable MFA, for Service accounts and Shared Mailbox accounts, used/managed by a group.
Below are steps to enable/disable MFA for selected users.
Incoming E-Mail Settings was deprecated in SharePoint Online. In this scenario we are trying to re-create this feature using Exchange Online and Power Automate.
Fill the mandatory fields and click on Create. [Alias can be left blank. No blanks if entered]
Shared mailbox was created successfully.
You can use 'Add users to this mailbox' to add users to manage the Shared Mailbox as shown in above image or use 'Manage mailbox delegation' as shown in the below image to add users to manage the Shared mailbox.
Add User to Read and manage the Shared Mailbox.
Now the Shared Mailbox is ready to use.
If MFA is enabled on your tenant, please disable MFA for the Shared Mailbox account.
Step 2: Go to M365 admin center > Users > Active Users (using the below link).
Search for the Shared Mailbox you created. Select, click on Reset password to set a new password, so that you can access the Shared Mailbox.
Step 3: From App Launcher Click on Power Automate
or login into https://us.flow.microsoft.com/en-us/. Go to Templates and search for 'save my email attachment'. Click on the 'Save my email attachment to Sharepoint document library' template.
Once the template is loaded, click on Fix connection...
You will see the below screen, Click on Sign in
Pick the SharedMailBox account you created above, for the 3 Connections to be fixed.
Once the Connections were successfully completed, Click on Continue
Click on the (. . .) on top-right of each workflow item to make sure SharedMailbox account was connected under My connections.
Click on the Folder icon and select Inbox. Make sure Only with Attachments and Include Attachments is Yes (as shown below).
Select the Site Address from Dropdown or by typing the Site URL. Click on the Folder icon and select the Document Library in the Folder Path.
Verify and update To, Subject and Body fields as per your requirement. This flow will send an email notification in case of any error occurred.
On top-right below your name click on Flow Checker to view any Errors or Warnings.
On top-right or at the end of the Flow, Click on Save to save the Flow.
On top-left you will see a message 'Your flow is ready to go' as shown below.
Click on My flows, you will see the saved flow under Cloud flows.
Step 4: Verification
Sent email from my Gmail account to the SharedMailbox account.
It took more than 15 mins for the attachment to appear in the SharePoint Library.
As of now, this is only the Workaround solution found to replace the Incoming E-Mail Settings feature.