SharePoint (2003 thru Online): April 2018

Tuesday, April 17, 2018

Export an Excel table to SharePoint


You can export data from an Excel table to a SharePoint list. When you export the list, Excel will create a new SharePoint list on the site. You can then work with the data on the site, just like you would for any other SharePoint list.

Note: Exporting a table as a list does not create a data connection to the SharePoint list. If you were to update the table in Excel after exporting it, the updates will not be reflected in the SharePoint list.

To export a table in an Excel spreadsheet to a list on a SharePoint site, you need:

  • A SharePoint site where you are creating the list.
  • Permissions to create lists on the site. If you are not sure, contact your SharePoint site administrator.

To view the list in datasheet view on the SharePoint site you need:
  • Excel or Access. These programs are required for using the datasheet view on the SharePoint site.
Note: Datasheet view is not supported in 64-bit version of Microsoft Office. It is recommended that you install 32-bit version of Office in order to be able to use Datasheet view in a list on a SharePoint site.


Export a table to a SharePoint list

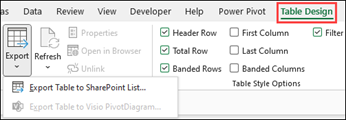
Click inside the table.

Click Design >> Export >> Export Table to SharePoint List.


In the Address box, type the address, or URL of the SharePoint site.

Important: Type everything that’s in your Web address before the “/default.aspx”. For example, if the address is http://contoso/default.aspx, type http://contoso. If the address is http://contoso/teams/accounting/sitepages/home.aspx, type http://contoso/teams/accounting.


In the Name box, type a unique name for the list.

Optionally, enter a description in the Description box.

Click Next.

Note: You may be asked to enter your Office365 credentials, or organizational domain credentials, or both.

Review the information given in Columns and Data Types and then click Finish.

Click OK.

A message indicating that your table is published, along with the Uniform Resource Locator (URL) appears. Click on the URL to go to the list.

Note: Another way to open the list is to go the SharePoint site, click the gear icon on the upper-right corner, and click Site Contents.


Supported data types

Some Excel data types cannot be exported to a list on the SharePoint site. When unsupported data types are exported, these data types are converted to data types that are compatible with SharePoint lists. For example, formulas that you create in Excel are converted to values in a SharePoint list. After the data is converted, you can create formulas for the columns on the SharePoint site.

When you export an Excel table to a SharePoint site, each column in a SharePoint list is assigned one of the following data types:

  • Text (single line)
  • Text (multiple lines)
  • Currency
  • Date/time
  • Number
  • Hyperlink (URL)
If a column has cells with different data types, Excel applies a data type that can be used for all of the cells in the column. For example, if a column contains numbers and text, the data type in the SharePoint list will be text.

Monday, April 9, 2018

Restore the Team in Microsoft Teams using SharePoint Online Management Shell

IMPORTANT: As a best practice, we recommend always staying current: uninstall the old AzureADPreview version and get the latest one before you run SharePoint Online Management Shell commands.

In your search bar, type SharePoint Online Management Shell. Pin it to the Taskbar.

Right-click on SharePoint Online Management Shell. and select Run ISE as Administrator.


To uninstall a previous version of AzureADPreview, run this command:

Uninstall-Module AzureADPreview

To install the latest version of AzureADPreview, run this command:

Install-Module AzureADPreview


At the message about an untrusted repository, Click on "Yes to All". It will take a minute or so for the new module to install.

Restore the deleted Team

Note: You must have Office 365 global admin or organization management permissions.
Install the most current preview version of AzureADPreview module,  to make sure these steps work for people.
Run the following command to connect to Azure AD

Connect-AzureAD

In the Sign in to your Account screen that opens, enter your Office 365 admin account and password to connect you to your service, and click Sign in.


Run this command to display all soft-deleted Office 365 groups in your organization that are still within the 30 day retention period:


Get-AzureADMSDeletedGroup

Take note of the object ID of the group, or groups, you want to restore. If you don't see the group you're looking for on this list then it has likely been purged permanently.

Caution: If a new group has been created with the same alias or SMTP address as your deleted group, you will have to delete that new group before you'll be able to restore your deleted group.

To restore that group run this command:

Restore-AzureADMSDeletedDirectoryObject –Id <objectId>

This process usually takes just a few minutes but in a few rare cases it can take as long as 24 hours to completely restore. To verify that the group has been successfully restored, run this command in PowerShell:

Get-AzureADGroup –ObjectId <objectId>

Once the restore has successfully completed, the group should reappear on the navigation pane in Outlook and Outlook on the web. All restored content, including SharePoint, Microsoft Team and Planner, should be available to the group members again.
_________________________________________________________________________________
Permanently delete the Team in Microsoft Teams

Sometimes you may want to permanently purge a group without waiting the 30 days for the soft-delete to expire. To do that, start PowerShell and run this command to get the object ID of the group:

Get-AzureADMSDeletedGroup

Take note of the object ID of the group, or groups, you want to permanently delete.

Caution: Removing the group removes the group and its data forever.
To remove the group run this command in PowerShell:

Remove-AzureADMSDeletedDirectoryObject –Id <objectId>

To confirm that the group has been successfully purged, run the Get-AzureADMSDeletedGroup cmdlet again to confirm that the group no longer appears on the list of soft-deleted groups. In some cases it may take as long as 24 hours for the group and all of its data to be permanently deleted.

Restore a deleted Office 365 Group

If you've deleted an Office 365 group, by default it's retained for 30 days. This 30-day period is called "soft-delete" because you can still restore the group. After 30 days, the group and associated content is permanently deleted and cannot be restored.

During the "soft-delete" period if a user tries to access the site they will get a 403 forbidden message. After this period if the user tries to access the site they will get a 404 not found message.

When a group is restored, the following content is restored:

Azure Active Directory (AD) Office 365 Groups object, properties and members
Group SMTP address
Exchange Online shared inbox and calendar
SharePoint Online team site and files
OneNote notebook
Planner


If you have a connected Microsoft Team or Office 365 Connected Yammer group, that related content is restored, too.

You can also permanently delete a soft-deleted group if you can't wait the 30 days for the retention period to expire for the content to be permanently deleted. 

_________________________________________________________________________________
Restore an Office 365 Group using the Exchange admin center

Go to the .

In the left navigation of the Office 365 admin center, expand Admin center, and then choose Exchange.

In the Exchange admin center, select recipients, and then choose groups. You can view whether the group is Active or soft Deleted. If the group has been permanently deleted, it won't be listed at all.


To view the exact time when the group was soft deleted, select the group and view the info in the right pane.


Select the Office 365 group you want to restore, and then choose the restore icon.


Choose refresh 
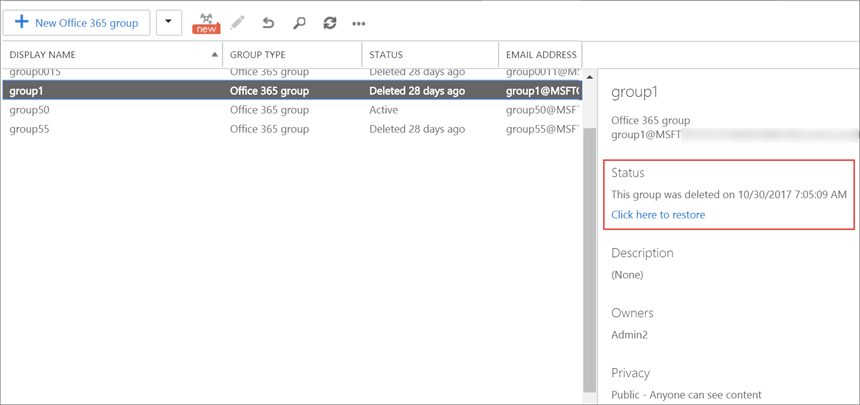
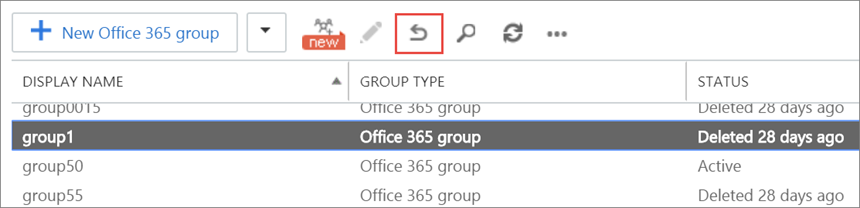
to update the information on the page. Your group will show as Active.
_________________________________________________________________________________
Restore an Office 365 Group using SharePoint Online Management Shell

IMPORTANT: If you use Remove-MsolGroup in PowerShell to delete a group, this will delete the group permanently. When using PowerShell to delete groups, it's best practice to use Remove-AzureADMSGroup to soft-delete the Office 365 group. 

That way you can restore it if needed.Install the preview version of the Azure Active Directory Module for SharePoint Online Management Shell

IMPORTANT: As a best practice, we recommend always staying current: uninstall the old AzureADPreview version and get the latest one before you run SharePoint Online Management Shell commands.

In your search bar, type SharePoint Online Management Shell. Pin it to the Taskbar.

Right-click on SharePoint Online Management Shell. and select Run ISE as Administrator.

To uninstall a previous version of AzureADPreview, run this command:

Uninstall-Module AzureADPreview

To install the latest version of AzureADPreview, run this command:

Install-Module AzureADPreview


At the message about an untrusted repository, Click on "Yes to All". It will take a minute or so for the new module to install.

_________________________________________________________________________________
Restore the deleted group

Note: You must have Office 365 global admin or organization management permissions.
Install the most current preview version of AzureADPreview module,  to make sure these steps work for people.
Run the following command to connect to Azure AD

Connect-AzureAD

In the Sign in to your Account screen that opens, enter your Office 365 admin account and password to connect you to your service, and click Sign in.


Run this command to display all soft-deleted Office 365 groups in your organization that are still within the 30 day retention period:


Get-AzureADMSDeletedGroup

Take note of the object ID of the group, or groups, you want to restore. If you don't see the group you're looking for on this list then it has likely been purged permanently.

Caution: If a new group has been created with the same alias or SMTP address as your deleted group, you will have to delete that new group before you'll be able to restore your deleted group.

To restore that group run this command:

Restore-AzureADMSDeletedDirectoryObject –Id <objectId>

This process usually takes just a few minutes but in a few rare cases it can take as long as 24 hours to completely restore. To verify that the group has been successfully restored, run this command in PowerShell:

Get-AzureADGroup –ObjectId <objectId>

Once the restore has successfully completed, the group should reappear on the navigation pane in Outlook and Outlook on the web. All restored content, including SharePoint and Planner, should be available to the group members again.
_________________________________________________________________________________
Permanently delete an Office 365 group

Sometimes you may want to permanently purge a group without waiting the 30 days for the soft-delete to expire. To do that, start PowerShell and run this command to get the object ID of the group:

Get-AzureADMSDeletedGroup

Take note of the object ID of the group, or groups, you want to permanently delete.

Caution: Removing the group removes the group and its data forever.
To remove the group run this command in PowerShell:

Remove-AzureADMSDeletedDirectoryObject –Id <objectId>

To confirm that the group has been successfully purged, run the Get-AzureADMSDeletedGroup cmdlet again to confirm that the group no longer appears on the list of soft-deleted groups. In some cases it may take as long as 24 hours for the group and all of its data to be permanently deleted.

Content copied from:
https://support.office.com/en-us/article/restore-a-deleted-office-365-group-b7c66b59-657a-4e1a-8aa0-8163b1f4eb54?ui=en-US&rs=en-US&ad=US#bkmk_perm

Monday, April 2, 2018

OneDrive Ribbon missing

OneDrive for Business is a SharePoint Library. OneDrive provisioning is also controlled in SharePoint admin center. By default, you may not see the Files, Library Ribbon. We can use simple trick to get the Ribbon back.


1. At the end of the URL, add "?ShowRibbon=true" as shown below.
    All.aspx?ShowRibbon=true

2. Click on the Gear Icon, as shown below and click on Ribbon, it will be On


Now you can see the Files, Library Ribbon.