We would recommend this order as it will minimize the number of warnings/errors in the Windows Event Log. This is applicable to all (SharePoint 2003, 2007, 2010, 2013 & 2016).
Shutting down the SP Servers (FARM)
1. WFE Servers 2. Index and Search Servers 3. App Servers (the App server that runs Central Administration web site last) 4. SQL Servers
Turning on the SP Servers (FARM)
[we can use the below hierarchy for re-boot also]
1. SQL Servers 2. App Servers (the App server that runs Central Administration web site first) 3. Index and Search Servers 4. WFE Servers
The logs grow enormously and occupy most of the drive space on the Front End Server. This may affect the performance of the Server as all the Transactions are looped thru it. To control the log files growing, we want to create Scheduled Tasks to delete the logs older than 4 days. 1. Delete SP Log more than 4 days Created a VB Script file with below code and placed it in a Folder "Scripts" folder on C:\ Drive. 'DelSPLogs.vbs - August 19, 2013 'Venugopal Reddy Gurram 'Deletes SharePoint Logs more than 4 days Dim i, fso, f, f1, sf, BasePath, CalcResult, fNameArray() BasePath = "C:\Program Files\Common Files\Microsoft Shared\Web Server Extensions\14\LOGS" Set fso = CreateObject("Scripting.FileSystemObject") Set f = fso.GetFolder(BasePath) Set sf = f.SubFolders For Each f1 in sf CalcResult = DateDiff("d",f1.DateCreated,Now) if CalcResult > 4 then ReDim preserve fNameArray(i) fNameArray(i) = f1.Name i = i + 1 end if Next For Each fName in fNameArray FSO.DeleteFolder(BasePath & "\" & fName) Next
2. Delete .usage Files more than 4 days. We need to perform this activity manually. Stop the "SharePoint 2010 Timer" service and start deleting the usage files in below folder.
SharePoint 2010 Logs: C:\Program Files\Common Files\Microsoft Shared\Web Server Extensions\14\LOGS Once Completed deletion, start the "SharePoint 2010 Timer" service
The following T-SQL command will list all user/group rights defined for all site collection of web application -- Query to get all the users assigned to roles
SELECTDISTINCT CASEWHEN PATINDEX('%\%', FullUrl)> 0 THENLEFT(FullUrl, PATINDEX('%\%', FullUrl)-1)ELSE FullUrl ENDAS[Site], Webs.Title, Webs.FullUrl, Perms.ScopeUrl, UserInfo.tp_Login As Account, CASEWHEN UserInfo.tp_DomainGroup>0 THENNULLELSE UserInfo.tp_Title ENDASUsername, CASEWHEN UserInfo.tp_DomainGroup>0 THEN UserInfo.tp_Login ELSENULLENDAS[ADGroup], NULLAS[SharePoint Group], Roles.Title AS RoleTitle, Roles.PermMask FROM dbo.RoleAssignment INNERJOIN dbo.UserInfo ON RoleAssignment.SiteId = UserInfo.tp_SiteID AND UserInfo.tp_ID= RoleAssignment.PrincipalId INNERJOIN dbo.Perms ON Perms.SiteId = RoleAssignment.SiteId AND Perms.ScopeId =RoleAssignment.ScopeId INNERJOIN dbo.Roles ON RoleAssignment.SiteId = Roles.SiteId AND RoleAssignment.RoleId= Roles.RoleId INNERJOIN dbo.Webs ON Roles.SiteId = Webs.SiteId AND Roles.WebId = Webs.Id WHERE Roles.Type<>1 AND tp_Deleted=0 UNION -- Query to get all the SharePoint groups assigned to roles SELECTDISTINCT CASEWHEN PATINDEX('%\%', FullUrl)> 0 THENLEFT(FullUrl, PATINDEX('%\%', FullUrl)-1)ELSE FullUrl ENDAS[Site], Webs.Title, Webs.FullUrl, Perms.ScopeUrl, UserInfo.tp_Login As Account, CASEWHEN UserInfo.tp_DomainGroup>0 THENNULLELSE UserInfo.tp_Title ENDASUsername, CASEWHEN UserInfo.tp_DomainGroup>0 THEN UserInfo.tp_Login ELSENULLENDAS[ADGroup], Groups.Title AS[SharePoint Group], Roles.Title AS RoleTitle, Roles.PermMask FROM dbo.RoleAssignment INNERJOIN dbo.Roles ON RoleAssignment.SiteId = Roles.SiteId AND RoleAssignment.RoleId= Roles.RoleId INNERJOIN dbo.Perms ON Perms.SiteId = RoleAssignment.SiteId AND Perms.ScopeId =RoleAssignment.ScopeId INNERJOIN dbo.Webs ON Roles.SiteId = Webs.SiteId AND Roles.WebId = Webs.Id INNERJOIN dbo.Groups ON RoleAssignment.SiteId = Groups.SiteId AND RoleAssignment.PrincipalId = Groups.ID INNERJOIN dbo.GroupMembership ON GroupMembership.SiteId = Groups.SiteId AND GroupMembership.GroupId = Groups.ID INNERJOIN dbo.UserInfo ON GroupMembership.SiteId = UserInfo.tp_SiteID AND GroupMembership.MemberId = UserInfo.tp_ID WHERE Roles.Type<>1 AND tp_Deleted=0
By default security changes are not audited. To enable auditing in SharePoint 2007:
Select Site Actions + Site Settings + Modify All Site Settings at the site collection root site.
Click the Site collection audit settings link.
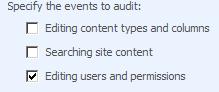
Select the Editing users and permissions option:
Once turned on, changes to permissions on sites, lists and items will be audited. To view the audit log:
Click the Audit log reports link on the “Site Settings” page for the site collection.
Click the Security Settings link:
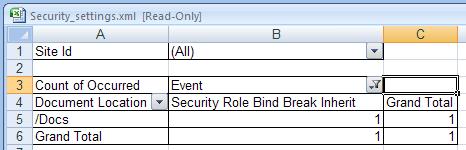
This will open the audit log in an Excel spreadsheet. The following example shows a summary showing a single security change resulting from a breaking of permission inheritance:
By default security changes are not audited. To enable auditing in SharePoint 2010:
Select Site Actions + Site Settings at the site collection root site.
Click the Site collection audit settings link under Site Collection Administration.
Select the Editing users and permissions option:
Once turned on, changes to permissions on sites, lists and items will be audited. To view the audit log:
Click the Audit log reports link on the “Site Settings” page for the site collection.
Click the Security Settings link:
3. Select the File Save Location to save the Excel sheet.
This will open the audit log in an Excel spreadsheet. The following example shows a summary showing a single security change resulting from a breaking of permission inheritance:
Recently, I was trying to browse a website with IE 10, which also uses Java. Noticed the "Website Restore error" (as shown below).
When i tried to browse the same site with IE 10 (No Add-ons) [You will see the IE 10 (No Add-ons) under Accessories >> System Tools], it was fine but saw a warning message.
The browser's Java plugin is not enabled. This Site uses java for certain file operations.
Worked on to identify the add-on which causes the "Website Restore error".
Finally found that the new Java add-on was causing the issue.
Disabled the 'Java Plug-in 11.51.2' and browsed the web site. Now it is working fine.
Many SharePoint Developers work on InfoPath templates and publish from their computer/laptop. While they leave the company,if we forget to get the copies, it will be difficult to make further modifications.
We found a way to extract the latest template from the Form Library.
Go to the Form Library Settings >> Advanced Settings, you will see the URL of the Template. You can click on Edit Template and continue modifying.
Otherwise, you can save the Template to your desktop and start working on it. Add the Template URL to the site URL to save the Template to your Desktop. http://spdev.com/test/InfopathLibrary/Forms/template.xsn
You can also use SharePoint Designer to get the latest template.
Open Site in SharePoint Designer. Go to Form Library >> Forms Folder. You will find the template.xsn. Get a copy and use it to update new modifications.
Sometimes, SharePoint Search functionality doesn't work due to issues like error in Propagation Status in Search Administration such as query Server not responding. Click on the below link for solution. http://venugopalareddy.blogspot.com/2014/10/query-server-is-not-responding-and.html Also we need to clear the config cache on all servers. This is a summary of the actions:
Stop the “SharePoint 2010 Timer” service.
There are loads of XML files that can be found in the folder "C:\ProgramData\Microsoft\SharePoint\Config\". Note there seems to be folder(s) under Config which has a GUID.
Do not delete the folder(s) with GUID.
Delete all the XML files in the GUID folder.
Do not delete 'cache.ini' file.
Edit the "cache.ini" file, setting the content to "1" (without the double-quotes). This indicates that all cache settings need to be refreshed. Eventually this value gets automatically updated to another number when the cache is repopulated.
Start the “SharePoint 2010 Timer” service.
We need to perform the above steps on Index, Search, WFE(s) and App(s) servers in order.
Based on your SharePoint Usage, it is better to do this activity every 6 months.
Tried to find list of DB’s used by SharePoint. We used to go searching the Central Admin - Application Management - Content Databases option and note all the databases against the URLs. 1. Found an awesome option, navigating to Central Admin >> Operations >> Perform a Backup
2. You can also run the following script on "SharePoint_Config" and get the list. Change the DatabaseInstance and DatabaseServer in the below script with your details. SELECT o.[Name] AS 'SharePoint_Config', Instance.[Name] AS 'DatabaseInstance', [Server].[Name] AS 'DatabaseServer' FROM Objects AS o INNER JOIN classes c on c.id = o.classid LEFT JOIN Objects AS Instance ON o.ParentId = Instance.Id LEFT JOIN [Objects] AS [Server] ON Instance.ParentId = [Server].Id WHERE c.Fullname LIKE '%Administration.SPConfigurationDatabase%' OR c.Fullname LIKE '%Administration.SPContentDatabase%' OR c.Fullname LIKE '%Administration.SharedDatabase%' OR c.Fullname LIKE '%Administration.SearchSharedDatabase%' OR c.Fullname LIKE '%Administration.SPSearchDatabase%'
A good solution to display RSS Feeds using XML Web part, so there was no need for some third-party Web Parts. Also there was no need to write any additional code.
Easy step-by-step guide.
Go to page you need to add the RSS Feed, Open this page in edit view and add new Web Part called XML Web Part.
If Web Part is added to page then open it’s settings window.
On the field XML Link insert your blog feed URL. Check out if link is correct and content is receivable by clicking the link titled as Test Link.
Push button titled as [XSL Editor].
XSL editing window is opened and now insert XSL code given below. When inserted click [OK].
You should see the RSS feed as bulleted list.
Save the edited page.
XSL you need is here. Take it using copy and paste.
With the below code, you will get limited items 5 with Published Date in Green color.
We need to place the below code in the CEWP in the page where we have the Source Web Part we want to make the column change. Here is the sample Code: <script type="text/javascript" language="javascript"> var x = document.getElementsByTagName("TD") // find all of the TDs var i=0; for (i=0;i<x.length;i++) { if (x[i].className=="ms-vb2") //find the TDs styled for lists { //repeat the above for each data value if (x[i].innerHTML=="On track") { // x[i].parentNode.style.backgroundColor='lightblue'; // set the background color of row x[i].style.backgroundColor='blue'; // set the background color of cell x[i].style.Color='white'; // set font the color x[i].style.fontWeight='bold'; // set font to bold } if (x[i].innerHTML=="Requires attention") { // x[i].parentNode.style.backgroundColor='orange'; // set the background color of row x[i].style.backgroundColor='orange'; // set the background color of cell x[i].style.Color='white'; // set font the color x[i].style.fontWeight='bold'; // set font to bold } if (x[i].innerHTML=="Behind schedule") { // x[i].parentNode.style.backgroundColor='red'; // set the background color of row x[i].style.backgroundColor='red'; // set the background color of cell x[i].style.Color='white'; // set font the color x[i].style.fontWeight='bold'; // set font to bold } } } </script>
Code Notes: x[i] is one of the table cells (TD) x[i].innerHTML is the contents of a cell (TD) (which may include additional HTML) x[i].parentNode is the row containing the cell (a TR) x[i].parentNode.style.stylename is used to set any valid style on the TR
( We can only recover passwords for Service accounts used to run App Pools ) Somehow we missed to get few Service Accounts passwords while knowledge transfer, when the previous SharePoint Administrator was leaving the company and the guy who created the Service Account forgot to update the Password Vault. For MOSS 2007, we have tool called SharePoint Documentation Generator where we can retrieve the Identity & Passwords from the Application Pools. As some internal mechanism got changed for new versions, we cannot use this Tool in SP 2010 and 2013. Luckily, we found a couple of App Pools running with this Service Account.
Ran Windows PowerShell as Administrator and entered the below command, pressed Enter. cmd.exe /c $env:windir\system32\inetsrv\appcmd.exe list apppool "<Name of the App Pool>" /text:ProcessModel.Password As shown below.
(^‿^) ... got the password. Tried for other service accounts also. This time updated the Passwords in the Password Vault :) __________________________________________________________ Finding used accounts on SharePoint 201 Farm.
Service Application Pool accounts
Using the cmdlet
Get-SPServiceApplicationPool
gives you both service application pool name and process account name.
-------------------------------------------
Service Application accounts
To find out what service application pools are used for a given service application use this command:
Note that the -EA = 0 (-ErrorAction SilentlyContinue) will swallow any exceptions due to the fact that not all service applications are web based (inherits from SPIisWebServiceApplication).
-----------------------------------------
Service Instance accounts
The command to get these gets a bit long winded to account for that some are managed and some not:
Using Get-Process does not contain information about what accounts the services are running under. Getting this information would require us to dig a bit deeper.
Fire up PowerShell and type in the following:
Get-WmiObject -Query "select * from win32_service where name LIKE 'SP%v4'" | select name, startname
Other processes ends with "14":
Get-WmiObject -Query "select * from win32_service where name LIKE '%14'" | select name, startname
-----------------------------------------
Object cache accounts
These accounts are used for accessing cached data. Not setting them causes a performance overhead as explained here.
The values are stored in the Web Application properties and can be fetched like this: