"The list cannot be displayed in Datasheet view for one or more of the following reasons.
- A datasheet component compatible with Windows SharePoint Services is not installed.
- Your browser does not support ActiveX controls.
- A component is not properly configured for 32-bit or 64-bit support".
As Office 2007 end of life was Oct 10, 2017, MSFT stopped sharing the links related to Office 2007 and its components like 2007 Office System Drivers: Data Connectivity Components.
Now a days, many users were using Windows 10 with Office 365 Pro Plus, but still have SharePoint 2007 and SharePoint 2010 sites. When they go to any List and click on Datasheet View, it still shows the above error message.
We searched in MSFT downloads and found links for Access Database Engine for Office 2010 and Office 2016. Installed but didn't work.
Finally we found the download for 2007 Office System Drivers: Data Connectivity Components at the below link and installed.
This will help SharePoint Users with Windows 10 OS, while using Windows Explorer thru MOSS 2007, SPS2010 and SharePoint Online.
Microsoft added a new feature to Windows 10 OS to resolve one of the longest standing issues (260 character limit) that users experienced when using Windows Explorer.
Windows by default has a limit of 260 characters which led to all kinds of issues including the inability to run operations on files stored under paths exceeding the limit, issues with the extraction of files, and issues with transferring files from systems that have no such limit.
Enable support for long paths using the Group Policy Editor. (This policy is available in Windows 10 only, not in Windows 7)
Tap on the Windows-key, type gpedit.msc, and hit enter.
Confirm the UAC prompt if it appears.
Use the hierarchy on the left to navigate to the following policy: Local Computer Policy > Computer Configuration > Administrative Templates > System > Filesystem
Locate the "Enable NTFS Win32 long paths" policy and double-click on it.
Switch its state to Enabled.
Click OK.
Enabling NTFS long paths will allow manifested win32 applications and Windows Store applications to access paths beyond the normal 260 char limit per node. Enabling this setting will cause the long paths to be accessible within the process.
In SharePoint 2010 document libraries, the PDF’s that have been uploaded do not show the correct icon and only give you the option to save instead of opening them.
The below PowerShell script downloads a icon GIF image from Adobe named pdficon_small.gif, places it in the images folder under the 14 hive, associates it in the DOCICON.XML file, sets Browser File Handling to Permissive, and then runs IISReset.
PowerShell
$14 = "C:\Program Files\Common Files\Microsoft Shared\Web Server Extensions\14"
The PDF Key was added to the DocIcon.XML with this PDF GIF image icon file.
Browser File Handling to "Permissive" will enable the PDF’s to be opened instead of only saved.
PDF docs now have the correct icon and are allowed to be opened. Microsoft KB Article related to PDF Issue in SharePoint.
________________________________________________________________________
We can also enable opening PDF files is by adding the pdf extension to the allowed MIME types of the web application. VIEW
In SharePoint, IIS is the only place where the SSL Certificate needs to be uploaded and attached to the Site in the Site Bindings. 1. Click on the root node in IIS 7 Manager and select the “Server Certificates” icon in the feature pane on the right, you should Import your Cert here. 2. Enter a name (I’m using company.com in this example) and click OK. You should see your certificate appear in the list of server certificates. 3. Select the IIS site that is running the SharePoint application and click on the “Bindings…” link on the right hand side of the page. 4. To enable SSL click “Add”, select “https” and select the SSL certificate we created earlier: 5. Click OK. At this point we have configured IIS to allow connections to this site over SSL but we need to let SharePoint know to map these requests to the correct web application.
Configure SharePoint to accept requests over HTTPS
6. Navigate to Central Administration > Operations, select “Alternate Access Mappings” and click “Edit Public URL’s” 7. Select the Alternate Access Mapping Collection for the FBA web application and enter the relevant HTTPS address (e.g. My FBA site is located at http://www.company.com as an example so I would enter https://www.company.com). It is up to you which Zone you put the URL in as this doesn’t affect anything and is just there to help you remember what they are each used for.
Sometimes, even after the SSL Certificate is updated properly and the old Certificates are deleted, it will still be showing the OLD SSL Cert and may cause issues.
We should run the below Commands to make the NEW SSL Cert get updated.
1. Issue an iisreset /stop command
2. Then type net stop http followed by net start http
3. Issue an iisreset /start command
Even though you ran the above Commands sometimes, site will not be accessible. Verify the below option of the specific Web Site and make sure it is set to 'Ignore'. Don't forget to reset IIS, if the below option is modified.
First, go to Document/Form Library Go to Settings >> Document/Form Library Settings >> RSS Settings (under Communications) You can select the fields as shown below.
Update the List and View IDs and the URL should look as shown below. http://dev.sp2010.com/Infopath/_layouts/listfeed.aspx?List=E5F5F740%2DB5B8%2D440B%2DBA22%2D051127AAA366&View=211E24B2%2D01F9%2D44D1%2DB371%2DED8BD63249D9 You can give the link to users and they have an option to Subscribe to this feed.
Have you ever wanted to simply add some video to a landing page in SharePoint? There are a lot of hefty applications out there that do this quite well, utilizing Silverlight and Ajax, but, did you know that you can do this with out of the box SharePoint? It's actually quite simple. Here's how!
Upload a media file to a standard SharePoint Document Library
Navigate to the site where you want to embed the video
Edit the page and select Add a Web Part
Under Miscellaneous, insert a Content Editor Web Part
From the Web select Open the Tool Pane
From Tool Pane, select Source Editor
Copy in the following code (replace http://link to video here with the actual link to the video in the library):
<div align="center"> <embed src="http://link to video here" autoplay="true" loop="false" width="200" height="200" </embed> </div>
Click Apply. Its just a matter of formatting after that!
Problem:Even though you type in correct username and password, it will prompt the login box again and again. Many organizations have DMZ environment to serve External Clients and Vendors. The SharePoint environment is the key to make easy access websites and share. Many cases, internal users also will be having access to these DMZ SharePoint Sites. Firewall plays the security role to allow authentication between Internal Users and DMZ SharePoint sites. When Firewall is busy or down, it will not authenticated and will not allow Internal Users to access the DMZ SharePoint sites. It behaves the same as like your account was locked.
The Solution is make sure the Firewall is up and running and also make sure, in IIS Manager >> Application Pools, SecurityTokenServiceApplicationPool is started. Also make sure the Account used to run the App Pool is not locked.
If you still see issues, recycle theSecurityTokenServiceApplicationPool This should fix the issue of Users login Failure or prompt the login box again and again. There are only few scenarios where users will be unable to login into the site. 1. When User's Account was locked. 2. When Firewall blocks the Authentication request from User. 3. When AD does not respond to authenticate the User Account.
SharePoint : Farm A Farm or Server Farm is a group of servers that share the same administrative tools and are part of the same organization or group.
It can be done (web/datababase/index etc) on a single server in “Simple Installation” mode in which case you don’t need a NLB. For many small businesses this is plenty enough. Medium sized businesses usually start with at least 2 Web Front Ends (WFE’s) and a database server. Multinationals can have some very complex setups involving dozens of components.
SharePoint : Web Front End server (WFE)
A web server that handles web page requests from users, processes the request and returns the data. They process HTTP/S traffic and rely on Internet Information Server (IIS) to provide much of the web server 'stack'
In a farm there can be multiple Web Front End (WFE) servers and a Network Load Balancer (NLB) will distribute requests between them. This is the primary method of scaling in SharePoint - as the number of users grows you add more WFE servers. Is also used to add redundancy - If a WFE fails the NLB can distribute requests to other WFE's.
SharePoint : Application Server
An Application Server is a computer that provides key infrastructure and services for applications that are hosted on a farm.
Typically - in SharePoint this means that a server that has been assigned to run duties such as Excel, Visio or Access Services or Index/Search services - as opposed to general web server duties of a Web Front End server.
SharePoint : Index / Search Server
An Index Server is assigned the task of 'crawling' your content and building up an Index of key words and phrases. A Search Server then uses this index to respond to user searches and suggest results.
By pre-indexing content ahead of a search being performed results from a huge number (billions) of documents and web pages can be displayed extremely quickly. If the search was performed 'on demand' it could take hours for result to be collated. (This is exactly the same way that Internet search engines work).
In SharePoint you can have all services (web, database, index, search and application) on a single server in a small installation but indexing (and to a lesser extent) search services are often put on their own server. In a large installation you can have several index and search servers.
ISSUE After setting up User Profile Service Application and configuring the synchronization connection to your active directory you receive the following error in Application Log of the Server running FIMSynchronizationService (In our case this is APP Server). The management agent “MOSSAD-DEC” failed on run profile “DS_FULLIMPORT” because of connectivity issues. Event Id 6050
For further investigation use the MIISClient.exe tool located in “C:\Program Files\Microsoft Office Servers\14.0\Synchronization Service\UIShell” on the operations TAB you also see the following error under (DS_FULLIMPORT) Status: stopped-conectivity. failed-search Replication access was denied 8453 (Error Code)
Resolution Verify and Confirm that the service account used to run Forefront Identity Manager Synchronization Service (FIMSynchronizationService) has the AD Security right of “Replicating Directory Changes” at the Domain Level. 1. Open the "Active Directory Users and Computers" snap-in 2. On the View menu, click "Advanced Features". 3. Right-click the domain object, such as “ou.domain.com”, and then click "Properties". 4. On the Security tab, if the desired user account is not listed, click Add; if the desired user account is listed, proceed to step 7. 5. In the Select Users, Computers, or Groups dialog box, select the desired user account, and then click Add. 6. Click OK to return to the Properties dialog box. 7. Click the desired user account. 8. Click to select the "Replicating Directory Changes" check box from the list. 9. Click Apply, and then click OK. 10. Close the snap-in. NOTE: Group “Domain Admins” already has the above right however if you are still seeing this issue add the service account explicitly to the AD Security. Even after applying the above Steps, we may still see the problem some times. Perform the below steps with the help of your Systems Admin, if you don't have access to Domains/Domain Controllers.
Use this procedure to grant Replicate Directory Changes permission on the CN=Configuration container to an account.
On the domain controller, click Start, click Run, type adsiedit.msc, and then click OK.
If the Configuration node is not already present, do the following:
In the navigation pane, click ADSI Edit.
On the Action menu, click Connect to.
In the Connection Point area of the Connection Settings dialog box, click Select a well know Naming Context, select Configuration from the drop-down list, and then click OK.
Expand the Configuration node, right-click the CN=Configuration... node, and then click Properties.
In the Properties dialog box, click the Security tab.
In the Group or user names section, click Add.
Type the name of the synchronization account, and then click OK.
In the Group or user names section, select the synchronization account.
In the Permissions section, select the Allow check box next to the Replicating Directory Changes (Replicate Directory Changes on Windows Server 2003) permission, and then click OK.
After following all these steps, Full Synchronization was completed successfully with Profile Import.
We would recommend this order as it will minimize the number of warnings/errors in the Windows Event Log. This is applicable to all (SharePoint 2003, 2007, 2010, 2013 & 2016).
Shutting down the SP Servers (FARM)
1. WFE Servers 2. Index and Search Servers 3. App Servers (the App server that runs Central Administration web site last) 4. SQL Servers
Turning on the SP Servers (FARM)
[we can use the below hierarchy for re-boot also]
1. SQL Servers 2. App Servers (the App server that runs Central Administration web site first) 3. Index and Search Servers 4. WFE Servers
By default security changes are not audited. To enable auditing in SharePoint 2007:
Select Site Actions + Site Settings + Modify All Site Settings at the site collection root site.
Click the Site collection audit settings link.
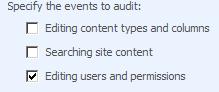
Select the Editing users and permissions option:
Once turned on, changes to permissions on sites, lists and items will be audited. To view the audit log:
Click the Audit log reports link on the “Site Settings” page for the site collection.
Click the Security Settings link:
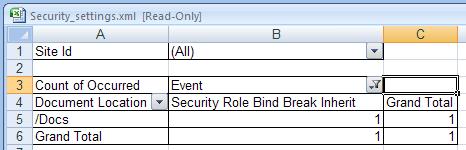
This will open the audit log in an Excel spreadsheet. The following example shows a summary showing a single security change resulting from a breaking of permission inheritance:
By default security changes are not audited. To enable auditing in SharePoint 2010:
Select Site Actions + Site Settings at the site collection root site.
Click the Site collection audit settings link under Site Collection Administration.
Select the Editing users and permissions option:
Once turned on, changes to permissions on sites, lists and items will be audited. To view the audit log:
Click the Audit log reports link on the “Site Settings” page for the site collection.
Click the Security Settings link:
3. Select the File Save Location to save the Excel sheet.
This will open the audit log in an Excel spreadsheet. The following example shows a summary showing a single security change resulting from a breaking of permission inheritance: