SharePoint (2003 thru Online): SharePoint Online
Showing posts with label SharePoint Online. Show all posts

Wednesday, March 11, 2026

PowerShell Script to update Company logos across all SharePoint Online Sites

We apply Company logos across all SharePoint Online Site Collections and subsites. When a new logo is designed, I receive requests to update them. The PowerShell script below simplifies this process.

While running this script, you will get a window prompt to login with your Global Admin/SharePoint Admin account. Enter credentials and proceed forward.

# --------------------------
# Configuration
# --------------------------
$clientId = "12a34567-f123-4567-890e-1cch23456789"
$SiteCollectionUrl = "https://yourtenant.sharepoint.com/sites/company"
$LogoUrl = "https://yourtenant.sharepoint.com/sites/BrandGuide/Images/Company_Logo.png"

# Connect to root once (to enumerate subsites)
Connect-PnPOnline -Url $SiteCollectionUrl -Interactive -ClientId $clientId

# Get root + all subsites (recursive)
$webs = Get-PnPSubWeb -Recurse -IncludeRootWeb

# ---- Count of all sites (webs) ----
$totalSites = $webs.Count
Write-Host "Total sites (root + all subsites) found: $totalSites" -ForegroundColor Cyan

# Detect if your Connect-PnPOnline supports -ReturnConnection
$hasReturnConnection = (Get-Command Connect-PnPOnline).Parameters.ContainsKey("ReturnConnection")

$success = 0
$failed  = 0

foreach ($w in $webs) {
    try {
        Write-Host "[$success/$totalSites] Updating logo for: $($w.Title) -> $($w.Url)" -ForegroundColor White

        if ($hasReturnConnection) {
            $conn = Connect-PnPOnline -Url $w.Url -Interactive -ClientId $clientId -ReturnConnection
            Set-PnPWeb -Connection $conn -SiteLogoUrl $LogoUrl   # Set-PnPWeb works on current web / via -Connection
        }
        else {
            Connect-PnPOnline -Url $w.Url -Interactive -ClientId $clientId
            Set-PnPWeb -SiteLogoUrl $LogoUrl                    #
        }

        $success++
        Write-Host "SUCCESS: $($w.Url)" -ForegroundColor Green
    }
    catch {
        $failed++
        Write-Host "FAILED: $($w.Url) | $($_.Exception.Message)" -ForegroundColor Red
    }
}

Write-Host "Logo update process complete." -ForegroundColor Cyan
Write-Host "Summary: Total=$totalSites | Success=$success | Failed=$failed" -ForegroundColor Yellow

The result shows as below.

Monday, February 23, 2026

M365 Tenant - SharePoint Online Storage Cleanup

Items in the SharePoint Online Recycle Bin, including both the first and second stages, contribute to the site's storage quota for 93 days. Storage space is only released once items are permanently deleted. 

If there is a retention policy, deleted items may be moved to the Preservation Hold Library, which also consumes storage. 

To free up space right away, delete items from the second-stage Recycle Bin, and then clean up the Preservation Hold Library.

The PowerShell script below is the most effective way to carry out these tasks across all site collections in the tenant.

#____________________________________________________________________________________________________________________________
#==================================================================================================
# OSI - Retention Exception Update + PHL Cleanup + Recycle Bin Cleanup (PnP)
# Single-Shot Mode (≤100 sites) — OPTIMIZED with PnP Batching
#==================================================================================================

#------------------------------ CONFIG -------------------------------------
$PolicyName               = "Document Retention Policy"
$ExceptionsCsvPath        = "E:\Reports\RP_Sites_2.csv"
$SitesCsvPath             = "E:\Reports\Sites_2.csv"

$IPPSSessionUPN           = "admin@spadmins.onmicrosoft.com"
$PnPClientId              = "12a34567-f123-4567-891e-2aaf34567890"

$PHLPageSize              = 2000
$BatchChunkSize           = 100        # ← items per PnP batch (100 is the sweet spot)

$EnableRecycleBinCleanup  = $true
$RecycleBinRowLimit       = 0

#------------------------------ SECTION 1: RETENTION POLICY EXCEPTIONS ---------------------------
Write-Host "=== Updating Retention Policy Exceptions (Single-Shot) ===" -ForegroundColor Cyan

[array]$excludeSites = Import-Csv -Path $ExceptionsCsvPath |
    Select-Object -ExpandProperty URL |
    ForEach-Object { $_.Trim().TrimEnd("/") } |
    Where-Object { $_ } |
    Sort-Object -Unique

Write-Host "Loaded $($excludeSites.Count) exception site URLs from $ExceptionsCsvPath"

if ($excludeSites.Count -gt 100) {
    Write-Host "ERROR: $($excludeSites.Count) sites exceed the 100-site static scoping limit." -ForegroundColor Red
    Write-Host "Use batched mode with deployment wait, or switch to Adaptive Scopes." -ForegroundColor Red
    return
}

Connect-IPPSSession -UserPrincipalName $IPPSSessionUPN

try {
    Set-RetentionCompliancePolicy `
        -Identity $PolicyName `
        -AddSharePointLocationException $excludeSites

    Write-Host "Successfully added all $($excludeSites.Count) exception sites in one call." -ForegroundColor Green
}
catch {
    Write-Host "FAILED to add exceptions: $($_.Exception.Message)" -ForegroundColor Red
}

Write-Host "Retention exception update completed." -ForegroundColor Cyan

#------------------------------ SECTION 2: PHL CLEANUP + RECYCLE BIN CLEANUP ---------------------

Write-Host "`n=== PHL Cleanup + Recycle Bin Cleanup ===" -ForegroundColor Cyan

$sites = Import-Csv -Path $SitesCsvPath
Write-Host "Loaded $($sites.Count) sites from $SitesCsvPath"

$hasClearRecycleCmd = $null -ne (Get-Command Clear-PnPRecycleBinItem -ErrorAction SilentlyContinue)

foreach ($site in $sites) {
    $siteUrl = $site.URL.Trim().TrimEnd("/")
    if (-not $siteUrl) { continue }

    Write-Host "`nProcessing site: $siteUrl" -ForegroundColor Yellow

    try {
        Connect-PnPOnline -Url $siteUrl -Interactive -ClientId $PnPClientId -ErrorAction Stop
    }
    catch {
        Write-Host "Failed to connect to $siteUrl : $($_.Exception.Message)" -ForegroundColor Red
        continue
    }

    # ── PHL Cleanup ──────────────────────────────────────────────────────
    $phl = Get-PnPList -Identity "Preservation Hold Library" -ErrorAction SilentlyContinue
    if (-not $phl) {
        Write-Host "No Preservation Hold Library found at $siteUrl" -ForegroundColor DarkGray
    }
    else {
        Write-Host "Preservation Hold Library found at $siteUrl" -ForegroundColor Green

        $items = @()
        try {
            $items = Get-PnPListItem -List "Preservation Hold Library" -PageSize $PHLPageSize -ScriptBlock {
                param($pagedItems)
                $pagedItems.Context.ExecuteQuery()
            }
        }
        catch {
            Write-Host "Failed to list PHL items at $siteUrl : $($_.Exception.Message)" -ForegroundColor Red
            $items = @()
        }

        if ($items.Count -gt 0) {
            Write-Host "$($items.Count) items found in Preservation Hold Library — deleting in batches of $BatchChunkSize..." -ForegroundColor Cyan

            # ╔══════════════════════════════════════════════════════════════╗
            # ║  OPTIMIZATION: PnP Batching — replaces item-by-item delete  ║
            # ║  Groups up to $BatchChunkSize requests into ONE API call    ║
            # ╚══════════════════════════════════════════════════════════════╝
            $totalDeleted = 0
            for ($i = 0; $i -lt $items.Count; $i += $BatchChunkSize) {

                $batch = New-PnPBatch

                $end = [Math]::Min($i + $BatchChunkSize - 1, $items.Count - 1)
                foreach ($item in $items[$i..$end]) {
                    Remove-PnPListItem -List "Preservation Hold Library" -Identity $item.Id -Batch $batch
                }

                try {
                    Invoke-PnPBatch -Batch $batch -ErrorAction Stop
                    $totalDeleted += ($end - $i + 1)
                    Write-Host "  Batch deleted items $($i+1)$($end+1) of $($items.Count)" -ForegroundColor DarkCyan
                }
                catch {
                    Write-Host "  Batch failed at items $($i+1)$($end+1): $($_.Exception.Message)" -ForegroundColor DarkYellow
                }
            }
            Write-Host "PHL cleanup complete: $totalDeleted / $($items.Count) items deleted" -ForegroundColor Green
        }
        else {
            Write-Host "No items found in Preservation Hold Library" -ForegroundColor DarkGray
        }
    }

    # ── Recycle Bin Cleanup ──────────────────────────────────────────────
    if ($EnableRecycleBinCleanup) {
        if (-not $hasClearRecycleCmd) {
            Write-Host "Clear-PnPRecycleBinItem cmdlet not found. Per PnP docs, it may require PnP.PowerShell Nightly. Skipping recycle bin cleanup." -ForegroundColor DarkYellow
        }
        else {
            try {
                if ($RecycleBinRowLimit -gt 0) {
                    Clear-PnPRecycleBinItem -All -Force -RowLimit $RecycleBinRowLimit
                }
                else {
                    Clear-PnPRecycleBinItem -All -Force
                }
                Write-Host "Recycle bins cleared for: $siteUrl" -ForegroundColor Green
            }
            catch {
                Write-Host "Failed to clear recycle bins for $siteUrl : $($_.Exception.Message)" -ForegroundColor Red
            }
        }
    }
}

Write-Host "`n=== DONE ===" -ForegroundColor Cyan

Thursday, August 29, 2024

Modification of Teams URL in Microsoft 365 Admin Center

Introduction

Microsoft has recently restructured how administrators can modify Teams URLs. Previously managed through the SharePoint admin center, this function has now transitioned to the Teams & Groups section within the Microsoft 365 admin center. This change aims to streamline administrative tasks and provide a more integrated user experience.

Background

The SharePoint admin center traditionally housed various features for managing team sites and associated URLs. However, as Microsoft's suite of tools has evolved, the need for a more cohesive approach to administrative functions became apparent. This led to the migration of Teams URL management to the Microsoft 365 admin center under the Teams & Groups section.

Steps to Modify Teams URL in Microsoft 365 Admin Center

To ensure a smooth transition and ease of use, follow these detailed steps to modify Teams URLs within the new location:

Accessing the Microsoft 365 Admin Center

·        Navigate to the Microsoft 365 admin center and logging in with your administrator credentials. Once logged in, you will see a navigation panel on the left-hand side of the screen.

Locating Teams & Groups

·        In the navigation panel, scroll down and select the "Teams & groups" option. Select "Active teams & groups".

Modifying the Teams URL

·        Find the specific team whose URL you wish to modify from the list of available teams. Click on the Name of the Team to open its settings and details.

·        Locate the Site address. Click the "Edit" button down to it.

·        Enter the desired new SharePoint site address and confirm the changes by clicking "Save".


Verification

·        After saving the changes, ensure that the new URL is functional by accessing the team through the updated link.

·        If any issues arise, verify the changes in the admin center and consult Microsoft support if necessary.

Conclusion

The relocation of Teams URL modification to the Teams & Groups section of the Microsoft 365 admin center represents a strategic move towards a more unified administrative environment. By following the outlined steps, administrators can efficiently manage Teams URLs and ensure seamless access for their organization.

For further assistance or detailed guidance, please refer to the official Microsoft documentation or contact support.

Monday, June 10, 2024

Apply Sensitivity label to all Site collections in SharePoint admin center

With E3 license, we have to label everything manually, which is very time-consuming when we deal with many site collections.

For our project, I used a PowerShell Script to automate the process of applying Sensitivity labels to all Site Collections.

#Run the Get-Label command to retrieve the list of available labels:
Connect-IPPSSession -UserPrincipalName spadmin@gurram.onmicrosoft.com
Get-Label |ft Name, Guid, ContentType
#Copy the required label GUID
Disconnect-IPPSSession
--------------------------------------------------------------
#Connect to PnP PowerShell
Connect-PnPOnline -Url "https://gurram-admin.sharepoint.com" -Interactive

#Get All Site collections - Include Only: Team site (no M365 Group), Team site (classic experience), Project Web App site and Team sites
$Sites = Get-PnPTenantSite | Where-Object { $_.Template -eq "STS#3" -or $_.Template -eq "STS#0" -or $_.Template -eq "PWA#0" -or $_.Template -eq "GROUP#0" }

#For each site in the Site collections
ForEach ($site in $Sites) {
    #Required Label GUID from the above Script
    $LabelId = "abc123de-45f6-7g89-hi12-34j56789jk12"  
    $ctn = Connect-PnPOnline -Url $site.URL -Interactive
    $label = Get-PnPSiteSensitivityLabel -Connection $ctn

   if ($label.DisplayName -eq "") {
   #Add sensitivity Label to site
   Set-PnPTenantSite -Identity $site.URL -SensitivityLabel $LabelId
  } else {
    Write-Host $site.URL,"Not Blank"
  }
   $Object = [PSCustomObject]@{
    URL = $site.URL
    Sensitivitylabel= $label.DisplayName
    }
    $List += $Object
    #Write-Host $site.URL
    }
#Disconnect
Disconnect-PnPOnline

Apply Sensitivity Label to all Document Libraries in a Site collection

E3 ($249) and E5($449) licenses have a big price gap, and E5 license has the advantage of auto labelling. Without it, we have to label everything manually, which is very time-consuming when we deal with many site collections and a lot of content.

For our project, I used a PowerShell Script to automate the process. I applied Sensitivity labels to all Site Collections first. 

Then, using the below PowerShell Script, I applied Sensitivity labels to Document libraries in each site collection. This way, the Office files that are uploaded or updated will get the label from the Document Library. However, we still need to label other file types manually.

List all the sites in a CSV file with URL as Header (As shown below).


symbol in PowerShell script is used for comments.

# Import the CSV file
$sites = Import-Csv -Path "D:\Dev_Sites_FilesWise.csv"

# Loop through each site
foreach ($site in $sites) {
    # Connect to the SharePoint site
    Connect-PnPOnline -Url $site.Url -Interactive

# The GUID of the 'Internal Use' sensitivity label
$Label = "Internal Use"

# Retrieve all document libraries (Except Style Library) from the site
$libraries = Get-PnPList | Where-Object {
  $_.BaseTemplate -eq [Microsoft.SharePoint.Client.ListTemplateType]::DocumentLibrary
    -and $_.Title -ne "Style Library"}

# Apply the sensitivity label to each document library if it doesn't already exist and print the name
foreach ($library in $libraries) {
 # Retrieve the current sensitivity label of the document library
 $currentLabel = (Get-PnPList -Identity $library.Id).DefaultSensitivityLabelForLibrary
   
  # Check if the sensitivity label is empty
  #if ($currentLabel -eq $null) {
      if ([string]::IsNullOrWhiteSpace($currentLabel)) {
      Set-PnPList -Identity $library.Id -DefaultSensitivityLabelForLibrary $Label
      Write-Host "'Internal Use' applied to: " $library.Title
    }
  else {
      Write-Host "Sensitivity label already exists on: " $library.Title
    }
}
}
# Disconnect the session
Disconnect-PnPOnline

Thursday, May 9, 2024

Add/Remove sites (bulk list) from Search Index thru PowerShell

 We need to remove 150 sites from Search Index. We have to make sure they don't show up in search results by turning off that option for each site. The normal way of doing this is too slow for so many sites. We use a faster PowerShell script method to handle 150 sites at once.

Regular method

By default, the option Allow this site to appear in Search results is set to Yes for all Site collections in Sharepoint online. This means the site content can show up in search results.

On the site, select Settings (Wheel) icon., and then select Site settings. If you don't see Site settings, select Site information, and then select View all site settings.

Under Search, click Search and offline availability.

In the Indexing Site Content section, under Allow this site to appear in Search results, select Yes to allow the content of the site to appear in search results.


If you don't want the content to show up in search results, choose No.

NOTE: Search results are always security trimmed, so users will only see content they have permission to see.


PowerShell Script Method

List all the sites in a CSV file with URL as Header (As shown below).


# symbol in PowerShell script is used for comments.

# Connect to Admin Center
$adminSiteUrl = "https://gurram-admin.sharepoint.com/"
$adminConnection = Connect-PnPOnline -Url $AdminSiteUrl -Interactive

$CSVImport = "D:\Sites.csv"
$SitesCollections = Import-CSV -Path $CSVImport
 
ForEach($Site in $SitesCollections)
   {
         $siteCollectionConnection = Connect-PnPOnline -Url $Site.URL -Interactive
         Set-PnPSite -Identity $Site.URL -DenyAndAddCustomizePages $false
         $Web = Get-PnPWeb -Connection $siteCollectionConnection
         #Indexing Site Content = Yes(false), = No(true)
         $Web.NoCrawl = $false
         $Web.Update()
         Invoke-PnPQuery
         #To unlock the site (-LockState Unlock), To lock the site (-LockState ReadOnly)
         #we did not use the below option, because we want to delete sites later
         Set-PnPSite -Identity $Site.URL -LockState ReadOnly
         #to know the completed site
         write-host $Site.URL
    }


This script completed successfully in less than 10 minutes.

Monday, February 13, 2023

Adding or updating the Primary admin for any SPO Site Collection thru PowerShell Commands.

In this post, we want to achieve the ability of adding or updating the Primary admin for any Site Collection thru PowerShell Commands.

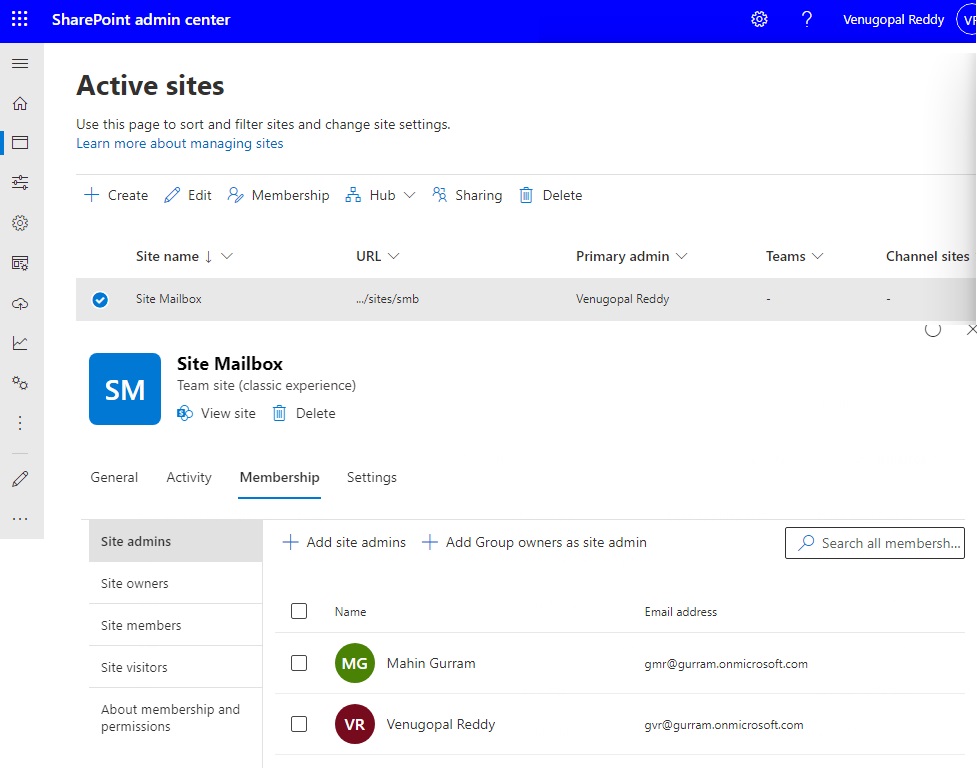
With the new features in SharePoint Admin center, we lost the ability to change the Primary Admin for any Site Collection thru 'Permissions' feature. With new 'Membership' feature, we can add Site admins, Site Owners, Site Members and Site Visitors, but cannot add or update any Site admin(s) as Primary Admin.


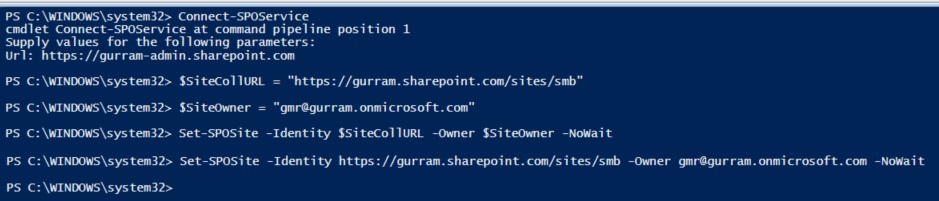
With the below PowerShell Commands are updating the Primary Admin from Venugopal Reddy (gvr@gurram.onmicrosoft.com) to Mahin Gurram (gmr@gurram.onmicrosoft.com)

#Variables
$SiteCollURL = "https://gurram.sharepoint.com/sites/smb"
$SiteOwner = "gmr@gurram.onmicrosoft.com"

#Connect to SharePoint Online
Connect-SPOService
#The above Command will prompt you enter SharePoint Admin URL & dialog box to enter your SharePoint Admin Credentials

#Sharepoint online powershell Set Site Owner (Primary Admin) - with Variables
Set-SPOSite -Identity $SiteCollURL -Owner $SiteOwner -NoWait

#Sharepoint online powershell Set Site Owner (Primary Admin) - Direct Command
Set-SPOSite -Identity https://gurram.sharepoint.com/sites/smb -Owner gmr@gurram.onmicrosoft.com -NoWait

After running the above Commands, below is the PowerShell Screen.


The required Site Collection's Primary Admin was updated.

Wednesday, December 18, 2019

Updated Feature: Image resizing in the modern SharePoint experience

MSFT is introducing the ability to resize an image in the modern SharePoint experience. 
We'll be gradually rolling this out to Targeted Release customers in early January 2020.
The roll out will be complete by the beginning of February 2020.

This message is associated with Office 365 Roadmap ID 57812.

How does this affect me?
The modern SharePoint site is comprised of web parts, the building blocks of the page. The Image web part lets an editor insert an image on a page, whether from their SharePoint site, their computer, or an external web location.

With this update, page editors will also be able to resize images in the image web part.


What do I need to do to prepare for this change?
There is no action you need to take to prepare for this change, but you might consider updating your user training and notifying your help desk.

Wednesday, November 13, 2019

LookBook for SharePoint Online sites

Recently MSFT released LookBook to make SharePoint admins and users get inspired with these designs or add them to your tenant to start building your next stunning site with them. This also includes SharePoint Themes Designer to Design beautiful and performant sites, pages, and web parts with SharePoint in Office 365.

In this episode, we will work on applying new branding site from LookBook.

Click on the https://lookbook.microsoft.com/ link.  
On top Navigation, go to View the designs to view a bunch of available designs. Below screenshot shows the existing branding templates.

Picked 'Mark8 Project team' site under Team.
Click on "Add to your tenant". You will see the below message if you have SharePoint admin role.  You need Tenant admin role.
Tenant admin means Global admin.
Checkbox the Consent on behalf of your organization and Click Accept
Change Site Title or Site URL if needed and click on Provision
Click on Confirm, and watch the Provisioning Status.


Sometimes, it might take more than 5 mins. No worries, you will receive an email notification (as shown below).
Click on Open site >. You can also view/open the site thru Active Sites.
The new created Site looks the same as the preview in the LookBook site.

Tuesday, November 12, 2019

File hover card feature in O365/SPO

MSFT introduced an Office 365 file hover card feature: people who viewed files.

We'll be gradually rolling this out to Targeted Release customers in mid-November 2019.
The roll out will be completed by the end of February 2020.

This message is associated with Microsoft 365 Roadmap ID 56515.

How does this affect me?
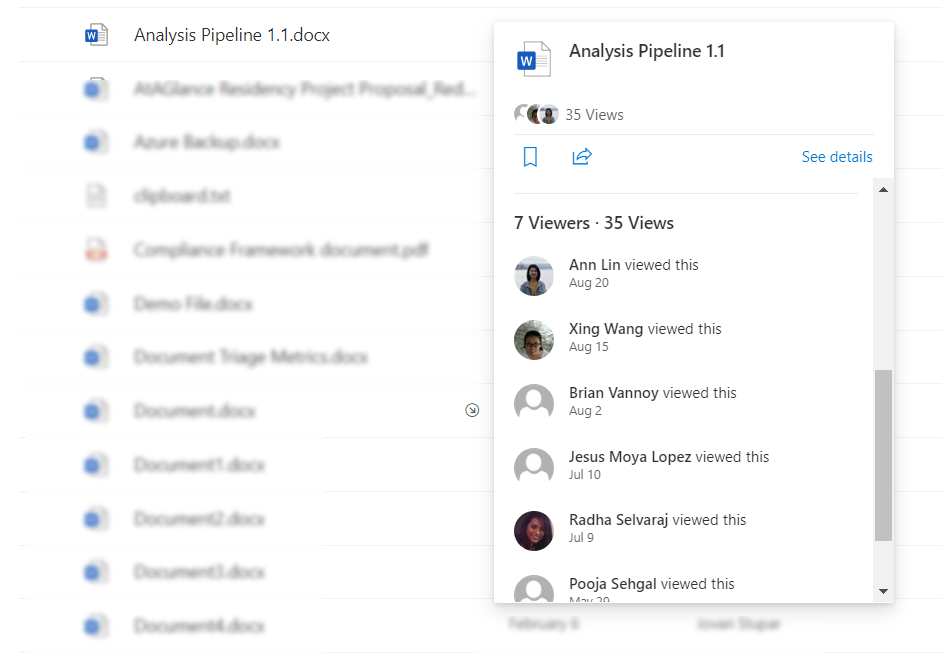
This new file card feature will show you who has viewed your files and pages in SharePoint. When someone views a file you own or a page or news article that you have authored, SharePoint displays that people information and profile image of the viewer in the file hover card.


This information is available only to people who themselves have access to a file and only when the SharePoint site owner has enabled this feature. Users who cannot access the file will not see this data.

This feature exists alongside file details and actions like Inside Look and Activity.

What do I need to do to prepare for this change?
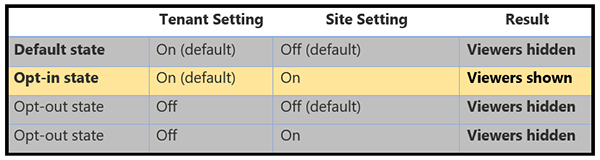
Tenant level: There are administrative controls to enable and disable at the tenant level. This setting is default On at the tenant level.

To disable the feature for all SharePoint sites in the tenant, admins will need to change the control by visiting the SharePoint admin center and navigating to the Sharing settings.

SharePoint site level: The administrative controls for each SharePoint site are default Off. This toggle is accessible in the Manage Site Features settings.

Viewer information will only appear if a SharePoint site owner changes the default setting to Active.


Tenant and SP setting options


Note: Microsoft recommends enabling the file viewers feature on sites where users are expected to be collaborating frequently and not on communication sites or sites with potentially sensitive information.

Tuesday, October 15, 2019

Sharing Reports for OneDrive

When you run the sharing report on file and folder sharing in OneDrive, the CSV file is saved to a location of your choosing in the OneDrive. 
NOTE: If you don't want site members to see the report, consider creating a folder with different permissions where only site owners can access the report.

Steps to Run the Sharing report.

Open the site where you want to run the report.
On the Settings menu, click OneDrive settings.
Under More Settings, Manage access section, click Run sharing report.

Create a New > Folder (here we created MyShareReport Folder), select the Folder and click Save, and then click Run sharing report again.

The report may take some time to run depending on the size of the site.
When the report is finished running you will receive an email with a link to the report.
Go to MyShareReport Folder, inside, you will see the saved sharing report in CSV format.

CSV format

For items shared with direct access, the report contains one row for each user / item combination. SharePoint groups are shown in the report, but not individual users inside them.

For items shared with a link, the report contains a row for each signed-in user who has used the link or has been sent the link through the sharing dialog box. Links emailed directly that haven't been clicked, and Anyone links are not included in the report.
The report contains the following columns:
Resource Path - The relative URL of the item
Item Type - The type of item (web, folder, file, etc.)
Permission - The permission level the user has on this item
User Name - Friendly name of the user or group that has access to this item. If this is a sharing link, the user name is SharingLink
User E-mail - The email address of the user who has access to this item. This is blank for SharePoint groups.
User or Group Type - The type of user or group: Member (internal), Guest (external), SharePoint group, Security group or Office 365 group. (Note that Member refers to a member in the directory, not a member of the site.)
Link ID - The GUID of the sharing link if user name is Sharing Link
Link Type - The type of link (Anonymous, Company, Specific People) if user name is Sharing Link
AccessViaLinkID - The Link ID used to access the item if a user's permission to an item is via a link.