SharePoint (2003 thru Online): SPO
Showing posts with label SPO. Show all posts

Monday, February 13, 2023

Adding or updating the Primary admin for any SPO Site Collection thru PowerShell Commands.

In this post, we want to achieve the ability of adding or updating the Primary admin for any Site Collection thru PowerShell Commands.

With the new features in SharePoint Admin center, we lost the ability to change the Primary Admin for any Site Collection thru 'Permissions' feature. With new 'Membership' feature, we can add Site admins, Site Owners, Site Members and Site Visitors, but cannot add or update any Site admin(s) as Primary Admin.


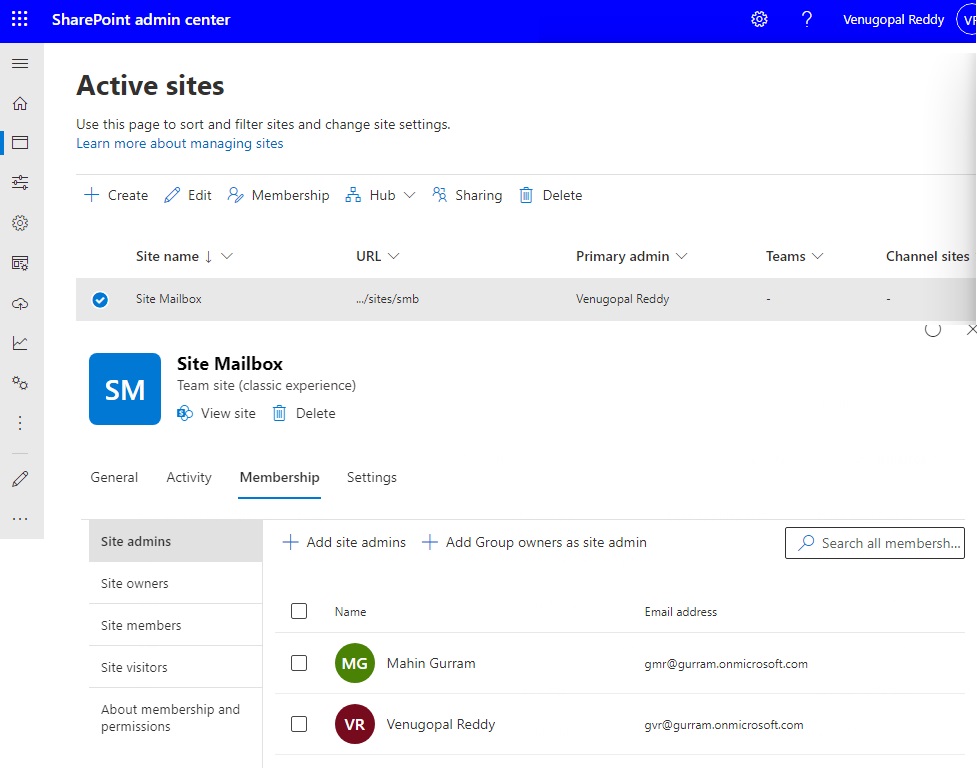
With the below PowerShell Commands are updating the Primary Admin from Venugopal Reddy (gvr@gurram.onmicrosoft.com) to Mahin Gurram (gmr@gurram.onmicrosoft.com)

#Variables
$SiteCollURL = "https://gurram.sharepoint.com/sites/smb"
$SiteOwner = "gmr@gurram.onmicrosoft.com"

#Connect to SharePoint Online
Connect-SPOService
#The above Command will prompt you enter SharePoint Admin URL & dialog box to enter your SharePoint Admin Credentials

#Sharepoint online powershell Set Site Owner (Primary Admin) - with Variables
Set-SPOSite -Identity $SiteCollURL -Owner $SiteOwner -NoWait

#Sharepoint online powershell Set Site Owner (Primary Admin) - Direct Command
Set-SPOSite -Identity https://gurram.sharepoint.com/sites/smb -Owner gmr@gurram.onmicrosoft.com -NoWait

After running the above Commands, below is the PowerShell Screen.


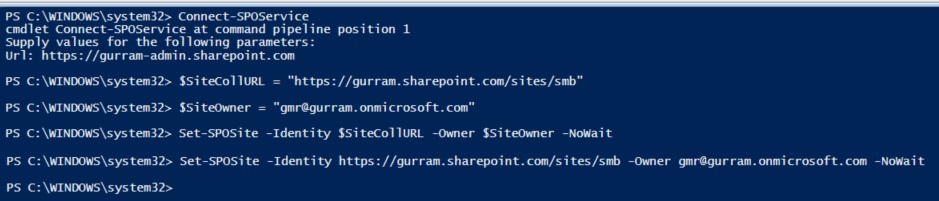
The required Site Collection's Primary Admin was updated.

Tuesday, October 15, 2019

Sharing Reports for OneDrive

When you run the sharing report on file and folder sharing in OneDrive, the CSV file is saved to a location of your choosing in the OneDrive. 
NOTE: If you don't want site members to see the report, consider creating a folder with different permissions where only site owners can access the report.

Steps to Run the Sharing report.

Open the site where you want to run the report.
On the Settings menu, click OneDrive settings.
Under More Settings, Manage access section, click Run sharing report.

Create a New > Folder (here we created MyShareReport Folder), select the Folder and click Save, and then click Run sharing report again.

The report may take some time to run depending on the size of the site.
When the report is finished running you will receive an email with a link to the report.
Go to MyShareReport Folder, inside, you will see the saved sharing report in CSV format.

CSV format

For items shared with direct access, the report contains one row for each user / item combination. SharePoint groups are shown in the report, but not individual users inside them.

For items shared with a link, the report contains a row for each signed-in user who has used the link or has been sent the link through the sharing dialog box. Links emailed directly that haven't been clicked, and Anyone links are not included in the report.
The report contains the following columns:
Resource Path - The relative URL of the item
Item Type - The type of item (web, folder, file, etc.)
Permission - The permission level the user has on this item
User Name - Friendly name of the user or group that has access to this item. If this is a sharing link, the user name is SharingLink
User E-mail - The email address of the user who has access to this item. This is blank for SharePoint groups.
User or Group Type - The type of user or group: Member (internal), Guest (external), SharePoint group, Security group or Office 365 group. (Note that Member refers to a member in the directory, not a member of the site.)
Link ID - The GUID of the sharing link if user name is Sharing Link
Link Type - The type of link (Anonymous, Company, Specific People) if user name is Sharing Link
AccessViaLinkID - The Link ID used to access the item if a user's permission to an item is via a link.

Tuesday, September 24, 2019

Global reader (Azure role)


MSFT are introducing a new Azure Active Directory (AD) role called global reader.
MSFT  started the roll out and will be completed worldwide in October, 2019. 

Global reader is the read-only counterpart to global administrator. Users in this role can read settings and administrative information across Microsoft 365 services but cannot take management actions.

It is available in my tenant (below screenshot).


MSFT created the global reader role to help reduce the number of global administrators in your organization. Because global administrator accounts are powerful and vulnerable to attack, MSFT recommend that you have fewer than five global administrators.
Assign global reader instead of global administrator for planning, audits, or investigations.
Use global reader in combination with other limited admin roles like Exchange administrator to make it easier to get work done without the invoking the global administrator role.

Global reader works with the new Microsoft 365 admin center, Exchange admin center, Teams admin center, Security center, Compliance center, Azure AD admin center, and Device Management admin center.

Note: At public preview launch, global reader does not work with SharePoint, Privileged Access Management, Customer Lockbox, sensitivity labels, or the following features within Teams: Teams Lifecycle, Reporting & Call Analytics, IP Phone Device Management, and App Catalog. All of these services will work with global reader in the future.

This role will be added advantage for SharePoint Online admins to understand the integrations between features in M365/o365.
To get the most value from this new feature, we suggest that you identify the admins in your organization who should have the global reader role assigned to them. For example:
Remove the global admin role and assign global reader, and any other essential limited roles, to individuals and admins who can complete their tasks with only the global reader role or the role in combination with limited admin roles like Exchange admin or user admin.
Assign the global reader role to individuals in your organization who don’t have admin center access today and are dependent on coworkers for getting the administrative information they need for their work.

Monday, July 29, 2019

OneDrive Limitations


  • Individual files cannot exceed 2 gigabytes (GB).
  • File upload size up to 15 GB.
  • Up to 20,000 individual files or folders can be synced with the OneDrive client.
  • The file path (site name + site location + folders + filename) must contain fewer than 400 characters for files synced with the OneDrive client (If you exceed that limit, you'll receive an error message).
  • File names beginning with a tilde (~) & (~$) are not supported.
  • These names aren't allowed for files or folders: .lock, CON, PRN, AUX, NUL, COM0 - COM9, LPT0 - LPT9, _vti_, desktop.ini ("forms" isn't supported when the folder is at the root level for a library.)
  • The following characters are not supported in file names: \ / : * ? " < > | # %
  • You can't add a network or mapped drive as your OneDrive sync location. OneDrive doesn't support syncing using symbolic links or junction points. 
  • Thumbnails & PDF previews are not generated for files larger than 100 MB. 
OneDrive Storage space per user (based on License)


2 GB
Office 365 Enterprise F1

1 TB
Office 365 Business Essentials Office 365 Nonprofit Business Essentials
Office 365 Business Office 365 Nonprofit Business Premium
Office 365 Business Premium Office 365 Nonprofit E1
Office 365 ProPlus OneDrive for Business Plan 1
Office 365 Enterprise E1 SharePoint Online Plan 1
Office 365 Government G1

Beyond 1 TB, to unlimited
Office 365 Enterprise E3 Office 365 Nonprofit E3
Office 365 Enterprise E5 Office 365 Nonprofit E5
OneDrive for Business Plan 2 Microsoft 365 Enterprise E3
SharePoint Online Plan 2 Microsoft 365 Enterprise E5
Office 365 Enterprise E3 Microsoft 365 A3
Office 365 Enterprise E5 Microsoft 365 A5
Office 365 A1 Microsoft 365 US Government G3
Office 365 A3 Microsoft 365 US Government G5
Office 365 A5 Microsoft 365 E3 for nonprofit
Office 365 US Government G3 Microsoft 365 E5 for nonprofit
Office 365 US Government G5

1 TB per user for subscriptions with fewer than 5 users. For subscriptions with 5 or more users, Microsoft will initially provide 1 TB per user, which admins can increase to up to 5 TB per user. To request additional storage, admins must contact Microsoft support.

Wednesday, July 17, 2019

SharePoint Online - Change the look for Communication sites


Site footer is a new SharePoint feature. MSFT will begin rolling this feature out soon. This message is associated with Microsoft 365 Roadmap ID 33138

How does this affect me?
SharePoint Communication sites will have an out-of-the box footer control, which can be controlled either using UI elements or by using APIs. MSFT will be gradually rolling this out to customers in mid-July, and the roll out will be completed worldwide by the end of July.

Note: The site footer feature is only available on communication site site pages. They are not available for list pages, library pages, or other pages on your site.

Footer
Go to your site, click Settings >> Change the look >> Footer, select On Footer visibility & Footer name visibility. Upload the Logo and enter the Footer name. Click Save.

The Footer is visible on the Site. To add or change links in the footer, click Edit in footer navigation.


Click on +, Select URL, enter Address and Display name, Click OK and Click Save. You can add one level of up to eight links or labels. Using ... you can Edit, Move up & Move down or Remove the Footer Navigation links. Using +, you can add new links.


The Footer is visible to users as shown below.


Header
Go to your site, click Settings >> Change the look >> Header, select Standard or Compact for Layout. Upload the Site logo and select the Background style. Click Save.


Navigation
Go to your site, click Settings >> Change the look >> Navigation, select Mega menu or Cascading for Menu style. Click Save.


Theme
Go to your site, click Settings >> Change the look >> Theme, select anyone under SharePoint themes, you will see Customize next to it and Click on it to modify Main color and Accent color. Click Save.

Tuesday, July 2, 2019

New Feature: OneDrive & SharePoint integration with Azure AD B2B (Preview)

MC183679, Stay Informed, Published On : June 28, 2019

OneDrive & SharePoint integration with Azure AD B2B is a new Office 365 feature in preview. We'll begin rolling this preview out soon.

This message is associated with Microsoft 365 Roadmap ID 33415.

How does this affect me?
This integration is disabled by default during preview and so this roll out will not affect you unless you choose to opt-in.

This preview integrates external sharing in SharePoint and OneDrive with Azure AD B2B. This includes external sharing of files, folders, list items, document libraries and sites.

With this integration turned on, when a user shares an item in SharePoint or OneDrive with an external user then a Guest account is immediately created for that external user (if one does not already exist). As a result, any sign-in or conditional access policies in place in your organization will take effect on those external users.

We'll be gradually rolling out the ability to opt-in to the preview starting in late June, and the roll out will be completed worldwide by the end of July.

What do I need to do to prepare for this change?
Because this integration is off by default, while in preview, there is nothing you need to do to prepare for this change. However, once it exits preview next year then you will not be able to turn it off. 


Advantages of Azure AD B2B
  • Invited external users are each given an account in the directory and are subject to Azure AD access policies such as multi-factor authentication.
  • Invitations to a SharePoint site use Azure AD B2B and no longer require users to have or create a Microsoft account.
  • If you have configured Google federation in Azure AD, federated users can now access SharePoint and OneDrive resources that you have shared with them.
  • SharePoint and OneDrive sharing is subject to the Azure AD organizational relationships settings, such as Members can invite and Guests can invite.
Opt in to the Azure AD passcode authentication preview
  • Sign in to the Azure portal as an Azure AD global administrator.
  • In the navigation pane, select Azure Active Directory.
  • Under Manage, select Organizational Relationships.
  • Select Settings.
  • Under Enable Email One-Time Passcode for guests (Preview), select Yes.
  • Click Save.


Opt in to the SharePoint and OneDrive integration with Azure AD B2B
Install the latest version of the SharePoint Online Services Module for Windows PowerShell (min version 8924.1200).

Connect to your tenant by using Connect-SPOService.
Run the following cmdlets:
Set-SPOTenant -EnableAzureADB2BIntegration $true 
Set-SPOTenant -SyncAadB2BManagementPolicy $true


Opting out of the preview
You can disable the preview by running 
Set-SPOTenant -EnableAzureADB2BIntegration $false

(You can also opt out of the Azure AD passcode authentication preview.) 
  • Sign in to the Azure portal as an Azure AD global administrator.
  • In the navigation pane, select Azure Active Directory.
  • Under Manage, select Organizational Relationships.
  • Select Settings.
  • Under Enable Email One-Time Passcode for guests (Preview), select No.
  • Click Save.

Content that was shared externally while the preview was enabled will need to be shared again with the specific external users.

Note that after preview, this feature will replace the ad-hoc external sharing experience used in OneDrive and SharePoint today for all tenants and you will not be able to opt out.

New Feature: Bulk Approvals in SharePoint Online

MC184171, Stay Informed, Published On : July 2, 2019

Bulk Approvals in SPO is a new Office 365 feature. We'll begin rolling this feature out soon.

This enhancement is related to Microsoft 365 Roadmap ID 52716.

How does this impact me?
Once available, users can select multiple items and approve or reject them at the same time.

We'll be gradually rolling this out to Targeted Release customers in early July and the roll out will be completed worldwide by the end of September.


To enable the Content Approval, go to Wheel icon >> Library Settings >> Versioning Settings >> Require content Approval for submitted items? YES

Go back to Document Library and you will see two new columns Approval Status and Approver Comments added to the default view. Select multiple documents and right click, go to Advanced >> Approve/Reject, click. 
A dialog box appears as below, select the option, add comments and click OK.

When item is uploaded to a Content Approval enabled Document Library, you will see a notification 'Notify your team'
Click on 'Notify your team', select the approver and click on Notify. Approve will be notified.

Friday, June 14, 2019

SPO - Site/Site Collections activities with Powershell

We can perform all activities thru SharePoint admin center. But Powershell has more features and is very effective for code lovers. In this scenario, we are performing the SharePoint Online tasks using Powershell.

First, make sure you installed SharePoint Online Management Shell on your PC and install the SPO modules using below commands. (use -Force parameter to install new version if old version already exists).

Install-Module -Name Microsoft.Online.SharePoint.PowerShell -Force


Install-Module SharePointPnPPowerShellOnline


Go thru the blog to >> Connect-SPOService 


Create new site/site collection

Below is the default syntax. We can pick required parameters. 

(Note: You must be a SharePoint Online global administrator to run the cmdlet).

New-SPOSite
[-CompatibilityLevel <Int32>]
[-LocaleId <UInt32>]
[-NoWait]
-Owner <String>
[-ResourceQuota <Double>]
-StorageQuota <Int64>
[-Template <String>]
[-TimeZoneId <Int32>]
[-Title <String>]
-Url <UrlCmdletPipeBind>
[<CommonParameters>]


Use the Get-SPOWebTemplate cmdlet to get the list of valid templates. If no template is specified, one can be added later.


The below customized Powershell cmdlet as per our requirement.


New-SPOSite -Url https://gurram.sharepoint.com/sites/hr -Owner gvr@gurram.onmicrosoft.com -NoWait -Template STS#0 -Title "HR"


New site collection was created.

_______________________________________________________________

Delete site/site Collection


The Remove-SPOSite cmdlet does not delete a site collection from the site collections list permanently. Instead, the removed site collection is moved to the Recycle Bin. Below is the default syntax. We can pick required parameters. 

(Note: You must be a SharePoint Online global administrator and a site collection administrator to run the cmdlet).


Remove-SPOSite
      [-Confirm]
      -Identity <SpoSitePipeBind>
      [-NoWait]
      [-WhatIf]
      [<CommonParameters>]

The below customized Powershell cmdlet as per our requirement.


Remove-SPOSite -Identity https://gurram.sharepoint.com/sites/hr -NoWait


Click on Yes or Yes to All.
The removed site collection was moved to the Recycle Bin.
_______________________________________________________________

Restore site/site Collection.

Use the Restore-SPODeletedSite cmdlet to restore a site collection from the Recycle Bin.

Below is the default syntax. We can pick required parameters. 
(Note: You must be a SharePoint Online global administrator and a site collection administrator to run the cmdlet).


Restore-SPODeletedSite
       -Identity <SpoSitePipeBind>
       [-NoWait]
       [<CommonParameters>]


The below customized Powershell cmdlet as per our requirement.


Restore-SPODeletedSite -Identity https://gurram.sharepoint.com/sites/hr -NoWait


The site collection was restored.

_______________________________________________________________

Delete site/site Collection permanently.


The Remove-SPODeletedSite cmdlet permanently removes a SharePoint Online deleted site collection from the Recycle Bin. Below is the default syntax. We can pick required parameters. 

(Note: You must be a SharePoint Online global administrator and a site collection administrator to run the cmdlet).


Remove-SPODeletedSite
      [-Confirm]
      -Identity <SpoSitePipeBind>
      [-NoWait]
      [-WhatIf]
      [<CommonParameters>]

The below customized Powershell cmdlet as per our requirement.


Remove-SPODeletedSite -Identity https://gurram.sharepoint.com/sites/hr -NoWait


Removed the SharePoint Online deleted site collection from the Recycle Bin and deleted it permanently.

Thursday, March 7, 2019

Working with MS Teams, SharePoint Online and MS Flow.

In this post, we are going to create a List Library and add it in Teams as tab. Also create a flow to send email notification when new item is created in the List Library thru ShaPoint Online.

Note: We can create Flow in OneDrive and SharePoint Online. From April 2019, MSFT enabled Flow in Teams also.

Microsoft Teams (Teams or MS Teams) is the popular and most used App among the O/M365 suite. Microsoft is adding more new features to Teams.  The back-end for Microsoft Teams is SharePoint Online. Whenever new Team is created, one new Site Collection gets created with Team Site template.

We can view these sites in SharePoint admin center (as shown below).

I am using MyFamily Team for this activity.

Go to Teams >> under any Channel >> Files tab. You can see 'Open in SharePoint'. clicking on it will open the concerned Team as SharePoint site (as shown below).


Created a new List named 'Teams List' (The same way we do in SharePoint). Also created 3 basic fields and 3 sample items (as shown below).


Click on Add a tab option


You will see all the Apps allowed by your tenant. Select 'SharePoint'


Click on Lists tab, select the 'Teams List', click Save. 'Post to the channel about this tab' check box is optional. Checking this box will post about in the Conversations tab.


Teams List tab was added to the General channel in the MyFamily Team.


Click on the + New to add items to the List. Click on 'Open in SharePoint' to open this List in SharePoint mode.
_________________________________________________________________________________

Note: Microsoft Flow button is not available in the classic experience.

If the default behavior is set to the classic experience then you will not see the Flow button in the command bar of your list or library. If the new experience is available you can enable it for your list or library by going to List Settings, and then clicking on Advanced Settings. To learn more, see Switch the default experience for lists or document libraries from new or classic.
Now we are going to create a flow to send basic notification when new list items was added/created.

Go to the Teams List Library thru 'Open in SharePoint'.  On the menu bar, Click on Flow >> 'Create a flow' (As shown below). 


You will see a window on the right side with existing flow templates. Click on Show more to view more.  Click on 'Send a customized email when a new SharePoint list item is added'


This will open a new page with Flow app. Click Create Flow button at the bottom of the page.


Click on Edit Description and add your own Description. Click Save.


Click on Edit


Use the ... at the end of the Workflow item to go to Settings (as shown below). Update the existing steps and also add using + New Step.


Updated few fields as per requirement.


You can see these options in the top-right corner of the Flow page (as shown below).


Once completed, Save it. Click on Flow Checker to view any Errors or messages. Click on Test to perform a test and create a new item in the Teams List. 


You will see a message, Your flow ran successfully.


An email is sent to the receiver's Inbox as shown below.