SharePoint (2003 thru Online): Microsoft Teams
Showing posts with label Microsoft Teams. Show all posts

Thursday, August 29, 2024

Modification of Teams URL in Microsoft 365 Admin Center

Introduction

Microsoft has recently restructured how administrators can modify Teams URLs. Previously managed through the SharePoint admin center, this function has now transitioned to the Teams & Groups section within the Microsoft 365 admin center. This change aims to streamline administrative tasks and provide a more integrated user experience.

Background

The SharePoint admin center traditionally housed various features for managing team sites and associated URLs. However, as Microsoft's suite of tools has evolved, the need for a more cohesive approach to administrative functions became apparent. This led to the migration of Teams URL management to the Microsoft 365 admin center under the Teams & Groups section.

Steps to Modify Teams URL in Microsoft 365 Admin Center

To ensure a smooth transition and ease of use, follow these detailed steps to modify Teams URLs within the new location:

Accessing the Microsoft 365 Admin Center

·        Navigate to the Microsoft 365 admin center and logging in with your administrator credentials. Once logged in, you will see a navigation panel on the left-hand side of the screen.

Locating Teams & Groups

·        In the navigation panel, scroll down and select the "Teams & groups" option. Select "Active teams & groups".

Modifying the Teams URL

·        Find the specific team whose URL you wish to modify from the list of available teams. Click on the Name of the Team to open its settings and details.

·        Locate the Site address. Click the "Edit" button down to it.

·        Enter the desired new SharePoint site address and confirm the changes by clicking "Save".


Verification

·        After saving the changes, ensure that the new URL is functional by accessing the team through the updated link.

·        If any issues arise, verify the changes in the admin center and consult Microsoft support if necessary.

Conclusion

The relocation of Teams URL modification to the Teams & Groups section of the Microsoft 365 admin center represents a strategic move towards a more unified administrative environment. By following the outlined steps, administrators can efficiently manage Teams URLs and ensure seamless access for their organization.

For further assistance or detailed guidance, please refer to the official Microsoft documentation or contact support.

Tuesday, September 15, 2020

Creating Microsoft Lists in Microsoft Teams

Earlier, we have option to link SharePoint Lists in Microsoft Teams. Now we can create Microsoft lists from the Microsoft Teams Web and Client.

Go to Microsoft Teams, Click on + (You can do this in any Channel)

Click on Lists icon.
Click on Save to finish adding Lists to the Channel.
The Lists is added as tab.
Click on Add an existing list, if you already have a list created.
Click on Create a list for new.

We see the default options - Blank list, From Excel and From existing list. The brand new options is Templates
[Microsoft is adding new templates, everytime we get updates]
By Clicking the any of the template, we can preview the List with Demo data. We can always go Back and select different template. Click on Use template to go forward.


Enter Name, Description. Choose color, choose icon. Click on Create.


The Issue tracker list was created and  added as a tab in the Channel.

Click on New Item to create List items.

The list is saved to the Microsoft Teams Site Collection. You can view the list using Open in SharePoint.

Wednesday, December 4, 2019

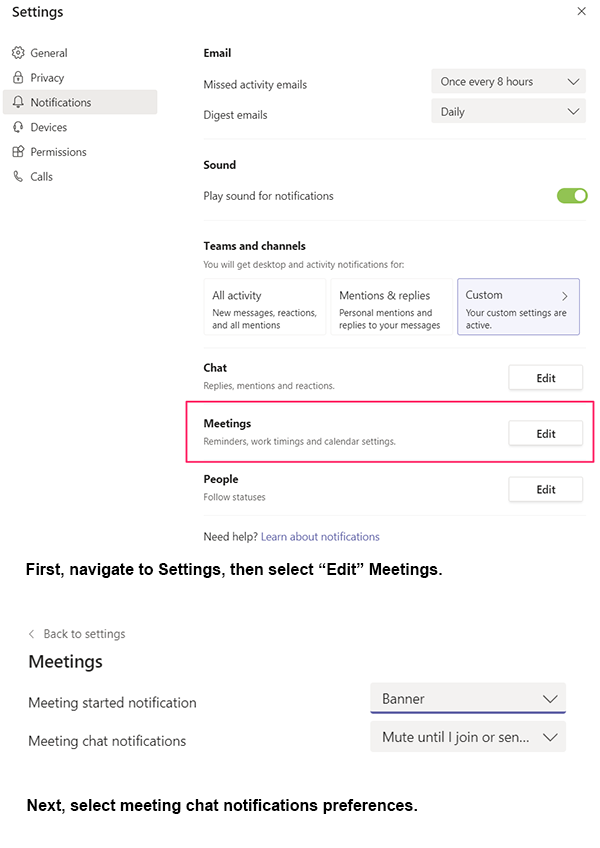
New Feature: Meeting chat notifications

MSFT are enabling meeting chat notifications for Teams. They will be gradually rolling this out in early December 2019.The rollout will be completed by mid-December.

This message is associated with Microsoft 365 Roadmap ID 54637.

How does this affect me?

By default, meeting chats will be muted until a user either sends a message in the chat or joins the online meeting.
Users who have joined a meeting, whether or not they have sent a message in the meeting chat, will receive notifications of chat messages for that meeting unless they have modified their settings.
Users who send a message in a meeting chat will receive notifications for chat messages for that meeting unless they have modified their settings.

Users can change the default setting:
In the web browser or desktop client, users should tap their profile picture at the top right of the app, select Settings > Notifications.

In the mobile client, users should access the "Hamburger" menu and choose Settings > Notifications.
Then navigate to the meetings section and open the menu for Meeting chat notifications.


What do I need to do to prepare for this change?

There is nothing you need to do to prepare for this change, but you may consider updating your user training and notifying your help desk.

Thursday, March 7, 2019

Working with MS Teams, SharePoint Online and MS Flow.

In this post, we are going to create a List Library and add it in Teams as tab. Also create a flow to send email notification when new item is created in the List Library thru ShaPoint Online.

Note: We can create Flow in OneDrive and SharePoint Online. From April 2019, MSFT enabled Flow in Teams also.

Microsoft Teams (Teams or MS Teams) is the popular and most used App among the O/M365 suite. Microsoft is adding more new features to Teams.  The back-end for Microsoft Teams is SharePoint Online. Whenever new Team is created, one new Site Collection gets created with Team Site template.

We can view these sites in SharePoint admin center (as shown below).

I am using MyFamily Team for this activity.

Go to Teams >> under any Channel >> Files tab. You can see 'Open in SharePoint'. clicking on it will open the concerned Team as SharePoint site (as shown below).


Created a new List named 'Teams List' (The same way we do in SharePoint). Also created 3 basic fields and 3 sample items (as shown below).


Click on Add a tab option


You will see all the Apps allowed by your tenant. Select 'SharePoint'


Click on Lists tab, select the 'Teams List', click Save. 'Post to the channel about this tab' check box is optional. Checking this box will post about in the Conversations tab.


Teams List tab was added to the General channel in the MyFamily Team.


Click on the + New to add items to the List. Click on 'Open in SharePoint' to open this List in SharePoint mode.
_________________________________________________________________________________

Note: Microsoft Flow button is not available in the classic experience.

If the default behavior is set to the classic experience then you will not see the Flow button in the command bar of your list or library. If the new experience is available you can enable it for your list or library by going to List Settings, and then clicking on Advanced Settings. To learn more, see Switch the default experience for lists or document libraries from new or classic.
Now we are going to create a flow to send basic notification when new list items was added/created.

Go to the Teams List Library thru 'Open in SharePoint'.  On the menu bar, Click on Flow >> 'Create a flow' (As shown below). 


You will see a window on the right side with existing flow templates. Click on Show more to view more.  Click on 'Send a customized email when a new SharePoint list item is added'


This will open a new page with Flow app. Click Create Flow button at the bottom of the page.


Click on Edit Description and add your own Description. Click Save.


Click on Edit


Use the ... at the end of the Workflow item to go to Settings (as shown below). Update the existing steps and also add using + New Step.


Updated few fields as per requirement.


You can see these options in the top-right corner of the Flow page (as shown below).


Once completed, Save it. Click on Flow Checker to view any Errors or messages. Click on Test to perform a test and create a new item in the Teams List. 


You will see a message, Your flow ran successfully.


An email is sent to the receiver's Inbox as shown below.


Monday, September 10, 2018

SharePoint Online - New Site Collection / Sub-site / Library

To create a New (Private) Site Collection, use the below 2 options (This activity is for SharePoint Administrators only).

1. from the  classic SharePoint admin center >> site collections >> New >> Private Site Collection

2. from Microsoft 365 admin center >> Resources >> Sites >> Add a site

Title: "Development" Use a meaningful name as per your requirement.

Web Site address: "/sites/" is commonly selected. We used 'dev' instead of 'Development' [short URLs are recommended].
Select a language: English 
Select a template: Team site (classic experience) 

[You can change any of the above options as per your requirements.]


You will see a message "Your Site Collection is being created. It can take 15 minutes or longer to complete this task.", which will disappear in few seconds (as shown below).


From classic SharePoint admin center >> site collections or from Microsoft 365 admin center >> Sites, You can only see site collections created with Template "Team site (classic experience)".


From modern SharePoint admin center >> sites >> Active sites, You can see all site collections created with all templates .


You can use tools like Share-gate or SharePoint Online Management Shell to view all the Site Collections created with all templates.

classic SharePoint admin center >> https://tenant-admin.sharepoint.com/_layouts/15/online/SiteCollections.aspx

modern SharePoint admin center >> https://tenant-admin.sharepoint.com/_layouts/15/online/AdminHome.aspx#/home
_______________________________________________________________________

Create a Subsite (This activity is for SharePoint Administrators, Site Collection Administrators and users with Full Control permissions)


Go to Site contents from the Quick Launch (Left Menu) or Settings wheel icon on the top-right side.


Site contents >> New >> Subsite


Title: Any meaningful title
Description: Any meaningful description.
Web Site Address: We used 'tt' instead of 'Team Training' [short URLs are recommended].
Select a language: English
Select a template: selected Team site (classic experience)
User permissions: selected Use unique permissions

Selecting Use same permissions as parent site will provide option to select existing groups from the parent dev site (we created in the above example)


Selecting Use unique permissions will provide option to create new groups linked to this new site. (you still have option to use an existing group)


Navigation & Navigation Inheritance: These two options are  self explanatory and are based on the business requirement.


Once completed all the above fields (as per requirement), Click on Create, will create a new Subsite.
________________________________________________________________________________

Create a Document library (This activity is for SharePoint Administrators, Site Collection Administrators and Users with Full Control permissions)


Go to Site contents from the Quick Launch (Left menu) or Settings wheel icon on the top-right side.


Site contents >> New >> Document library


Name: whatever entered here will be part of URL [short URLs are recommended].
Description: Any meaningful description (is Optional).
Show in site navigation: Check this box to show the library in the Quick launch (Left menu).


Click Create, will create a new Document library with ttd as Name.
_____________________________________________________________________________________

Users won't prefer having short names for the libraries. We can change the Document Library Name after it is created.


Go to Wheel icon >> Library settings.


Under General Settings >> List name, description and navigation >> enter meaningful Name (here, we entered Team Training Documents).


You can also change Description and Navigation if needed.


Once completed, Click Save.

The Quick launch (Left menu) and Document library name were updated with the new name. But the URL still shows the short name (as recommended).


By default the Document library will inherit permissions from the parent site.


Click on "Stop Inheriting Permissions" to update specific permissions for this Document library.

Thursday, May 31, 2018

Restrict access to SharePoint Online and OneDrive based on network

We can control access to SharePoint Online and OneDrive resources based on defined network locations that you trust. This is also known as location-based policy.


OneDrive is basically a SharePoint MySite. Though they have separate admin center, both are inter linked.


Note: Microsoft recommends that when a location-based policy is enabled for SharePoint, the same policy and IP address ranges should be configured for Exchange and Yammer. SharePoint relies on these services to enforce that the users of these apps are within the trusted IP range. 


First, get the authorized IP address ranges of your trusted network boundary. We need to set them in SharePoint admin center or OneDrive admin center. [If you do in SharePoint admin center, it will automatically reflect in OneDrive admin center].


SP admin center


OD admin center


Any user who attempts to access SharePoint and OneDrive from outside this network boundary (using web browser, desktop app, or mobile app on any device) will be blocked and will get Access restricted message in browser.


Set a location-based policy using Windows PowerShell


2. Connect to SharePoint Online as a global admin or SharePoint admin in Office 365. To learn how, see Getting started with SharePoint Online Management Shell

3. Run Set-SPOTenant to specify your allowed IP addresses, as in this example (replace the example IP address "131.102.0.0/16" with your own):


  Set-SPOTenant -IPAddressAllowList "131.102.0.0/16"


Important Note: 

  • Use IPv4 or IPv6 formats ony.
  • Verify that there are no overlapping IP address ranges.
  • Double check the IP range(s) before enabling this policy to ensure you do not lock yourself out. 
4. Enforce the allowable IP ranges you just set as in this example:
  
      Set-SPOTenant -IPAddressEnforcement $true


Here are some important considerations for setting a location-based policy: 


External Sharing: As per the policy, users who try to access SharePoint resources from outside the defined IP address range will be blocked, including guest users outside of the range with whom files have been externally shared.

Access from first and third-party apps: Normally, a SharePoint document can be accessed from apps like Exchange, Yammer, Skype, Teams, Planner, Flow, PowerBI, PowerApps, OneNote, and so on. When a location-based policy is enabled, apps that do not support location-based policies are blocked. The only apps that currently support location-based policies are Yammer and Exchange. This means that all other apps are blocked, even when these apps are hosted within the trusted network boundary. This is because SharePoint cannot determine whether a user of these apps is within the trusted boundary. 


For Example: You cannot add OneNote in the Microsoft Teams. When you try to add OneNote in Microsoft Teams, it shows you permission error even though you were owner for that Team.

Access from dynamic IP ranges: Several services and providers host apps which have dynamic originating IP addresses. For example, a service that accesses SharePoint while running from one Azure data center may start running from a different data center due to a failover condition or other reason, thus dynamically changing its IP address. The location-based conditional access policy relies on fixed, trusted IP address ranges. If the IP address range cannot be determined up front, location-based policy may not be an option for your environment.