SharePoint (2003 thru Online): O365
Showing posts with label O365. Show all posts

Thursday, February 20, 2020

MSFT Authenticator mobile App, not receiving Notifications for 2nd step Verification.

Multi factor Authentication (MFA) Setup was done successfully. I was using the Microsoft Authenticator App on mobile to approve/reject the Notifications for 2nd step Verification.

After a couple of months, I formatted my mobile after getting a couple SMiShing messages. Installed the Microsoft Authenticator App, couldn't add my work account as it was asking to scan QR code or enter code manually. How to achieve this?

To perform the following steps, you should be Global Admininstrator of your tenant.

Click on the below link.
https://account.activedirectory.windowsazure.com/UserManagement/MultifactorVerification.aspx


Select the user and Click on Manage user settings.

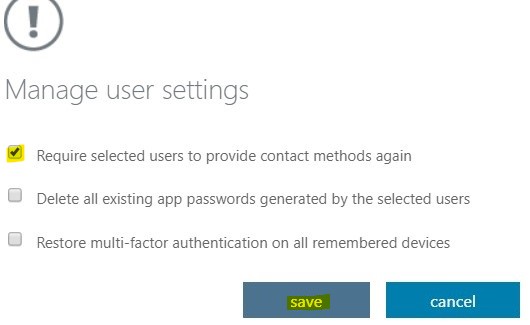
Select 'Require selected users to provide contact methods again' and Click Save.

'Delete all existing app passwords generated by the selected users'. This option can be used issues with app passwords.
"Restore multi-factor authentication on all remembered devices". This option can be used when users are using more than 2 devices.


Install Microsoft Authenticator app on your mobile Android or iPhone
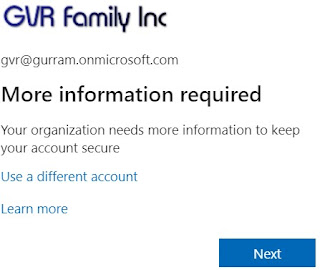
Click on https://www.office.com/ and enter your credentials. You will see a message as shown below. Click Next,


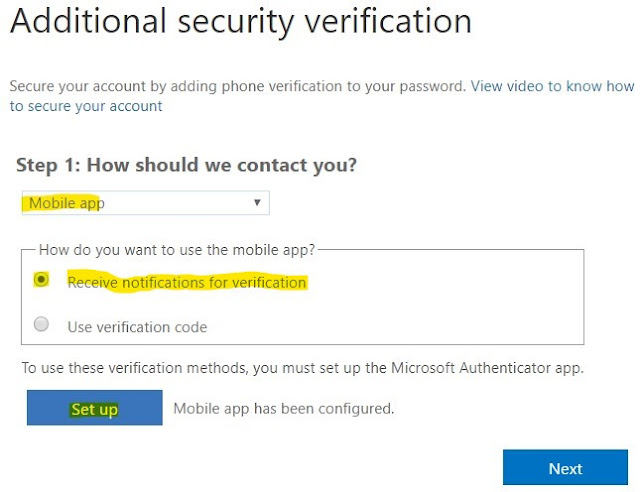
Select Receive notifications for verification, Click Set up

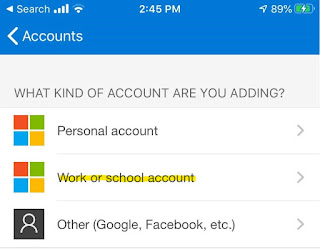
Open Microsoft Authenticator app on your mobile. Click + on the right-top corner and choose "Work or school account"


Follow Instructions 2, 3 on this screen.

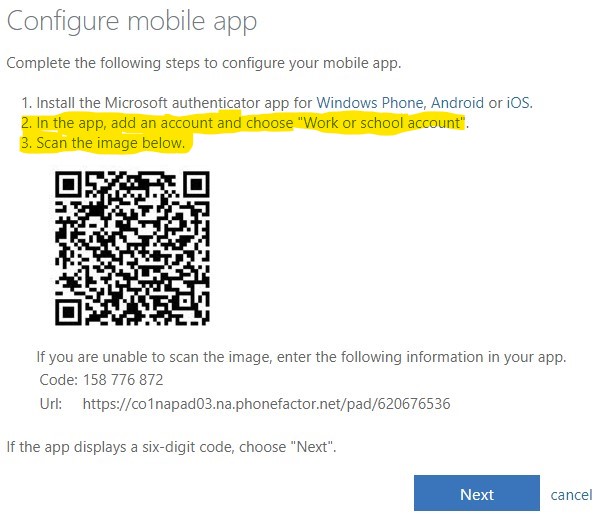
Scan the QR Code image (Shown above).


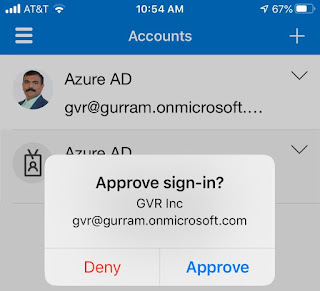
Your account gets added and you will receive notification for verification, Approve it.

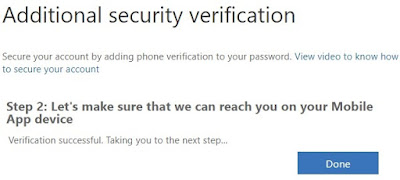
Once Verification successful, Click on Done.

Thursday, December 19, 2019

Updated Feature: Email notifications for comments and @mentions in Word, PowerPoint, and Excel

MSFT will be updating email notifications for comments and @mentions in Excel, PowerPoint, and Word.
We'll be gradually rolling this out in mid-January 2020
The roll out will be completed worldwide by the end of February 2020

This message is associated with Office 365 Roadmap ID 51538.

How does this affect me?
Currently, when a user comments on a document, presentation, or spreadsheet and adds the @ sign with someone's name (an @mention), that person may receive an email with a link to that comment. By clicking on the link, the mentioned person opens the document comment and enters that conversation.

With this update, when a user gets an email notification that someone has @mentioned them or who has replied to their comment, the email may now show both the comment thread and the surrounding document context without requiring them to open the document. In addition, users who receive the email will be able to reply to the comment without needing to open the document.

This update applies to these versions of Excel: Windows (version 1911 or later), Mac (version 16.31 or later), mobile, and web.
For Word, this update applies only to mobile and web versions.
For PowerPoint, this update applies only to the web version.
We will add additional support for PowerPoint and Word in 2020 and will notify you of those updates at that time.


Sometimes users may get email notifications that do not include the comment thread, context, or ability to reply from the email. This can happen:
When the file is marked sensitive via rules supporting Data Loss Prevention;

If the file is Rights Protected; or
Kathy > is there a better link?

If the person who left the comment is using a version of Office that does not yet support this feature.

Additional information

Tuesday, May 14, 2019

Microsoft Flow - Permissions (SharePoint Online)

Microsoft Flow is an online workflow service that automates actions across the most common apps and services.


Microsoft is offering different plans for Flow. 'Microsoft Flow for Office 365' plan is included in Office 365 Enterprise E3 & E5 plans. Note: We will be experimenting with Office 365 Enterprise E3 Developer plan which is similar to Office 365 Enterprise E3 for this blog purpose. We enabled Flow for Office 365 (as shown below)


Though License/App is enabled, we need permissions to view the Flow. In SharePoint Online, Teams, OneDrive, we cannot view Flow with Read, Limited Access, Restricted Read and Restricted Interfaces for Translation permission levels.


We can view Flow with all other Permission levels. 


Wednesday, May 8, 2019

SPO - O365 - Licenses and Apps - Post2

Continue from .....SPO - O365 - Licenses and Apps - Post1

TEST 4:  Enable SharePoint  Online for Developer app only.

Continuing new user (Teams Test) with user (no administrator access) role (as shown below).


Enabled Office 365 Enterprise E3 (Developer) License.

Enabled SharePoint Online for Developer App Only.


Login into https://www.office.com , you will see Office icons with OneDrive and SharePoint icons. 


Adding the above test user to OneDrive access is key (as shown below). SPac >> User profiles >> Manage User Permissions. [SharePoint admins and global Admins will be able to add/access].

Conclusion 4: Enabling Office 365 Enterprise E3 (Developer) License and SharePoint Online for Developer App, user was able to login into SharePoint Online site with providing permissions and can access One Drive, also can access the office apps (Word, Excel, PowerPoint, OneNote) thru browser.
_____________________________________________________________________

TEST 5: Without changing any Licences and Apps (continuing as above), Tried to login into Teams Windows app and Teams web app (as shown below).


Was unable to login into Teams Windows app, with below message.


Was unable to login into Teams web app, with below message.

Conclusion 5: Enabling Office 365 Enterprise E3 (Developer) License and SharePoint Online for Developer App, user was unable to login into Microsoft Teams Windows and web apps. 
__________________________________________________________________________________

TEST 6: Without changing any Licences and Apps (continuing as above), Tried to login into Microsoft Teams SPO Site Collection with link and access provided (as shown below).

Was able to login into the Teams SPO Site Collection


Conclusion 6: Enabling Office 365 Enterprise E3 (Developer) License and SharePoint Online for Developer App, user was able to login into Microsoft Teams SPO Site Collection with link and access provided.
__________________________________________________________________________________

Friday, March 15, 2019

Add custom tiles to the app launcher


In Office 365, you can add your own custom tiles to the app launcher that point to SharePoint sites, external sites, legacy apps, and more. The custom tile appears under the app launcher's All apps, but you can pin it to the Home apps and instruct your users to do the same. This makes it easy to find the relevant sites, apps, and resources to do your job. 

In the below example, a custom tile called "CRM" is used to access an organization's CRM site.


Add a custom tile to the app launcher

In the Office 365 admin center, search for tiles or use the left navigation pane by choosing Settings > Organization profile > Add custom tiles for your organization. Click Edit


NOTE: If you don't see the Custom tiles link, verify you have an Exchange Online mailbox assigned to you and you've successfully signed into your mailbox. Both are required for this feature.

Choose Add a custom tile.


Enter a Tile name for the new tile. The name will appear in the tile.

Enter a URL for the tile. This is the location where you want your users to go when they click the tile on the app launcher. Use HTTPS in the URL.

Enter a Description for the tile. You see this when you select the tile on the My apps page and choose App details.

Enter an Image URL for the tile. The image appears on the My apps page and app launcher.
TIP: The image should be 60x60 pixels and be available to everyone in your organization without requiring authentication.

Choose Save to create the custom tile.


Your custom tile now appears in the app launcher on the All tab for you and your users.


Note: If you don't see the custom tile created in the previous steps, make sure you have an Exchange Online mailbox assigned to you and you've signed into your mailbox at least once. These steps are required for custom tiles in Office 365.


Edit or delete a custom tile


In the Office 365 admin center, search for tiles or use the left navigation pane by choosing Settings > Organization profile > Add custom tiles for your organization and click

Select the Title name and click Edit title

Update the Tile name, URL, Description, or Image URL for the custom tile.

Click Update > Close.


To delete a custom tile, from the Custom tiles window, select the tile, click Remove tile and then click Delete.


Wednesday, March 13, 2019

Connect web parts in SharePoint Online

When you add a modern page to a site, you add and customize web parts, which are the building blocks of your page. You can connect some web parts to each other to create an interactive and dynamic experience for your page viewers. 

For example, you can connect a Document library web part to a File viewer web part. When a user clicks a file name in the Document library list, the File viewer shows the contents of that specific file. Or, connect a List web part or Document library web part to an Embed web part, and add custom code for a variety of dynamic experiences.

Go to Site Contents >> New >> Page


Enter Page Title, click on + icon (as shown below).


First select a Document Library web part.

next add the File Viewer web part.


Note: If you're adding the File viewer web part for the first time, the Recent documents pane will open. Click Cancel on the bottom right of this pane.

Click Edit web part button on the left side of the File viewer web part.


Click the ellipses (...) at the top right of the property pane, and then click Connect to source button.


Under Connect to source, select the document library you want to use from the drop down list. Click the X at the top of the pane to close it.


 Click Save as draft at the top of the page.

Test your connection by selecting a document from the Document library you chose. You should see the document displayed in the File viewer web part.

When you're ready for your audience to see the page, click Publish at the top right of the page.

You should be able to preview the selected Document as shown below.


Friday, March 8, 2019

History - OneDrive for Business


MySite feature was introduced with MOSS 2007, available with CALs. This was continued with all SharePoint versions including SharePoint Online. In SP 2013, 'Configure hybrid OneDrive and Sites features' in introduced. Going forward these two features (MySite & OneDrive for Business) will be merged and pushed over to OneDrive admin center.  

Both SharePoint admin center and OneDrive admin center will be available for SharePoint Administrator, where still many features are clubbed.

URL evolution

http://sp2007.com:81/personal/vrgurram/default.aspx

http://sp2010.com/my/personal/vrgurram/default.aspx


http://sp2013.com/my/personal/vrgurram/Documents/Forms/All.aspx


https://tenant-my.sharepoint.com/personal/gmr_tenant_com/Documents/Forms/All.aspx


Few things we can do with OneDrive for Business

We can go to Site Settings page of OneDrive for Business by adding (_layouts/15/settings.aspx) as shown below.
https://tenant-my.sharepoint.com/personal/gmr_tenant_com/_layouts/15/settings.aspx

You can enable Site Collection Features, Site Features, Audit Settings and many other settings like we do for regular SharePoint Site. Click on Apps will take you to Site Contents page.


Or you can use (_layouts/15/viewlsts.aspx?view=14) to add at the end of the URL and navigate to Site Contents page as shown below.

https://tenant-my.sharepoint.com/personal/gmr_tenant_com/_layouts/15/viewlsts.aspx?view=14

Like in regular SharePoint Site, you can create new Lists, Document Libraries, Subsites, add Apps.  But, only Documents List will be recognized as OneDrive for Business and will sync with your computer/phone.

The Key Options in OneDrive for Business are given below.

Generic URL - https://tenant-my.sharepoint.com/personal/gmr_tenant_com/
(Note: Add the above generic URL in front of the below links)

Recent                 -  _layouts/15/RecentDocuments.aspx
Shared with me - Documents/Forms/SharedWithMe.aspx 
Followed             - Social/FollowedContent.aspx
Recycle Bin         -  _layouts/15/AdminRecycleBin.aspx?mysite=1

New Experience - https://tenant-my.sharepoint.com/personal/gmr_tenant_com/_layouts/15/onedrive.aspx

Classic Experience - https://tenant-my.sharepoint.com/personal/gmr_tenant_com/Documents/Forms/All.aspx 

With New Experience, we can also Create Flow in OneDrive for Business.


Monday, September 10, 2018

SharePoint Online - New Site Collection / Sub-site / Library

To create a New (Private) Site Collection, use the below 2 options (This activity is for SharePoint Administrators only).

1. from the  classic SharePoint admin center >> site collections >> New >> Private Site Collection

2. from Microsoft 365 admin center >> Resources >> Sites >> Add a site

Title: "Development" Use a meaningful name as per your requirement.

Web Site address: "/sites/" is commonly selected. We used 'dev' instead of 'Development' [short URLs are recommended].
Select a language: English 
Select a template: Team site (classic experience) 

[You can change any of the above options as per your requirements.]


You will see a message "Your Site Collection is being created. It can take 15 minutes or longer to complete this task.", which will disappear in few seconds (as shown below).


From classic SharePoint admin center >> site collections or from Microsoft 365 admin center >> Sites, You can only see site collections created with Template "Team site (classic experience)".


From modern SharePoint admin center >> sites >> Active sites, You can see all site collections created with all templates .


You can use tools like Share-gate or SharePoint Online Management Shell to view all the Site Collections created with all templates.

classic SharePoint admin center >> https://tenant-admin.sharepoint.com/_layouts/15/online/SiteCollections.aspx

modern SharePoint admin center >> https://tenant-admin.sharepoint.com/_layouts/15/online/AdminHome.aspx#/home
_______________________________________________________________________

Create a Subsite (This activity is for SharePoint Administrators, Site Collection Administrators and users with Full Control permissions)


Go to Site contents from the Quick Launch (Left Menu) or Settings wheel icon on the top-right side.


Site contents >> New >> Subsite


Title: Any meaningful title
Description: Any meaningful description.
Web Site Address: We used 'tt' instead of 'Team Training' [short URLs are recommended].
Select a language: English
Select a template: selected Team site (classic experience)
User permissions: selected Use unique permissions

Selecting Use same permissions as parent site will provide option to select existing groups from the parent dev site (we created in the above example)


Selecting Use unique permissions will provide option to create new groups linked to this new site. (you still have option to use an existing group)


Navigation & Navigation Inheritance: These two options are  self explanatory and are based on the business requirement.


Once completed all the above fields (as per requirement), Click on Create, will create a new Subsite.
________________________________________________________________________________

Create a Document library (This activity is for SharePoint Administrators, Site Collection Administrators and Users with Full Control permissions)


Go to Site contents from the Quick Launch (Left menu) or Settings wheel icon on the top-right side.


Site contents >> New >> Document library


Name: whatever entered here will be part of URL [short URLs are recommended].
Description: Any meaningful description (is Optional).
Show in site navigation: Check this box to show the library in the Quick launch (Left menu).


Click Create, will create a new Document library with ttd as Name.
_____________________________________________________________________________________

Users won't prefer having short names for the libraries. We can change the Document Library Name after it is created.


Go to Wheel icon >> Library settings.


Under General Settings >> List name, description and navigation >> enter meaningful Name (here, we entered Team Training Documents).


You can also change Description and Navigation if needed.


Once completed, Click Save.

The Quick launch (Left menu) and Document library name were updated with the new name. But the URL still shows the short name (as recommended).


By default the Document library will inherit permissions from the parent site.


Click on "Stop Inheriting Permissions" to update specific permissions for this Document library.