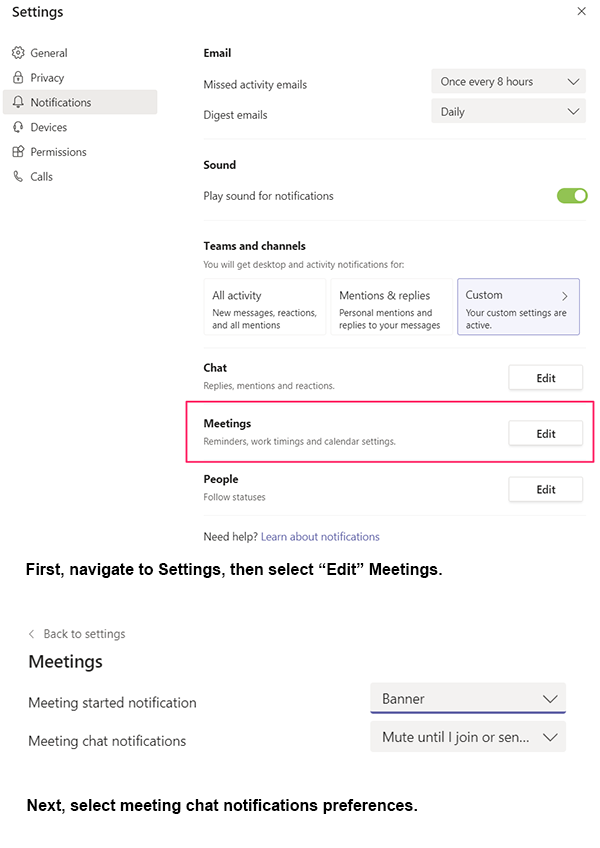
MSFT are enabling meeting chat notifications for Teams. They will be gradually rolling this out in early December 2019.The rollout will be completed by mid-December. This message is associated with Microsoft 365 Roadmap ID 54637. How does this affect me? By default, meeting chats will be muted until a user either sends a message in the chat or joins the online meeting. Users who have joined a meeting, whether or not they have sent a message in the meeting chat, will receive notifications of chat messages for that meeting unless they have modified their settings. Users who send a message in a meeting chat will receive notifications for chat messages for that meeting unless they have modified their settings. Users can change the default setting: In the web browser or desktop client, users should tap their profile picture at the top right of the app, select Settings > Notifications. In the mobile client, users should access the "Hamburger" menu and choose Settings > Notifications. Then navigate to the meetings section and open the menu for Meeting chat notifications. What do I need to do to prepare for this change? There is nothing you need to do to prepare for this change, but you may consider updating your user training and notifying your help desk.
One of the key benefits in the SharePoint Online is the ease of collaboration, not just with your co-workers, but also with all the partners and vendors. External sharing gives people outside of your organization access to certain areas of your site or to specific documents. Here's an overview of best practices and key facts about external sharing in SharePoint Online.
External Sharing in SharePoint Online - Important Changes
Microsoft changed the way SharePoint Online works with external users. You can now share the content with the following options:
Sharing files and folders with anonymous users – When this option is enabled, users can create a link to a document giving anonymous users access to that particular file.
Sharing files or folders with named external users – When you share a file with an External User, it’s treated as an ad hoc external recipient that won’t require a Microsoft account to be created or used.
Sharing sites – When you share a site, a Microsoft or Organizational account is still required. A Guest Account will be provisioned in your Azure AD for this particular user. Notice the slight change in the naming convention here, as Microsoft is slowly transitioning from the term External User to Guest User.
Adding external users to an Office 365 group – If a SharePoint site is also an Office 365 group, you can add External Users to the group, granting them access to the SharePoint site and other group content. Please note: Currently you can do so only via the Outlook group admin interface.
SharePoint Online administrators can control which of these options are available for SharePoint Online and OneDrive.
SPO, OneDrive, MS Teams Site Collections, Power BI Workspaces, all these have SPO Site Collections and are listed under Active Sites in new SP admin center (except OneDrive sites). Delegation of related roles to SPO admins will make life easier for everyone.
First, go to M365 admin center >> Settings >> Services & add-ins >> Sites Check "Let users share SharePoint Online and OneDrive content with people outside the organization" ans select New and existing external users (sign-in required), Save changes
Go to Classic SP Admin center >> sharing (selected below required options for my company. might change based on your company requirements).
Go to OneDrive admin center >> Sharing(selected below required options for my company. might change based on your company requirements).
Go to Modern SP Admin center >> Sites >> Active sites Using Customize columns, select 'External sharing' in the view. You can see how many sites are using External sharing option (as shown below).
SharePoint Online External Sharing Key Facts When administering a SharePoint Online environment, security is of paramount importance. Most importantly, you need to control the external sharing of SharePoint content. Here are a couple of things you should keep an eye on: When you share a SharePoint Site with a Guest / External User, it will be visible in the Azure AD (Filter by Guest User type).
When you share an Office 365 Group with a Guest User, it will be visible in the Group admin UI in Outlook and Azure AD (see above).
When you share a file with an External User, information about that can be retrieved only on that particular file. There is no record in Azure AD as the user has neither a Microsoft nor an Organizational account.
SharePoint Online External Users - Best Practices
SharePoint Online administrators are probably finding it a bit challenging to detect which files have been shared with ad hoc External Users. One way to find all such users is to navigate to the User Information List. This hidden list shows all the users who have access to a SharePoint site collection. The list URL goes like this: http://your_site_collection_url/_catalogs/users/simple.aspx.
All the users with a display name in an email format are External Users. However, even if you do manage to detect them, you won’t be able to tell which sites and documents they have access to. That's where SysKit Security Manager can help you out. With its Externally Shared Content Matrix you can see exactly what is shared with whom. Finding guest users is no more a tricky and time- consuming task.
However, you still have to be careful when sharing with external users. Here are a couple of best practices to follow: Make sure your end users know what they are doing. It is so easy to share something with an external email. Turn off sharing via anonymous links. Restrict content sharing to pre-approved email domains only. Disable sharing for site collections with really sensitive data. When sharing content with a user, make sure that only the user with that exact email address can view the content.
In this post, we are going to create a List Library and add it in Teams as tab. Also create a flow to send email notification when new item is created in the List Library thru ShaPoint Online. Note: We can create Flow in OneDrive and SharePoint Online. From April 2019, MSFT enabled Flow in Teams also. Microsoft Teams (Teams or MS Teams) is the popular and most used App among the O/M365 suite. Microsoft is adding more new features to Teams. The back-end for Microsoft Teams is SharePoint Online. Whenever new Team is created, one new Site Collection gets created with Team Site template.
We can view these sites in SharePoint admin center (as shown below).
Go to Teams >> under any Channel >> Files tab. You can see 'Open in SharePoint'. clicking on it will open the concerned Team as SharePoint site (as shown below).
Created a new List named 'Teams List' (The same way we do in SharePoint). Also created 3 basic fields and 3 sample items (as shown below).
Click on Add a tab option
You will see all the Apps allowed by your tenant. Select 'SharePoint'
Click on Lists tab, select the 'Teams List', click Save. 'Post to the channel about this tab' check box is optional. Checking this box will post about in the Conversations tab.
Teams List tab was added to the General channel in the MyFamily Team.
Click on the + New to add items to the List. Click on 'Open in SharePoint' to open this List in SharePoint mode.
Note: Microsoft Flow button is not available in the classic experience.
If the default behavior is set to the classic experience then you will not see the Flow button in the command bar of your list or library. If the new experience is available you can enable it for your list or library by going to List Settings, and then clicking on Advanced Settings. To learn more, see Switch the default experience for lists or document libraries from new or classic. Now we are going to create a flow to send basic notification when new list items was added/created. Go to the Teams List Library thru 'Open in SharePoint'. On the menu bar, Click on Flow >> 'Create a flow' (As shown below).
You will see a window on the right side with existing flow templates. Click on Show more to view more. Click on 'Send a customized email when a new SharePoint list item is added'.
This will open a new page with Flow app. Click Create Flow button at the bottom of the page.
Click on Edit Description and add your own Description. Click Save.
Click on Edit
Use the ... at the end of the Workflow item to go to Settings (as shown below). Update the existing steps and also add using + New Step.
Updated few fields as per requirement.
You can see these options in the top-right corner of the Flow page (as shown below). Once completed, Save it. Click on Flow Checker to view any Errors or messages. Click on Test to perform a test and create a new item in the Teams List.
You will see a message, Your flow ran successfully.
An email is sent to the receiver's Inbox as shown below.