SharePoint (2003 thru Online): Microsoft 365
Showing posts with label Microsoft 365. Show all posts

Monday, February 23, 2026

M365 Tenant - SharePoint Online Storage Cleanup

Items in the SharePoint Online Recycle Bin, including both the first and second stages, contribute to the site's storage quota for 93 days. Storage space is only released once items are permanently deleted. 

If there is a retention policy, deleted items may be moved to the Preservation Hold Library, which also consumes storage. 

To free up space right away, delete items from the second-stage Recycle Bin, and then clean up the Preservation Hold Library.

The PowerShell script below is the most effective way to carry out these tasks across all site collections in the tenant.

#____________________________________________________________________________________________________________________________
#==================================================================================================
# OSI - Retention Exception Update + PHL Cleanup + Recycle Bin Cleanup (PnP)
# Single-Shot Mode (≤100 sites) — OPTIMIZED with PnP Batching
#==================================================================================================

#------------------------------ CONFIG -------------------------------------
$PolicyName               = "Document Retention Policy"
$ExceptionsCsvPath        = "E:\Reports\RP_Sites_2.csv"
$SitesCsvPath             = "E:\Reports\Sites_2.csv"

$IPPSSessionUPN           = "admin@spadmins.onmicrosoft.com"
$PnPClientId              = "12a34567-f123-4567-891e-2aaf34567890"

$PHLPageSize              = 2000
$BatchChunkSize           = 100        # ← items per PnP batch (100 is the sweet spot)

$EnableRecycleBinCleanup  = $true
$RecycleBinRowLimit       = 0

#------------------------------ SECTION 1: RETENTION POLICY EXCEPTIONS ---------------------------
Write-Host "=== Updating Retention Policy Exceptions (Single-Shot) ===" -ForegroundColor Cyan

[array]$excludeSites = Import-Csv -Path $ExceptionsCsvPath |
    Select-Object -ExpandProperty URL |
    ForEach-Object { $_.Trim().TrimEnd("/") } |
    Where-Object { $_ } |
    Sort-Object -Unique

Write-Host "Loaded $($excludeSites.Count) exception site URLs from $ExceptionsCsvPath"

if ($excludeSites.Count -gt 100) {
    Write-Host "ERROR: $($excludeSites.Count) sites exceed the 100-site static scoping limit." -ForegroundColor Red
    Write-Host "Use batched mode with deployment wait, or switch to Adaptive Scopes." -ForegroundColor Red
    return
}

Connect-IPPSSession -UserPrincipalName $IPPSSessionUPN

try {
    Set-RetentionCompliancePolicy `
        -Identity $PolicyName `
        -AddSharePointLocationException $excludeSites

    Write-Host "Successfully added all $($excludeSites.Count) exception sites in one call." -ForegroundColor Green
}
catch {
    Write-Host "FAILED to add exceptions: $($_.Exception.Message)" -ForegroundColor Red
}

Write-Host "Retention exception update completed." -ForegroundColor Cyan

#------------------------------ SECTION 2: PHL CLEANUP + RECYCLE BIN CLEANUP ---------------------

Write-Host "`n=== PHL Cleanup + Recycle Bin Cleanup ===" -ForegroundColor Cyan

$sites = Import-Csv -Path $SitesCsvPath
Write-Host "Loaded $($sites.Count) sites from $SitesCsvPath"

$hasClearRecycleCmd = $null -ne (Get-Command Clear-PnPRecycleBinItem -ErrorAction SilentlyContinue)

foreach ($site in $sites) {
    $siteUrl = $site.URL.Trim().TrimEnd("/")
    if (-not $siteUrl) { continue }

    Write-Host "`nProcessing site: $siteUrl" -ForegroundColor Yellow

    try {
        Connect-PnPOnline -Url $siteUrl -Interactive -ClientId $PnPClientId -ErrorAction Stop
    }
    catch {
        Write-Host "Failed to connect to $siteUrl : $($_.Exception.Message)" -ForegroundColor Red
        continue
    }

    # ── PHL Cleanup ──────────────────────────────────────────────────────
    $phl = Get-PnPList -Identity "Preservation Hold Library" -ErrorAction SilentlyContinue
    if (-not $phl) {
        Write-Host "No Preservation Hold Library found at $siteUrl" -ForegroundColor DarkGray
    }
    else {
        Write-Host "Preservation Hold Library found at $siteUrl" -ForegroundColor Green

        $items = @()
        try {
            $items = Get-PnPListItem -List "Preservation Hold Library" -PageSize $PHLPageSize -ScriptBlock {
                param($pagedItems)
                $pagedItems.Context.ExecuteQuery()
            }
        }
        catch {
            Write-Host "Failed to list PHL items at $siteUrl : $($_.Exception.Message)" -ForegroundColor Red
            $items = @()
        }

        if ($items.Count -gt 0) {
            Write-Host "$($items.Count) items found in Preservation Hold Library — deleting in batches of $BatchChunkSize..." -ForegroundColor Cyan

            # ╔══════════════════════════════════════════════════════════════╗
            # ║  OPTIMIZATION: PnP Batching — replaces item-by-item delete  ║
            # ║  Groups up to $BatchChunkSize requests into ONE API call    ║
            # ╚══════════════════════════════════════════════════════════════╝
            $totalDeleted = 0
            for ($i = 0; $i -lt $items.Count; $i += $BatchChunkSize) {

                $batch = New-PnPBatch

                $end = [Math]::Min($i + $BatchChunkSize - 1, $items.Count - 1)
                foreach ($item in $items[$i..$end]) {
                    Remove-PnPListItem -List "Preservation Hold Library" -Identity $item.Id -Batch $batch
                }

                try {
                    Invoke-PnPBatch -Batch $batch -ErrorAction Stop
                    $totalDeleted += ($end - $i + 1)
                    Write-Host "  Batch deleted items $($i+1)–$($end+1) of $($items.Count)" -ForegroundColor DarkCyan
                }
                catch {
                    Write-Host "  Batch failed at items $($i+1)–$($end+1): $($_.Exception.Message)" -ForegroundColor DarkYellow
                }
            }
            Write-Host "PHL cleanup complete: $totalDeleted / $($items.Count) items deleted" -ForegroundColor Green
        }
        else {
            Write-Host "No items found in Preservation Hold Library" -ForegroundColor DarkGray
        }
    }

    # ── Recycle Bin Cleanup ──────────────────────────────────────────────
    if ($EnableRecycleBinCleanup) {
        if (-not $hasClearRecycleCmd) {
            Write-Host "Clear-PnPRecycleBinItem cmdlet not found. Per PnP docs, it may require PnP.PowerShell Nightly. Skipping recycle bin cleanup." -ForegroundColor DarkYellow
        }
        else {
            try {
                if ($RecycleBinRowLimit -gt 0) {
                    Clear-PnPRecycleBinItem -All -Force -RowLimit $RecycleBinRowLimit
                }
                else {
                    Clear-PnPRecycleBinItem -All -Force
                }
                Write-Host "Recycle bins cleared for: $siteUrl" -ForegroundColor Green
            }
            catch {
                Write-Host "Failed to clear recycle bins for $siteUrl : $($_.Exception.Message)" -ForegroundColor Red
            }
        }
    }
}

Write-Host "`n=== DONE ===" -ForegroundColor Cyan

Thursday, August 29, 2024

Modification of Teams URL in Microsoft 365 Admin Center

Introduction

Microsoft has recently restructured how administrators can modify Teams URLs. Previously managed through the SharePoint admin center, this function has now transitioned to the Teams & Groups section within the Microsoft 365 admin center. This change aims to streamline administrative tasks and provide a more integrated user experience.

Background

The SharePoint admin center traditionally housed various features for managing team sites and associated URLs. However, as Microsoft's suite of tools has evolved, the need for a more cohesive approach to administrative functions became apparent. This led to the migration of Teams URL management to the Microsoft 365 admin center under the Teams & Groups section.

Steps to Modify Teams URL in Microsoft 365 Admin Center

To ensure a smooth transition and ease of use, follow these detailed steps to modify Teams URLs within the new location:

Accessing the Microsoft 365 Admin Center

·        Navigate to the Microsoft 365 admin center and logging in with your administrator credentials. Once logged in, you will see a navigation panel on the left-hand side of the screen.

Locating Teams & Groups

·        In the navigation panel, scroll down and select the "Teams & groups" option. Select "Active teams & groups".

Modifying the Teams URL

·        Find the specific team whose URL you wish to modify from the list of available teams. Click on the Name of the Team to open its settings and details.

·        Locate the Site address. Click the "Edit" button down to it.

·        Enter the desired new SharePoint site address and confirm the changes by clicking "Save".


Verification

·        After saving the changes, ensure that the new URL is functional by accessing the team through the updated link.

·        If any issues arise, verify the changes in the admin center and consult Microsoft support if necessary.

Conclusion

The relocation of Teams URL modification to the Teams & Groups section of the Microsoft 365 admin center represents a strategic move towards a more unified administrative environment. By following the outlined steps, administrators can efficiently manage Teams URLs and ensure seamless access for their organization.

For further assistance or detailed guidance, please refer to the official Microsoft documentation or contact support.

Thursday, May 21, 2020

Microsoft Lists

Microsoft Lists is an evolution of SharePoint Lists.

We’ll be looking forward to trying out Microsoft Lists when it becomes available later this summer. It features deep integrations into Teams, SharePoint and other Microsoft products.


with Microsoft Lists, you can create, share, and track data and information—like issue tracking and status reporting—directly within Microsoft Teams, SharePoint, and the soon-to-be-released Lists mobile app.

Please go thru the below blog post for creating Lists.
Create Microsoft Lists

Wednesday, December 4, 2019

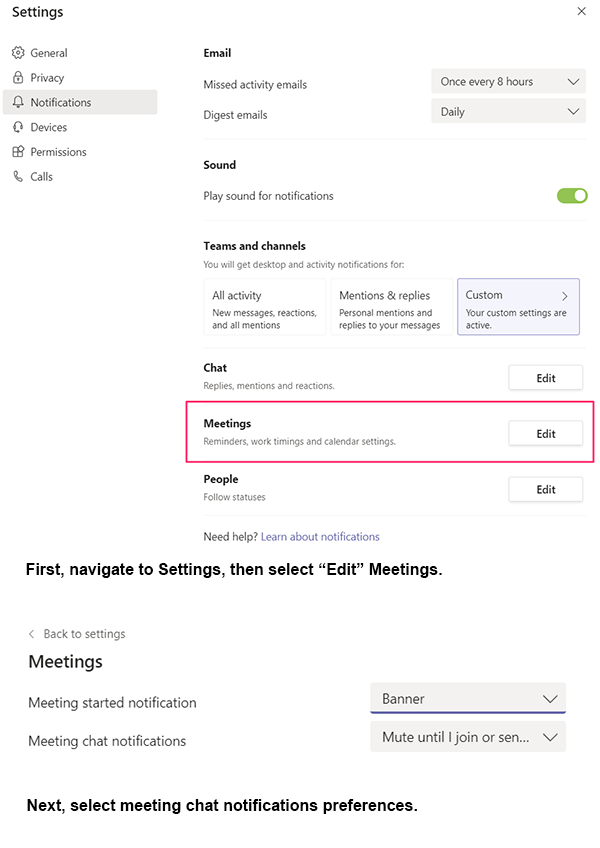
New Feature: Meeting chat notifications

MSFT are enabling meeting chat notifications for Teams. They will be gradually rolling this out in early December 2019.The rollout will be completed by mid-December.

This message is associated with Microsoft 365 Roadmap ID 54637.

How does this affect me?

By default, meeting chats will be muted until a user either sends a message in the chat or joins the online meeting.
Users who have joined a meeting, whether or not they have sent a message in the meeting chat, will receive notifications of chat messages for that meeting unless they have modified their settings.
Users who send a message in a meeting chat will receive notifications for chat messages for that meeting unless they have modified their settings.

Users can change the default setting:
In the web browser or desktop client, users should tap their profile picture at the top right of the app, select Settings > Notifications.

In the mobile client, users should access the "Hamburger" menu and choose Settings > Notifications.
Then navigate to the meetings section and open the menu for Meeting chat notifications.


What do I need to do to prepare for this change?

There is nothing you need to do to prepare for this change, but you may consider updating your user training and notifying your help desk.

Wednesday, November 13, 2019

LookBook for SharePoint Online sites

Recently MSFT released LookBook to make SharePoint admins and users get inspired with these designs or add them to your tenant to start building your next stunning site with them. This also includes SharePoint Themes Designer to Design beautiful and performant sites, pages, and web parts with SharePoint in Office 365.

In this episode, we will work on applying new branding site from LookBook.

Click on the https://lookbook.microsoft.com/ link.  
On top Navigation, go to View the designs to view a bunch of available designs. Below screenshot shows the existing branding templates.

Picked 'Mark8 Project team' site under Team.
Click on "Add to your tenant". You will see the below message if you have SharePoint admin role.  You need Tenant admin role.
Tenant admin means Global admin.
Checkbox the Consent on behalf of your organization and Click Accept
Change Site Title or Site URL if needed and click on Provision
Click on Confirm, and watch the Provisioning Status.


Sometimes, it might take more than 5 mins. No worries, you will receive an email notification (as shown below).
Click on Open site >. You can also view/open the site thru Active Sites.
The new created Site looks the same as the preview in the LookBook site.