SharePoint (2003 thru Online): PowerShell
Showing posts with label PowerShell. Show all posts

Wednesday, March 11, 2026

PowerShell Script to update Company logos across all SharePoint Online Sites

We apply Company logos across all SharePoint Online Site Collections and subsites. When a new logo is designed, I receive requests to update them. The PowerShell script below simplifies this process.

While running this script, you will get a window prompt to login with your Global Admin/SharePoint Admin account. Enter credentials and proceed forward.

# --------------------------
# Configuration
# --------------------------
$clientId = "12a34567-f123-4567-890e-1cch23456789"
$SiteCollectionUrl = "https://yourtenant.sharepoint.com/sites/company"
$LogoUrl = "https://yourtenant.sharepoint.com/sites/BrandGuide/Images/Company_Logo.png"

# Connect to root once (to enumerate subsites)
Connect-PnPOnline -Url $SiteCollectionUrl -Interactive -ClientId $clientId

# Get root + all subsites (recursive)
$webs = Get-PnPSubWeb -Recurse -IncludeRootWeb

# ---- Count of all sites (webs) ----
$totalSites = $webs.Count
Write-Host "Total sites (root + all subsites) found: $totalSites" -ForegroundColor Cyan

# Detect if your Connect-PnPOnline supports -ReturnConnection
$hasReturnConnection = (Get-Command Connect-PnPOnline).Parameters.ContainsKey("ReturnConnection")

$success = 0
$failed  = 0

foreach ($w in $webs) {
    try {
        Write-Host "[$success/$totalSites] Updating logo for: $($w.Title) -> $($w.Url)" -ForegroundColor White

        if ($hasReturnConnection) {
            $conn = Connect-PnPOnline -Url $w.Url -Interactive -ClientId $clientId -ReturnConnection
            Set-PnPWeb -Connection $conn -SiteLogoUrl $LogoUrl   # Set-PnPWeb works on current web / via -Connection
        }
        else {
            Connect-PnPOnline -Url $w.Url -Interactive -ClientId $clientId
            Set-PnPWeb -SiteLogoUrl $LogoUrl                    #
        }

        $success++
        Write-Host "SUCCESS: $($w.Url)" -ForegroundColor Green
    }
    catch {
        $failed++
        Write-Host "FAILED: $($w.Url) | $($_.Exception.Message)" -ForegroundColor Red
    }
}

Write-Host "Logo update process complete." -ForegroundColor Cyan
Write-Host "Summary: Total=$totalSites | Success=$success | Failed=$failed" -ForegroundColor Yellow

The result shows as below.

Monday, February 23, 2026

M365 Tenant - SharePoint Online Storage Cleanup

Items in the SharePoint Online Recycle Bin, including both the first and second stages, contribute to the site's storage quota for 93 days. Storage space is only released once items are permanently deleted. 

If there is a retention policy, deleted items may be moved to the Preservation Hold Library, which also consumes storage. 

To free up space right away, delete items from the second-stage Recycle Bin, and then clean up the Preservation Hold Library.

The PowerShell script below is the most effective way to carry out these tasks across all site collections in the tenant.

#____________________________________________________________________________________________________________________________
#==================================================================================================
# OSI - Retention Exception Update + PHL Cleanup + Recycle Bin Cleanup (PnP)
# Single-Shot Mode (≤100 sites) — OPTIMIZED with PnP Batching
#==================================================================================================

#------------------------------ CONFIG -------------------------------------
$PolicyName               = "Document Retention Policy"
$ExceptionsCsvPath        = "E:\Reports\RP_Sites_2.csv"
$SitesCsvPath             = "E:\Reports\Sites_2.csv"

$IPPSSessionUPN           = "admin@spadmins.onmicrosoft.com"
$PnPClientId              = "12a34567-f123-4567-891e-2aaf34567890"

$PHLPageSize              = 2000
$BatchChunkSize           = 100        # ← items per PnP batch (100 is the sweet spot)

$EnableRecycleBinCleanup  = $true
$RecycleBinRowLimit       = 0

#------------------------------ SECTION 1: RETENTION POLICY EXCEPTIONS ---------------------------
Write-Host "=== Updating Retention Policy Exceptions (Single-Shot) ===" -ForegroundColor Cyan

[array]$excludeSites = Import-Csv -Path $ExceptionsCsvPath |
    Select-Object -ExpandProperty URL |
    ForEach-Object { $_.Trim().TrimEnd("/") } |
    Where-Object { $_ } |
    Sort-Object -Unique

Write-Host "Loaded $($excludeSites.Count) exception site URLs from $ExceptionsCsvPath"

if ($excludeSites.Count -gt 100) {
    Write-Host "ERROR: $($excludeSites.Count) sites exceed the 100-site static scoping limit." -ForegroundColor Red
    Write-Host "Use batched mode with deployment wait, or switch to Adaptive Scopes." -ForegroundColor Red
    return
}

Connect-IPPSSession -UserPrincipalName $IPPSSessionUPN

try {
    Set-RetentionCompliancePolicy `
        -Identity $PolicyName `
        -AddSharePointLocationException $excludeSites

    Write-Host "Successfully added all $($excludeSites.Count) exception sites in one call." -ForegroundColor Green
}
catch {
    Write-Host "FAILED to add exceptions: $($_.Exception.Message)" -ForegroundColor Red
}

Write-Host "Retention exception update completed." -ForegroundColor Cyan

#------------------------------ SECTION 2: PHL CLEANUP + RECYCLE BIN CLEANUP ---------------------

Write-Host "`n=== PHL Cleanup + Recycle Bin Cleanup ===" -ForegroundColor Cyan

$sites = Import-Csv -Path $SitesCsvPath
Write-Host "Loaded $($sites.Count) sites from $SitesCsvPath"

$hasClearRecycleCmd = $null -ne (Get-Command Clear-PnPRecycleBinItem -ErrorAction SilentlyContinue)

foreach ($site in $sites) {
    $siteUrl = $site.URL.Trim().TrimEnd("/")
    if (-not $siteUrl) { continue }

    Write-Host "`nProcessing site: $siteUrl" -ForegroundColor Yellow

    try {
        Connect-PnPOnline -Url $siteUrl -Interactive -ClientId $PnPClientId -ErrorAction Stop
    }
    catch {
        Write-Host "Failed to connect to $siteUrl : $($_.Exception.Message)" -ForegroundColor Red
        continue
    }

    # ── PHL Cleanup ──────────────────────────────────────────────────────
    $phl = Get-PnPList -Identity "Preservation Hold Library" -ErrorAction SilentlyContinue
    if (-not $phl) {
        Write-Host "No Preservation Hold Library found at $siteUrl" -ForegroundColor DarkGray
    }
    else {
        Write-Host "Preservation Hold Library found at $siteUrl" -ForegroundColor Green

        $items = @()
        try {
            $items = Get-PnPListItem -List "Preservation Hold Library" -PageSize $PHLPageSize -ScriptBlock {
                param($pagedItems)
                $pagedItems.Context.ExecuteQuery()
            }
        }
        catch {
            Write-Host "Failed to list PHL items at $siteUrl : $($_.Exception.Message)" -ForegroundColor Red
            $items = @()
        }

        if ($items.Count -gt 0) {
            Write-Host "$($items.Count) items found in Preservation Hold Library — deleting in batches of $BatchChunkSize..." -ForegroundColor Cyan

            # ╔══════════════════════════════════════════════════════════════╗
            # ║  OPTIMIZATION: PnP Batching — replaces item-by-item delete  ║
            # ║  Groups up to $BatchChunkSize requests into ONE API call    ║
            # ╚══════════════════════════════════════════════════════════════╝
            $totalDeleted = 0
            for ($i = 0; $i -lt $items.Count; $i += $BatchChunkSize) {

                $batch = New-PnPBatch

                $end = [Math]::Min($i + $BatchChunkSize - 1, $items.Count - 1)
                foreach ($item in $items[$i..$end]) {
                    Remove-PnPListItem -List "Preservation Hold Library" -Identity $item.Id -Batch $batch
                }

                try {
                    Invoke-PnPBatch -Batch $batch -ErrorAction Stop
                    $totalDeleted += ($end - $i + 1)
                    Write-Host "  Batch deleted items $($i+1)$($end+1) of $($items.Count)" -ForegroundColor DarkCyan
                }
                catch {
                    Write-Host "  Batch failed at items $($i+1)$($end+1): $($_.Exception.Message)" -ForegroundColor DarkYellow
                }
            }
            Write-Host "PHL cleanup complete: $totalDeleted / $($items.Count) items deleted" -ForegroundColor Green
        }
        else {
            Write-Host "No items found in Preservation Hold Library" -ForegroundColor DarkGray
        }
    }

    # ── Recycle Bin Cleanup ──────────────────────────────────────────────
    if ($EnableRecycleBinCleanup) {
        if (-not $hasClearRecycleCmd) {
            Write-Host "Clear-PnPRecycleBinItem cmdlet not found. Per PnP docs, it may require PnP.PowerShell Nightly. Skipping recycle bin cleanup." -ForegroundColor DarkYellow
        }
        else {
            try {
                if ($RecycleBinRowLimit -gt 0) {
                    Clear-PnPRecycleBinItem -All -Force -RowLimit $RecycleBinRowLimit
                }
                else {
                    Clear-PnPRecycleBinItem -All -Force
                }
                Write-Host "Recycle bins cleared for: $siteUrl" -ForegroundColor Green
            }
            catch {
                Write-Host "Failed to clear recycle bins for $siteUrl : $($_.Exception.Message)" -ForegroundColor Red
            }
        }
    }
}

Write-Host "`n=== DONE ===" -ForegroundColor Cyan

Thursday, March 6, 2025

Get various properties of a SharePoint site collection using different PnP Syntaxes.

 My task was to create a report detailing various properties of a SharePoint site collection. Identifying which properties corresponded to specific PowerShell syntax required additional time. 

Ultimately, I developed this script to determine which properties are available in different syntaxes such as PnPTenantSite, PnPSite, and PnPWeb in PnP.Powershell module.

This script has proven to be very useful in understanding the properties. Please adjust the input as per your requirements; I have included all site collections in the tenant. The output is exported into CSV files.

Replace your Azure App ClientID and AdminSiteUrl. When using -Interactive in Connect-PnPOnline, you will see the credentials pop-up a couple of times. I used to keep the SP admin center site logged in on the default browser with same credentials to reduce the number of interactive sessions.

# Define the parameters for the Azure AD app
$clientId = "123456-a789-b123-456c-d78901234"
$AdminSiteUrl = "https://yourtenant-admin.sharepoint.com"

# Connect to SharePoint Online using the Azure AD app credentials
Connect-PnPOnline $AdminSiteUrl -Interactive -ClientId $clientId

# Get all site collections
$siteCollections = Get-PnPTenantSite -Detailed

# Initialize arrays to store properties
$tenantSitePropertiesList = @()
$sitePropertiesList = @()
$webPropertiesList = @()

# Loop through each site collection and get detailed properties
foreach ($site in $siteCollections) {
    $siteUrl = $site.Url
   
    # Connect to each site collection
    Connect-PnPOnline -Url $siteUrl -Interactive -ClientId $clientId
   
    # Get PnPTenantSite properties
    $tenantSiteProperties = Get-PnPTenantSite -Identity $siteUrl
    $tenantSitePropertiesList += $tenantSiteProperties
   
    # Get PnPSite properties
    $siteProperties = Get-PnPSite
    $sitePropertiesList += $siteProperties
   
    # Get PnPWeb properties
    $webProperties = Get-PnPWeb
    $webPropertiesList += $webProperties
}

# Export properties to CSV files
$tenantSitePropertiesList | Export-Csv -Path "D:\PnPTenantSiteProperties.csv" -NoTypeInformation
$sitePropertiesList | Export-Csv -Path "D:\PnPSiteProperties.csv" -NoTypeInformation
$webPropertiesList | Export-Csv -Path "D:\PnPWebProperties.csv" -NoTypeInformation

# Disconnect from SharePoint Online
#Disconnect-PnPOnline

Write-Host "The detailed properties have been exported to PnPTenantSiteProperties.csv,
PnPSiteProperties.csv, and PnPWebProperties.csv."

You can also run this script on a single site collection to obtain the properties. I ran it on all site collections to cross-verify the properties.


Thursday, February 27, 2025

Sharepoint PowerShell Modules

 The Microsoft.SharePoint.Client module is part of the SharePoint Online Client Components SDK, which is used to enable development with SharePoint Online. This module allows developers to interact with SharePoint Online using client-side object model (CSOM) APIs. It provides a way to perform various operations on SharePoint Online sites, such as creating and managing lists, libraries, and site collections, as well as handling permissions and workflows[1].

The SharePoint Online Client Components SDK can be downloaded from the official Microsoft Download Center[1]. However, it is recommended to use NuGet packages rather than installing CSOM assemblies to the Global Assembly Cache (GAC)[1].

Additionally, the Microsoft.Online.SharePoint.PowerShell module is another tool that can be used to manage SharePoint Online. It allows administrators to perform tasks such as updating the SharePoint Online Management Shell and managing tenant-level settings[2].


The Microsoft.SharePoint.Client and Microsoft.Online.SharePoint.PowerShell modules serve different purposes and are used in different contexts when working with SharePoint Online.

The Microsoft.SharePoint.Client module is part of the SharePoint Online Client Components SDK. It allows developers to interact with SharePoint Online using client-side object model (CSOM) APIs. This module is primarily used for development purposes, enabling operations such as creating and managing lists, libraries, and site collections, as well as handling permissions and workflows[3].

On the other hand, the Microsoft.Online.SharePoint.PowerShell module is a set of cmdlets specifically designed for SharePoint Online administration. It allows administrators to perform various management tasks, such as updating the SharePoint Online Management Shell and managing tenant-level settings[4]. This module is used within PowerShell to automate administrative tasks and manage SharePoint Online environments more efficiently[5].

In summary, the Microsoft.SharePoint.Client module is geared towards developers for building and interacting with SharePoint Online applications, while the Microsoft.Online.SharePoint.PowerShell module is intended for administrators to manage and configure SharePoint Online environments.


Thursday, June 20, 2024

Sensitivity labels Properties of all files in a Document library

Copilot is a big deal on Microsoft 365 these days. Lots of people are using it, and Sensitivity labels are getting more popular too. I had to run a PowerShell Script to get the Properties of all files in a Document library, including their Sensitivity labels. PnP PowerShell made it easy for me.

I ran the script using the PowerShell extension in Visual Studio Code.

# Connect to the SharePoint site
$siteURL = "https://gurram.sharepoint.com/sites/dev"
Connect-PnPOnline -Url $siteURL -Interactive

# The name of the document library
$libraryName = "test1"

# Retrieve all list items in the document library
$items = Get-PnPListItem -List $libraryName

# Loop through each item and retrieve FieldValuesForEdit
foreach ($item in $items) {
    # Retrieve the FieldValuesForEdit property of the list item
    $fieldValuesForEdit = Get-PnPProperty -ClientObject $item -Property "FieldValuesForEdit"
    Write-Host "Item ID:" $item.Id
    Write-Host "FieldValuesForEdit:"
    $fieldValuesForEdit.FieldValues.FileRef #FileReferenceLink
    $fieldValuesForEdit.FieldValues._IpLabelId #Label ID
    $fieldValuesForEdit.FieldValues._DisplayName #Label Display Name
}

Below screenshot shows the result.


Monday, June 10, 2024

Apply Sensitivity label to all Site collections in SharePoint admin center

With E3 license, we have to label everything manually, which is very time-consuming when we deal with many site collections.

For our project, I used a PowerShell Script to automate the process of applying Sensitivity labels to all Site Collections.

#Run the Get-Label command to retrieve the list of available labels:
Connect-IPPSSession -UserPrincipalName spadmin@gurram.onmicrosoft.com
Get-Label |ft Name, Guid, ContentType
#Copy the required label GUID
Disconnect-IPPSSession
--------------------------------------------------------------
#Connect to PnP PowerShell
Connect-PnPOnline -Url "https://gurram-admin.sharepoint.com" -Interactive

#Get All Site collections - Include Only: Team site (no M365 Group), Team site (classic experience), Project Web App site and Team sites
$Sites = Get-PnPTenantSite | Where-Object { $_.Template -eq "STS#3" -or $_.Template -eq "STS#0" -or $_.Template -eq "PWA#0" -or $_.Template -eq "GROUP#0" }

#For each site in the Site collections
ForEach ($site in $Sites) {
    #Required Label GUID from the above Script
    $LabelId = "abc123de-45f6-7g89-hi12-34j56789jk12"  
    $ctn = Connect-PnPOnline -Url $site.URL -Interactive
    $label = Get-PnPSiteSensitivityLabel -Connection $ctn

   if ($label.DisplayName -eq "") {
   #Add sensitivity Label to site
   Set-PnPTenantSite -Identity $site.URL -SensitivityLabel $LabelId
  } else {
    Write-Host $site.URL,"Not Blank"
  }
   $Object = [PSCustomObject]@{
    URL = $site.URL
    Sensitivitylabel= $label.DisplayName
    }
    $List += $Object
    #Write-Host $site.URL
    }
#Disconnect
Disconnect-PnPOnline

Apply Sensitivity Label to all Document Libraries in a Site collection

E3 ($249) and E5($449) licenses have a big price gap, and E5 license has the advantage of auto labelling. Without it, we have to label everything manually, which is very time-consuming when we deal with many site collections and a lot of content.

For our project, I used a PowerShell Script to automate the process. I applied Sensitivity labels to all Site Collections first. 

Then, using the below PowerShell Script, I applied Sensitivity labels to Document libraries in each site collection. This way, the Office files that are uploaded or updated will get the label from the Document Library. However, we still need to label other file types manually.

List all the sites in a CSV file with URL as Header (As shown below).


symbol in PowerShell script is used for comments.

# Import the CSV file
$sites = Import-Csv -Path "D:\Dev_Sites_FilesWise.csv"

# Loop through each site
foreach ($site in $sites) {
    # Connect to the SharePoint site
    Connect-PnPOnline -Url $site.Url -Interactive

# The GUID of the 'Internal Use' sensitivity label
$Label = "Internal Use"

# Retrieve all document libraries (Except Style Library) from the site
$libraries = Get-PnPList | Where-Object {
  $_.BaseTemplate -eq [Microsoft.SharePoint.Client.ListTemplateType]::DocumentLibrary
    -and $_.Title -ne "Style Library"}

# Apply the sensitivity label to each document library if it doesn't already exist and print the name
foreach ($library in $libraries) {
 # Retrieve the current sensitivity label of the document library
 $currentLabel = (Get-PnPList -Identity $library.Id).DefaultSensitivityLabelForLibrary
   
  # Check if the sensitivity label is empty
  #if ($currentLabel -eq $null) {
      if ([string]::IsNullOrWhiteSpace($currentLabel)) {
      Set-PnPList -Identity $library.Id -DefaultSensitivityLabelForLibrary $Label
      Write-Host "'Internal Use' applied to: " $library.Title
    }
  else {
      Write-Host "Sensitivity label already exists on: " $library.Title
    }
}
}
# Disconnect the session
Disconnect-PnPOnline

Thursday, May 9, 2024

Add/Remove sites (bulk list) from Search Index thru PowerShell

 We need to remove 150 sites from Search Index. We have to make sure they don't show up in search results by turning off that option for each site. The normal way of doing this is too slow for so many sites. We use a faster PowerShell script method to handle 150 sites at once.

Regular method

By default, the option Allow this site to appear in Search results is set to Yes for all Site collections in Sharepoint online. This means the site content can show up in search results.

On the site, select Settings (Wheel) icon., and then select Site settings. If you don't see Site settings, select Site information, and then select View all site settings.

Under Search, click Search and offline availability.

In the Indexing Site Content section, under Allow this site to appear in Search results, select Yes to allow the content of the site to appear in search results.


If you don't want the content to show up in search results, choose No.

NOTE: Search results are always security trimmed, so users will only see content they have permission to see.


PowerShell Script Method

List all the sites in a CSV file with URL as Header (As shown below).


# symbol in PowerShell script is used for comments.

# Connect to Admin Center
$adminSiteUrl = "https://gurram-admin.sharepoint.com/"
$adminConnection = Connect-PnPOnline -Url $AdminSiteUrl -Interactive

$CSVImport = "D:\Sites.csv"
$SitesCollections = Import-CSV -Path $CSVImport
 
ForEach($Site in $SitesCollections)
   {
         $siteCollectionConnection = Connect-PnPOnline -Url $Site.URL -Interactive
         Set-PnPSite -Identity $Site.URL -DenyAndAddCustomizePages $false
         $Web = Get-PnPWeb -Connection $siteCollectionConnection
         #Indexing Site Content = Yes(false), = No(true)
         $Web.NoCrawl = $false
         $Web.Update()
         Invoke-PnPQuery
         #To unlock the site (-LockState Unlock), To lock the site (-LockState ReadOnly)
         #we did not use the below option, because we want to delete sites later
         Set-PnPSite -Identity $Site.URL -LockState ReadOnly
         #to know the completed site
         write-host $Site.URL
    }


This script completed successfully in less than 10 minutes.

Monday, May 6, 2024

Add/Remove SharePoint sites (bulk list) to Retention Policy thru PowerShell.

We have a requirement to add 150 sites to the exclusion list of our retention policy. While we have traditionally accomplished this by manually editing the retention policy and adding the sites, this method is not feasible for such a large number of sites.

NOTE: 
Excluding sites from policy requires time, ranging from 10 minutes to 24 hours, to take effect.

Edit Retention Policy > Click on Edit (under Excluded) and add the sites.


Instead, we would like to use a PowerShell script to automate the process. This will allow us to add all the sites quickly and efficiently.

List all the sites in a CSV file with URL as Header (As shown below).

NOTE: I had to exclude 150 sharepoint sites from the retention policy, but it only allows 100 at a time. So I split them into two CSV files, one with 100 and one with 50. Then I ran the Powershell Script for each CSV file separately.


Below is the PowerShell Script.
NOTE: This activity requires certain permissions, such as Compliance Admin or Global Admin.
____________________________________________________________________________________
#Variables
$PolicyName = "FilesRetentionPolicy"
$CSVPath = "D:\DEV_Sites.csv"

#Get the CSV file contents, column URL to the array.
[array]$excludesites = Import-CSV -Path $CSVPath | Select -ExpandProperty URL

#Connect to Compliance Center through Exchange Online Module
Connect-IPPSSession -UserPrincipalName exadmin@gurram.onmicrosoft.com

#Get the Policy
$Policy = Get-RetentionCompliancePolicy -Identity $PolicyName

#Add SPO Sites (array) to Retention Policy
Set-RetentionCompliancePolicy -Identity $Policy.Name -AddSharePointLocationException $excludesites

----------------Use Remove when needed----------------
#Remove SPO Sites (array) from Retention Policy
Set-RetentionCompliancePolicy -Identity $Policy.Name -RemoveSharePointLocationException $excludesites
---------------------------------------------------------------------

#Disconnect the Exchange Online Module
Disconnect-ExchangeOnline
____________________________________________________________________________________
NOTE: If you notice any issues running the PowerShell script, make sure you have right version of Exo module.
 
Install-Module -Name ExchangeOnlineManagement -RequiredVersion 3.2.0 -SkipPublisherCheck

After running the PowerShell Script successfully, you can manually verify the added sites in Retention Policy.


Click on Edit in the above screen. You will see as shown below.


Monday, February 13, 2023

Adding or updating the Primary admin for any SPO Site Collection thru PowerShell Commands.

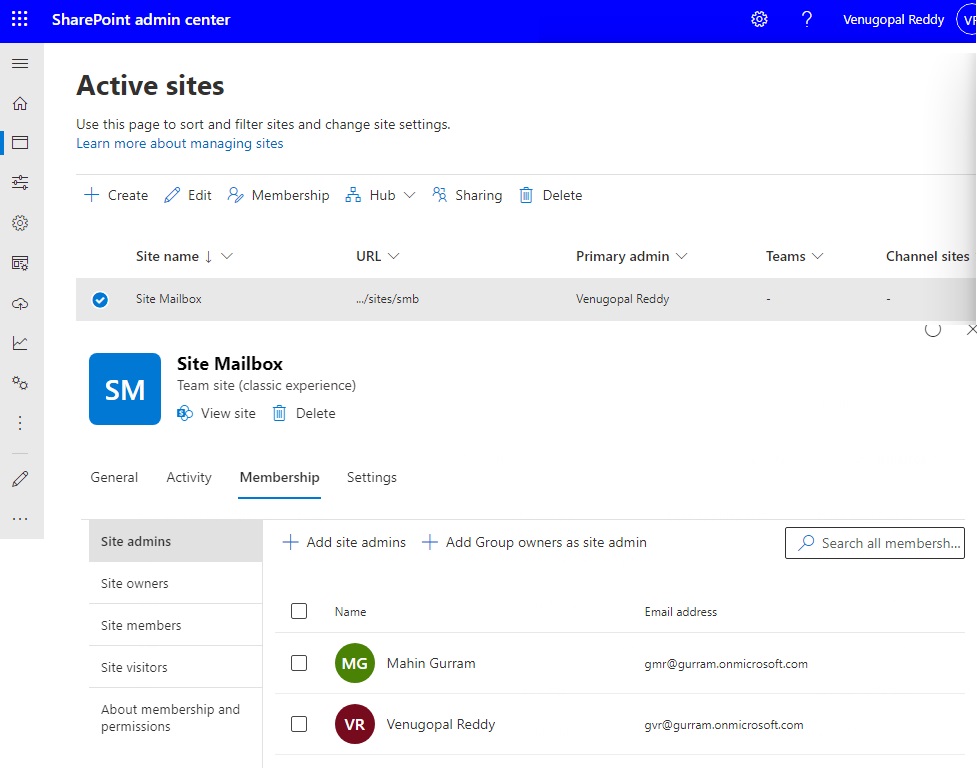
In this post, we want to achieve the ability of adding or updating the Primary admin for any Site Collection thru PowerShell Commands.

With the new features in SharePoint Admin center, we lost the ability to change the Primary Admin for any Site Collection thru 'Permissions' feature. With new 'Membership' feature, we can add Site admins, Site Owners, Site Members and Site Visitors, but cannot add or update any Site admin(s) as Primary Admin.


With the below PowerShell Commands are updating the Primary Admin from Venugopal Reddy (gvr@gurram.onmicrosoft.com) to Mahin Gurram (gmr@gurram.onmicrosoft.com)

#Variables
$SiteCollURL = "https://gurram.sharepoint.com/sites/smb"
$SiteOwner = "gmr@gurram.onmicrosoft.com"

#Connect to SharePoint Online
Connect-SPOService
#The above Command will prompt you enter SharePoint Admin URL & dialog box to enter your SharePoint Admin Credentials

#Sharepoint online powershell Set Site Owner (Primary Admin) - with Variables
Set-SPOSite -Identity $SiteCollURL -Owner $SiteOwner -NoWait

#Sharepoint online powershell Set Site Owner (Primary Admin) - Direct Command
Set-SPOSite -Identity https://gurram.sharepoint.com/sites/smb -Owner gmr@gurram.onmicrosoft.com -NoWait

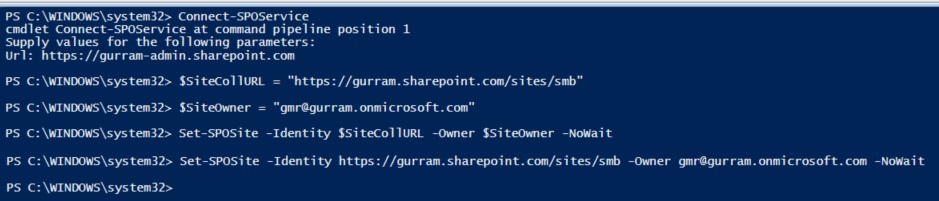
After running the above Commands, below is the PowerShell Screen.


The required Site Collection's Primary Admin was updated.

Friday, June 21, 2019

OneDrive Quota options

1. Set default storage limit for all users.
2. Set specific storage limit for selected users.

1. Set default storage limit for all users.1TB is the default tenant-wide setting for a user’s OneDrive for Business storage quota. Following your Office 365 plan, find your eligibility max storage per user. To increase the quota tenant-wide for every user, go to OneDrive Admin Center. Enter Default storage in GB and click Save.

Set the default OneDrive storage using PowerShell

Set-SPOTenant -OneDriveStorageQuota 2097152

We updated the OneDriveStorageQuota to 2097152 (2 TB). Use Get-SPOTenant to verify the update.

2. Set specific storage limit for selected users.

First, check if a user has the default storage limit or a specific limit. Sign in to https://admin.microsoft.com as a global or SharePoint admin. (If you see a message that you don't have permission to access the page, you don't have Office 365 administrator permissions in your organization.)
[Note: If you have Office 365 Germany, sign in at https://portal.office.de. If you have Office 365 operated by 21Vianet (China), sign in at https://login.partner.microsoftonline.cn/. Then select the Admin tile to open the admin center.]

In the left pane, select Users >> Active users >> Select the user >> Select the OneDrive tab.Next to "Storage used," look at the max value. (For example, 0 MB of 1024 GB)


To use several different storage settings for individual users’ OneDrives instead of using a tenant-wide option, we can run the following from PowerShell (inserting the target user’s OneDrive location and specifying the desired quota in MB):


Note: To perform the steps below you will need to have the SharePoint Online Management Shell installed. If you have issues with SharePoint Online Management Shell, try to install SharePoint Online Client Components SDK

(Windows 10 is recommended OS for using SharePoint Online Management Shell. You might see more issues with Windows 7.)

1. Open PowerShell as Administrator
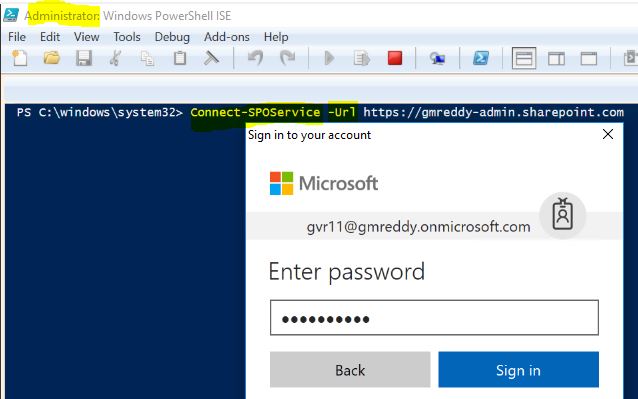
2. Connect to the service: Connect-SPOService -Url <https://yourdomain-admin.sharepoint.com>
3. Sign in with SharePoint administrator credentials


Set-SPOSite -Identity https://gurram-my.sharepoint.com/personal/tone_gurram_onmicrosoft_com -StorageQuota 5242880


NOTE: Based on your license, you can increase up to 5 TB only. You need to contact MSFT Support for more than 5 TB.

Use Get-SPOSite -Identity https://gurram-my.sharepoint.com/personal/tone_gurram_onmicrosoft_com to verify the update.