NOTE: Excluding sites from policy requires time, ranging from 10 minutes to 24 hours, to take effect.
Edit Retention Policy > Click on Edit (under Excluded) and add the sites.

Instead, we would like to use a PowerShell script to automate the process. This will allow us to add all the sites quickly and efficiently.
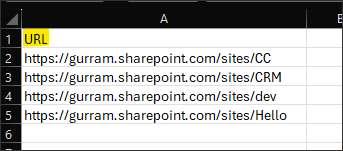
List all the sites in a CSV file with URL as Header (As shown below).
NOTE: I had to exclude 150 sharepoint sites from the retention policy, but it only allows 100 at a time. So I split them into two CSV files, one with 100 and one with 50. Then I ran the Powershell Script for each CSV file separately.
Below is the PowerShell Script.
NOTE: This activity requires certain permissions, such as Compliance Admin or Global Admin.
____________________________________________________________________________________
#Variables
$PolicyName = "FilesRetentionPolicy"
$CSVPath = "D:\DEV_Sites.csv"
#Get the CSV file contents, column URL to the array.
[array]$excludesites = Import-CSV -Path $CSVPath | Select -ExpandProperty URL
#Connect to Compliance Center through Exchange Online Module
Connect-IPPSSession -UserPrincipalName exadmin@gurram.onmicrosoft.com
#Get the Policy
$Policy = Get-RetentionCompliancePolicy -Identity $PolicyName
#Add SPO Sites (array) to Retention Policy
Set-RetentionCompliancePolicy -Identity $Policy.Name -AddSharePointLocationException $excludesites
----------------Use Remove when needed----------------
#Remove SPO Sites (array) from Retention Policy
Set-RetentionCompliancePolicy -Identity $Policy.Name -RemoveSharePointLocationException $excludesites
---------------------------------------------------------------------
#Disconnect the Exchange Online Module
Disconnect-ExchangeOnline
____________________________________________________________________________________
NOTE: If you notice any issues running the PowerShell script, make sure you have right version of Exo module.
Install-Module -Name ExchangeOnlineManagement -RequiredVersion 3.2.0 -SkipPublisherCheck
After running the PowerShell Script successfully, you can manually verify the added sites in Retention Policy.


No comments:
Post a Comment