2. Set specific storage limit for selected users.
1. Set default storage limit for all users.1TB is the default tenant-wide setting for a user’s OneDrive for Business storage quota. Following your Office 365 plan, find your eligibility max storage per user. To increase the quota tenant-wide for every user, go to OneDrive Admin Center. Enter Default storage in GB and click Save.
Set the default OneDrive storage using PowerShell
Set-SPOTenant -OneDriveStorageQuota 2097152
We updated the OneDriveStorageQuota to 2097152 (2 TB). Use Get-SPOTenant to verify the update.
2. Set specific storage limit for selected users.
First, check if a user has the default storage limit or a specific limit. Sign in to https://admin.microsoft.com as a global or SharePoint admin. (If you see a message that you don't have permission to access the page, you don't have Office 365 administrator permissions in your organization.)
[Note: If you have Office 365 Germany, sign in at https://portal.office.de. If you have Office 365 operated by 21Vianet (China), sign in at https://login.partner.microsoftonline.cn/. Then select the Admin tile to open the admin center.]
In the left pane, select Users >> Active users >> Select the user >> Select the OneDrive tab.Next to "Storage used," look at the max value. (For example, 0 MB of 1024 GB)
To use several different storage settings for individual users’ OneDrives instead of using a tenant-wide option, we can run the following from PowerShell (inserting the target user’s OneDrive location and specifying the desired quota in MB):
Note: To perform the steps below you will need to have the SharePoint Online Management Shell installed. If you have issues with SharePoint Online Management Shell, try to install SharePoint Online Client Components SDK
(Windows 10 is recommended OS for using SharePoint Online Management Shell. You might see more issues with Windows 7.)
1. Open PowerShell as Administrator
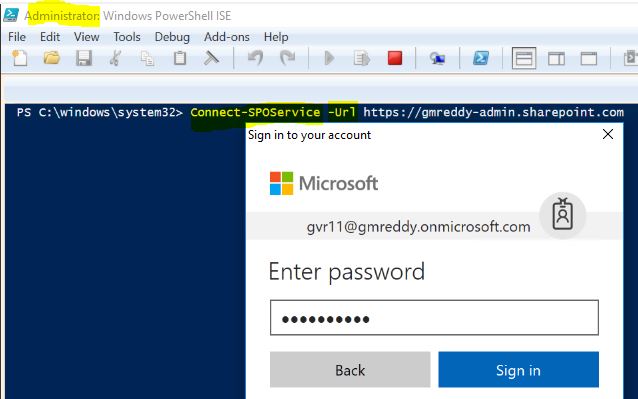
2. Connect to the service: Connect-SPOService -Url <https://yourdomain-admin.sharepoint.com>
3. Sign in with SharePoint administrator credentials

Set-SPOSite -Identity https://gurram-my.sharepoint.com/personal/tone_gurram_onmicrosoft_com -StorageQuota 5242880
NOTE: Based on your license, you can increase up to 5 TB only. You need to contact MSFT Support for more than 5 TB.
(Windows 10 is recommended OS for using SharePoint Online Management Shell. You might see more issues with Windows 7.)
1. Open PowerShell as Administrator
2. Connect to the service: Connect-SPOService -Url <https://yourdomain-admin.sharepoint.com>
3. Sign in with SharePoint administrator credentials

Set-SPOSite -Identity https://gurram-my.sharepoint.com/personal/tone_gurram_onmicrosoft_com -StorageQuota 5242880
NOTE: Based on your license, you can increase up to 5 TB only. You need to contact MSFT Support for more than 5 TB.
Use Get-SPOSite -Identity https://gurram-my.sharepoint.com/personal/tone_gurram_onmicrosoft_com to verify the update.


Thank you for all the posting, your blogs are very useful and helpful.
ReplyDeleteinstead of using the Tenant UI to check the users storage size, can we get this same details via PS ?
if yes please share the command. Thank you
Hi Friend, Use Get-SPOSite -Identity https://gurram-my.sharepoint.com/personal/tone_gurram_onmicrosoft_com to verify the update.
ReplyDelete