SharePoint (2003 thru Online): Azure AD
Showing posts with label Azure AD. Show all posts

Wednesday, February 9, 2022

Enable/Disable Multi-factor authentication (MFA) for selected users in M365/O365

The most common method of authenticating sign-in thru Passwords became most vulnerable with easy passwords and same passwords for multiple sign-ins to different services.

Multi-factor authentication (MFA) provides an additional level of security for sign-ins, which uses both a password (which should be strong) and an additional verification method like smart phone or biometric attribute.

The additional verification method is not employed until after the user's password has been verified. With MFA, even if a strong user password is compromised, the attacker does not have your smart phone or your fingerprint to complete the sign-in.

In few cases we need to disable MFA, for Service accounts and Shared Mailbox accounts, used/managed by a group.

Below are steps to enable/disable MFA for selected users.

Go to M365 admin center > Users > Active Users (using the below link)
https://admin.microsoft.com/Adminportal/Home#/users

Click on Multi-factor authentication.


or Go to Azure Portal > AAD > All Users 
(using the below link)

Click on Per-user MFA
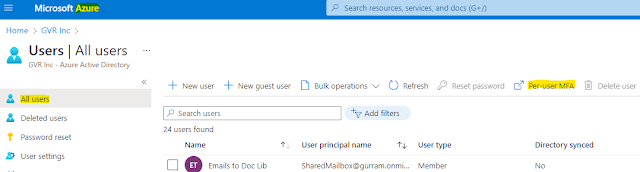

It will land in a different page routing to the below link.
https://account.activedirectory.windowsazure.com/UserManagement/MultifactorVerification.aspx?BrandContextID=O365
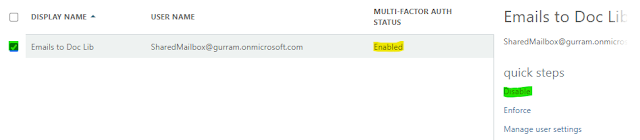
Select the user and Click on Disable in the side pane. (If you want to enable, Click on Enable)
Click on Yes

Close the message box.

Verify the MFA Status.

Thursday, August 13, 2020

Renaming 10 Azure Active Directory roles

Updated August 13, 2020: To ensure the best possible experience for our users, we are delaying some of our deployments to reduce the amount of change flowing into the services. Please see the updated roll-out timeline below

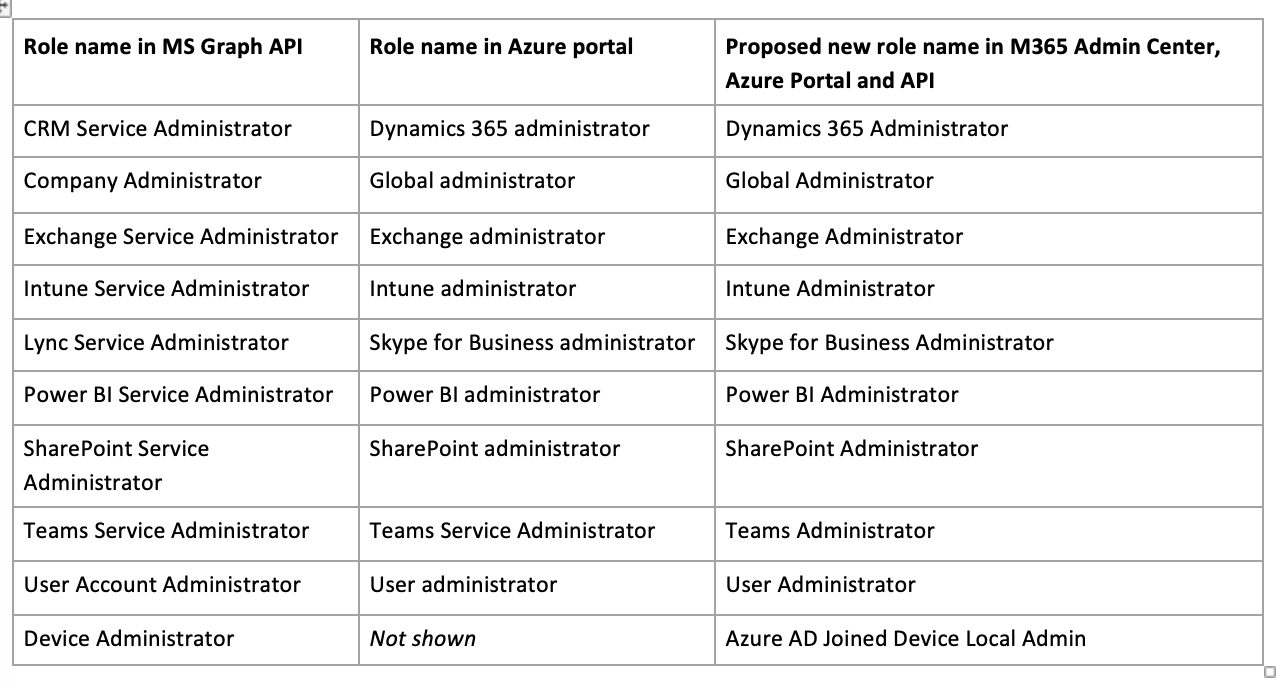
Some Azure Active Directory (AD) built-in roles have names that differ from those that appear in Microsoft 365 admin center, the Azure AD portal, and Microsoft Graph. This inconsistency can cause problems in automated processes. With this update, we are renaming 10 role names to make them consistent.

Key points
Timing: mid-September (previously mid-August) rollout; complete in early October (previously September)
Roll-out: tenant level
Control type: admin UI
Action: Review and assess by September 14, 2020

How this will affect your organization

After the rollout, you will see these 10 updated Azure AD names in the Microsoft 365 admin center, Azure AD portal, and Microsoft Graph API.

Table name here

What you need to do to prepare

If you have PowerShell script or application that leverages these roles by display name, please update it by September 14, 2020.

We strongly discourage the use of display names in your script or code. Instead, you should reference the role template ID. See this list of template IDs for Azure AD built-in roles.

Thursday, August 15, 2019

Guest users - SharePoint Online

1. Creating a Guest User Account for Office 365. We actually need to create  account in Azure AD and will sync to Office 365 admin center > Guest users tab.

Click on the below link to go to All users page in Azure.

https://portal.azure.com/#blade/Microsoft_AAD_IAM/UsersManagementMenuBlade/AllUsers

Click on 'New guest user'


Enter the guest user's e-mail address and an a personal message with the invitation, and then click the Invite button. This will send an invitation to the user.

Guest user will receive the below Invitation.
Click on Get Started. (In this case, the guest user email address is Microsoft account). It prompted to enter the password and sign in.
Click Accept

Click on Get Started. (In this case, the guest user email address is Gmail account) >> click on Send code.
It will send the Account verification code to the gmail address used for Guest user.
Enter the code, click on Sign in.
Click Accept
Click on the below link to go to All users page in Azure.
https://portal.azure.com/#blade/Microsoft_AAD_IAM/UsersManagementMenuBlade/AllUsers
In the All users page, Show Guest users only.
Click on NAME of the Guest user to enter Required details if needed. You can see Yes under Invitation accepted. You can enter Identity, Job info, Contact info..etc., Under Settings, you can block the sign in (Yes) for the Guest user.
NOTE: Once the above process was completed, then only we can Invite guest user to access the SharePoint Online or MS Teams.
________________________________________________
Inviting a Guest User thru SharePoint Online

Created a new Site Collection with 'Document center' template. 

Go to Wheel icon > Site settings > Site permissions > Grant permissions. Select Invite people, enter external email id, message, send an email invitation and permission level. Click on Share
External user will be notified thru Email notification as shown below and should click on Go To link to complete the registration.


Click on Access Requests List to know about.