Recently MSFT released LookBook to make SharePoint admins and users get inspired with these designs or add them to your tenant to start building your next stunning site with them. This also includes SharePoint Themes Designer to Design beautiful and performant sites, pages, and web parts with SharePoint in Office 365.
In this episode, we will work on applying new branding site from LookBook.
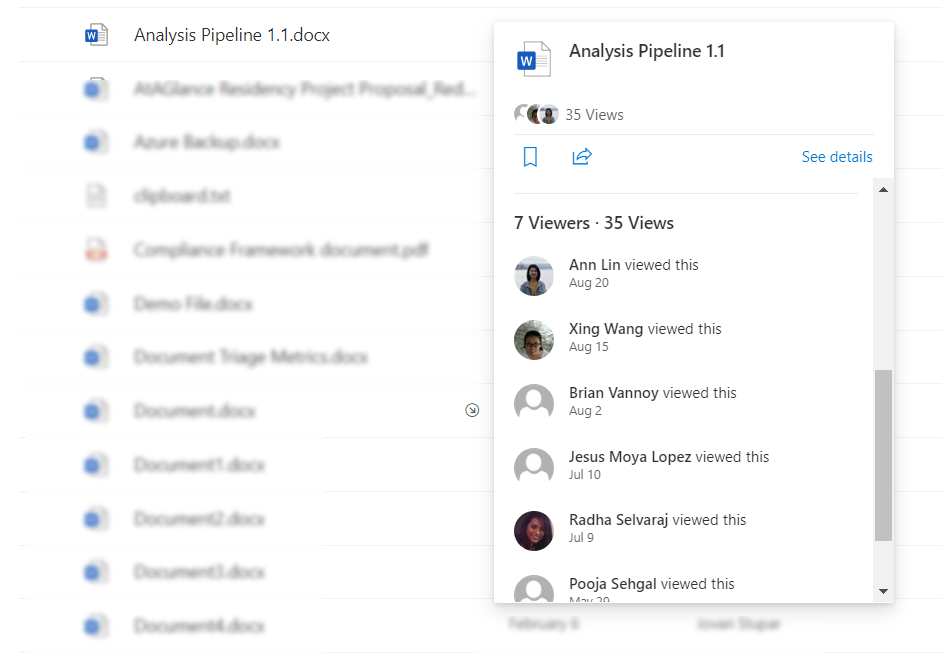
How does this affect me? This new file card feature will show you who has viewed your files and pages in SharePoint. When someone views a file you own or a page or news article that you have authored, SharePoint displays that people information and profile image of the viewer in the file hover card.
This information is available only to people who themselves have access to a file and only when the SharePoint site owner has enabled this feature. Users who cannot access the file will not see this data.
This feature exists alongside file details and actions like Inside Look and Activity.
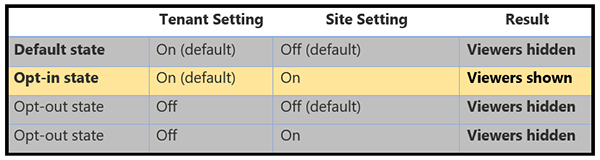
What do I need to do to prepare for this change? Tenant level: There are administrative controls to enable and disable at the tenant level. This setting is default On at the tenant level.
To disable the feature for all SharePoint sites in the tenant, admins will need to change the control by visiting the SharePoint admin center and navigating to the Sharing settings.
SharePoint site level: The administrative controls for each SharePoint site are default Off. This toggle is accessible in the Manage Site Features settings.
Viewer information will only appear if a SharePoint site owner changes the default setting to Active.
Tenant and SP setting options
Note: Microsoft recommends enabling the file viewers feature on sites where users are expected to be collaborating frequently and not on communication sites or sites with potentially sensitive information.
When you run the sharing report on file and folder sharing in OneDrive, the CSV file is saved to a location of your choosing in the OneDrive. NOTE: If you don't want site members to see the report, consider creating a folder with different permissions where only site owners can access the report. Steps to Run the Sharing report. Open the site where you want to run the report. On the Settings menu, click OneDrive settings.
Under More Settings, Manage access section, click Run sharing report.
Create a New > Folder (here we created MyShareReport Folder), select the Folder and click Save, and then click Run sharing report again.
The report may take some time to run depending on the size of the site.
When the report is finished running you will receive an email with a link to the report.
Go to MyShareReport Folder, inside, you will see the saved sharing report in CSV format.
CSV format For items shared with direct access, the report contains one row for each user / item combination. SharePoint groups are shown in the report, but not individual users inside them. For items shared with a link, the report contains a row for each signed-in user who has used the link or has been sent the link through the sharing dialog box. Links emailed directly that haven't been clicked, and Anyone links are not included in the report.
The report contains the following columns: Resource Path - The relative URL of the item
Item Type - The type of item (web, folder, file, etc.)
Permission - The permission level the user has on this item
User Name - Friendly name of the user or group that has access to this item. If this is a sharing link, the user name is SharingLink
User E-mail - The email address of the user who has access to this item. This is blank for SharePoint groups.
User or Group Type - The type of user or group: Member (internal), Guest (external), SharePoint group, Security group or Office 365 group. (Note that Member refers to a member in the directory, not a member of the site.)
Link ID - The GUID of the sharing link if user name is Sharing Link
Link Type - The type of link (Anonymous, Company, Specific People) if user name is Sharing Link
AccessViaLinkID - The Link ID used to access the item if a user's permission to an item is via a link.
MSFT are introducing a new Azure Active Directory (AD) role called global reader.
MSFT started the roll out and will be completed worldwide in October, 2019.
Global reader is the read-only counterpart to global administrator. Users in this role can read settings and administrative information across Microsoft 365 services but cannot take management actions. It is available in my tenant (below screenshot).
MSFT created the global reader role to help reduce the number of global administrators in your organization. Because global administrator accounts are powerful and vulnerable to attack, MSFT recommend that you have fewer than five global administrators. Assign global reader instead of global administrator for planning, audits, or investigations. Use global reader in combination with other limited admin roles like Exchange administrator to make it easier to get work done without the invoking the global administrator role.
Global reader works with the new Microsoft 365 admin center, Exchange admin center, Teams admin center, Security center, Compliance center, Azure AD admin center, and Device Management admin center. Note: At public preview launch, global reader does not work with SharePoint, Privileged Access Management, Customer Lockbox, sensitivity labels, or the following features within Teams: Teams Lifecycle, Reporting & Call Analytics, IP Phone Device Management, and App Catalog. All of these services will work with global reader in the future.
This role will be added advantage for SharePoint Online admins to understand the integrations between features in M365/o365. To get the most value from this new feature, we suggest that you identify the admins in your organization who should have the global reader role assigned to them. For example: Remove the global admin role and assign global reader, and any other essential limited roles, to individuals and admins who can complete their tasks with only the global reader role or the role in combination with limited admin roles like Exchange admin or user admin. Assign the global reader role to individuals in your organization who don’t have admin center access today and are dependent on coworkers for getting the administrative information they need for their work.
Farm Build Version via SharePoint Management Shell. Open SharePoint Management Shell as administrator.
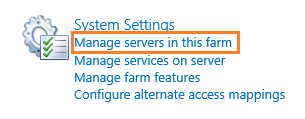
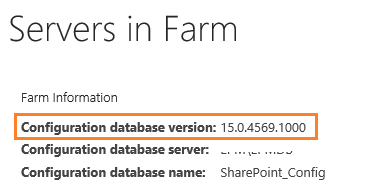
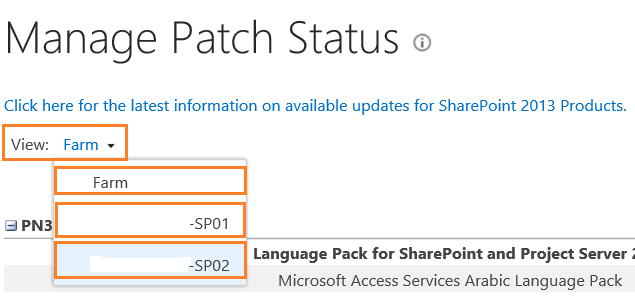
Run the Cmdlet’ Get-SPFarm.BuildVersion SharePoint Farm Build Version via Central Administration. Go to Central Administration > System Settings > Manage Servers in this farm. Under Farm Information > Check the Configuration database version = farm patch level of the farm (Build Farm Version). Get the Products and Patches build numbers that already installed on the farm. Go to Upgrade and Migration > Check product and patch installation status. You could check all the installed products in the whole farm or on a specific server. Check the install status and version columns for all installed Products/Patches.
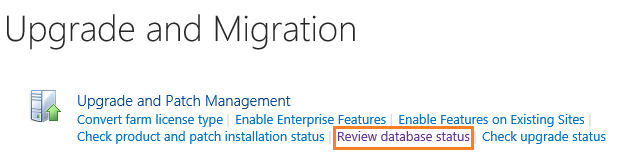
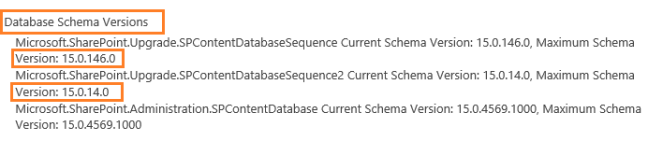
Get the Database build number on the farm. Central Administration > Upgrade and Migration > Review Database Status. Manage Database Upgrade Status > Click on Content Database name. Get the database Schema Versions. Get the Farm Build Version via SQL Server. Open SQL Server Management Studio. Open the Content Database > Versions Table. SELECT TOP 10 [VersionId] ,[Version] ,[Id] ,[TimeStamp] FROM [SharePoint_Config].[dbo].[Versions]
The Farm build number is the corresponding value of versionID start with ‘0000000-000’ that is ‘15.0.4569.1000‘. The version table also shows the Database Sequence build number that is ‘15.0.14.0‘ & ‘15.0.146.0‘.
Enter the guest user's e-mail address and an a personal message with the invitation, and then click the Invite button. This will send an invitation to the user.
Guest user will receive the below Invitation.
Click on Get Started. (In this case, the guest user email address is Microsoft account). It prompted to enter the password and sign in.
Click Accept
Click on Get Started. (In this case, the guest user email address is Gmail account) >> click on Send code.
It will send the Account verification code to the gmail address used for Guest user.
Click on NAME of the Guest user to enter Required details if needed. You can see Yes under Invitation accepted. You can enter Identity, Job info, Contact info..etc., Under Settings, you can block the sign in (Yes) for the Guest user.
NOTE: Once the above process was completed, then only we can Invite guest user to access the SharePoint Online or MS Teams. ________________________________________________ Inviting a Guest User thru SharePoint Online Created a new Site Collection with 'Document center' template. Go to Wheel icon > Site settings > Site permissions > Grant permissions. Select Invite people, enter external email id, message, send an email invitation and permission level. Click on Share
External user will be notified thru Email notification as shown below and should click on Go To link to complete the registration.
You must make sure that the Owners group has permissions to the Access Requests list, also make sure that the affected user is included in the Owners list. Go to Wheel icon > Site settings > click on Access requests and invitations.
Sometimes, you might not see the Access requests and invitations, Go to Site Settings > Site Permissions and look for "Access Request Settings" in the permissions bar. Click on it and make sure that "Allow access requests" are checked and that there is respective Group selected or a valid email address. If it still doesn't show up, the reason might be that there never has been a single access request to the site. Use a guest account that does not have any access and create a access request, then it should show up.Important: Only site collection administrators, SharePoint administrators in Microsoft 365, and members of the site's default Owners group have permission to use the Access Requests page.Follow these steps to add/verify permissions. 1. As a user who has the Manage Permissions Permission Level on the affected site and who also has access to the Access Requests list (for example, a Site Collection administrator), browse to the Access Requests list in Internet Explorer. https://tenant.sharepoint.com/sites/Docs/Access%20Requests/pendingreq.aspx?mbypass=1 2. Press F12 to open the F12 Developer Tools window. 3. Click the Network tab, and then press F5 to enable network traffic capturing. 4. In the Developer Tools window, double-click the first result in the URL list. This URL ends in "pendingreq.aspx." 5. In the Developer Tools window, click Response body. 6. In the search box, type pagelistid:, and then press Enter. 7. Copy the GUID that follows the pageListId. The GUID will be between an opening brace ( { ) character and a closing brace ( } ) character as follows: {GUID} 8. Include the opening and closing brace characters when you copy the GUID. This GUID is the identifier for the SharePoint Online Access Requests list for your organization. 9. In the browser address bar, enter https://<URL<URL of affected site, or site collection>/_layouts/15/ListEdit.aspx?List=<{GUID}>, and then press Enter. 10. The link looks like > https://tenant.sharepoint.com/sites/Docs/_layouts/15/ListEdit.aspx?List={349874e1-9078-4406-997d-154397d611b8} 11. On the Settings page, click Permissions for this list. 12. Make sure that the Owners group for the site was included in the list of permissions for the Access Requests list and you were listed in the Group. If not, click Grant Permissions, enter the name of the Owners group for the site in the Share dialog box, and then click Share.
You can use the Access Requests List to Approve/Decline Requests from Internal Users, Resend/Withdraw Invitations for Guest (External) users.