SharePoint (2003 thru Online)

Thursday, February 28, 2019

IRM service - SharePoint Online, OneDrive & Teams


To use IRM features with SharePoint Online, OneDrive & Teams. We should follow the below 3 steps.
_______________________________________________________________

Step 1: Activate the Azure Rights Management Service (Azure RMS).


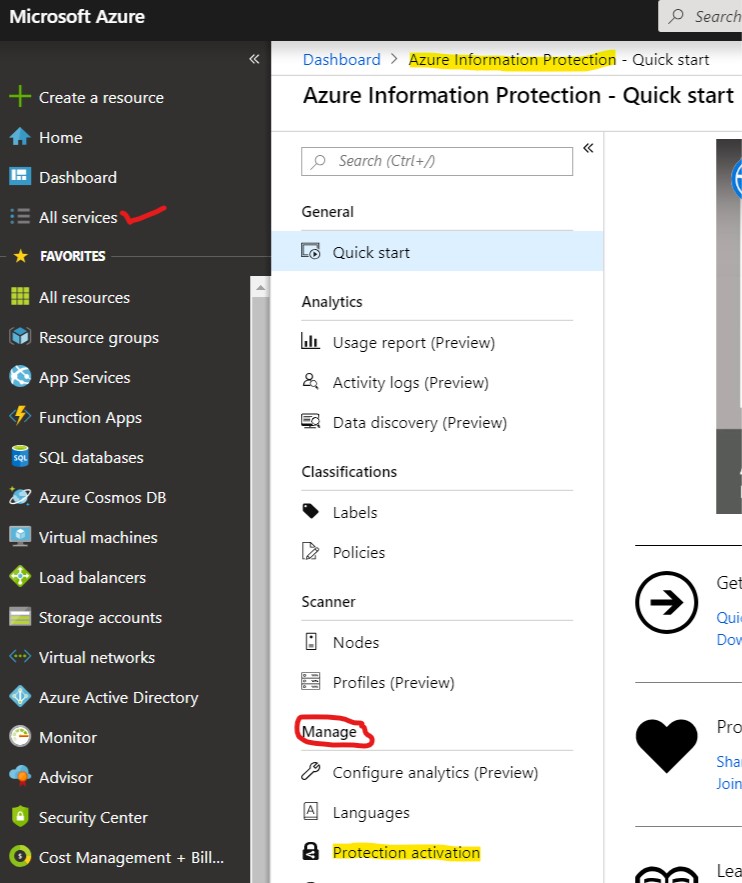
You must use Office 365 global administrator privileges to enable the Azure Rights Management Service. Open a new browser window and sign in to the Azure portal. On the left menu, click All services and start typing Information in the Filter box. Select Azure Information Protection.


If you haven't accessed the Azure Information Protection blade before, see the one-time additional steps to add this blade to the portal.

[Note: To open the Azure Information Protection blade, you must have either an Azure Information Protection Premium plan or an Office 365 plan that includes Rights Management.]


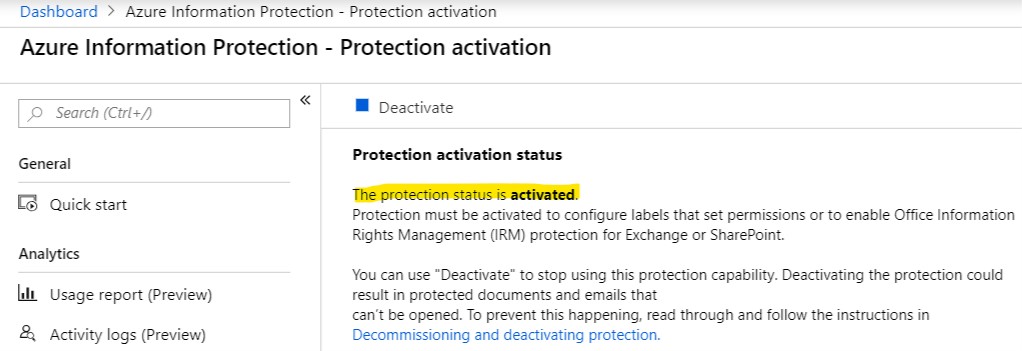
Locate the Manage menu options, and select Protection activation.

Click Activate, and then confirm your action.

When activation is complete, the information bar displays Activation finished successfully.


_______________________________________________________________

Step 2: @ SharePoint admin center to turn on IRM.

Sign in to Office 365 as a global admin or SharePoint admin.

Select the app launcher icon in the upper-left and choose Admin to open the Office 365 admin center. (If you don't see the Admin tile, you don't have Office 365 administrator permissions in your organization.)

In the left pane, choose Admin centers > SharePoint.

In the left pane, choose settings.

In the Information Rights Management (IRM) section, choose Use the IRM service specified in your configuration, and then Click on Refresh IRM Settings.



6. Click OK at the botton of the settings page.

After you refresh IRM settings, may take up to an hour to appear in Library Settings and List Settings. Users in your organization can begin using IRM in their SharePoint lists and document libraries.
_______________________________________________________________

Step 3:Apply Information Rights Management (IRM) to a list or library


Information Rights Management (IRM) is used to help control and protect files that are downloaded from lists or libraries. To apply IRM to a list or library, you must have administrator permissions for that list or library.


Note: If you are using SharePoint Online, your users might experience timeouts when downloading larger IRM-protected files. If this happens, then apply IRM protection by using your Office programs, and store larger files in a SharePoint library that does not use IRM.

Go to the list or library for which you want to configure IRM.

On the ribbon, click the Library tab, and then click Library Settings. (If you are working in a list, click the List tab, and then click List Settings).


Under Permissions and Management, click Information Rights Management. 

Note: The Information Rights Management link does not appear for picture libraries.


On the Information Rights Management Settings page, select the Restrict permission to documents in this library on download check box to apply restricted permission to documents that are downloaded from this list or library.


In the Create a permission policy title box, type a descriptive name for the policy that you can use later to differentiate this policy from other policies. For example, you can type Company Confidential if you are applying restricted permission to a list or library that will contain company documents that are confidential.


In the Add a permission policy description box, type a description that will appear to people who use this list or library that explains how they should handle the documents in this list or library. For example, you can type Discuss the contents of this document only with other employees if you want to restrict access to the information in these documents to internal employees.


To apply additional restrictions to the documents in this list or library, click Show Options, and do any of the following:

To do this:Do this:
Allow people to print documents from this list or library Select the Allow viewers to print check box. 
Allow people with at least the View Items permission to run embedded code or macros on a document. Select the Allow viewers to run script and screen reader to function on downloaded documents check box. 
If you select this option, users could run code to extract the contents of a document.
Require that people verify their credentials at specific intervals. 
Select this option if you want to restrict access to content to a specified period of time. If you select this option, people's issuance licenses to access the content will expire after the specified number of days, and people will be required to return to the server to verify their credentials and download a new copy. 
Select the Users must verify their credentials using this interval (days)check box, and then specify the number of days for which you want the document to be viewable. 
Prevent people from uploading documents that do not support IRM to this list or library. 
If you select this option, people will not be able to upload any of the following file types: 
File types that do not have corresponding IRM protectors installed on all of the front-end Web servers. 
File types that SharePoint Server 2010 cannot decrypt. 
File types that are IRM protected in another program 
Select the Do not allow users to upload documents that do not support IRMcheck box. 
Remove restricted permissions from this list or library on a specific date. Select the Stop restricting access to the library at check box, and then select the date that you want. 
Control the interval that credentials are cached for the program that is licensed to open the document. In the Set group protection and credentials interval, enter theinterval for caching credentials in number of days. 
Allow group protection so that users can share with members of the same group. Select Allow group protection, and enter the group's name for sharing. 

After you finish selecting the options you want, click OK.
_______________________________________________________________


IRM helps to protect restricted content in the following ways:

  • Helps to prevent an authorized viewer from copying, modifying, printing, faxing, or copying and pasting the content for unauthorized use.
  • Helps to prevent an authorized viewer from copying the content by using the Print Screen feature in Microsoft Windows.
  • Helps to prevent an unauthorized viewer from viewing the content if it is sent in e-mail after it is downloaded from the server.
  • Restricts access to content to a specified period of time, after which users must confirm their credentials and download the content again.
  • Helps to enforce corporate policies that govern the use and dissemination of content within your organization.

IRM cannot protect restricted content from the following:
  • Erasure, theft, capture, or transmission by malicious programs such as Trojan horses, keystroke loggers, and certain types of spyware.
  • Loss or corruption because of the actions of computer viruses.
  • Manual copying or retyping of content from the display on a screen.
  • Digital or film photography of content that is displayed on a screen.
  • Copying through the use of third-party screen-capture programs.
  • Copying of content metadata (column values) through the use of third-party screen-capture programs or copy-and-paste action.
IRM protection is applied to files at the list or library level. When IRM is enabled for a library, rights management applies to all of the files in that library. When IRM is enabled for a list, rights management applies only to files that are attached to list items, not the actual list items.


When people download files in an IRM-enabled list or library, the files are encrypted so that only authorized people can view them. Each rights-managed file also contains an issuance license that imposes restrictions on the people who view the file. Typical restrictions include making a file read-only, disabling the copying of text, preventing people from saving a local copy, and preventing people from printing the file. Client programs that can read IRM-supported file types use the issuance license within the rights-managed file to enforce these restrictions. This is how a rights-managed file retains its protection even after it is downloaded from the server.


The types of restrictions that are applied to a file when it is downloaded from a list or library are based on the individual user's permissions on the site that contains the file. The following table explains how the permissions on sites correspond to IRM permissions.

PermissionsIRM Permissions
Manage Permissions, Manage Web Site Full control (as defined by the client program): This permission generally allows a user to read, edit, copy, save, and modify permissions of rights-managed content. 
Edit Items, Manage Lists, Add and Customize Pages Edit, Copy, and Save: A user can print a file only if the Allow users to print documents check box is selected on the Information Rights Management Settings page for the list or library. 
View Items Read: A user can read the document, but cannot copy or modify its content. A user can print only if the Allow users to print documents check box is selected on the Information Rights Management Settings page for the list or library. 
Other No other permissions correspond directly to IRM permissions. 

_______________________________________________________________

When site owners enable IRM for a list or library, they can protect any supported file types in that list or library. When IRM is enabled for a library, rights management applies to all of the files in that library. When you enable IRM for a list, rights management applies only to files that are attached to list items, not the actual list items.

When people download files in an IRM-enabled list or library, the files are encrypted so that only authorized people can view them. Each rights-managed file also contains an issuance license that imposes restrictions on the people who view the file. Typical restrictions include making a file read-only, disabling the copying of text, preventing people from saving a local copy, and preventing people from printing the file. Client programs that can read IRM-supported file types use the issuance license within the rights-managed file to enforce these restrictions. This is how a rights-managed file retains its protection even after it is downloaded.

You cannot create or edit documents in an IRM-enabled library using Office Online. Instead, one person at a time can download and edit IRM-encrypted files. Use check-in and check-out to manage co-authoring , or authoring across multiple users.

When you download a PDF file from an IRM-protected library, Office 365 creates a protected PDF file. The file's extension won't change, but the file is protected. To view this file you'll need the Azure Information Protection viewer, the full Azure Information Protection client, or another application that supports viewing protected PDF files.

SharePoint Online supports encryption of the following file types:

  • PDF

  • The 97-2003 file formats for the following Microsoft Office programs: Word, Excel, and PowerPoint

  • The Office Open XML formats for the following Microsoft Office programs: Word, Excel, and PowerPoint

  • The XML Paper Specification (XPS) format


Document Library Settings >> IRM Settings in OneDrive.


Document Library Settings >>IRM Settings in Teams.


Monday, September 24, 2018

Run as Administrator and Run as different user at the same time.

Run as different user and elevate


Go to Start > Run and type secpol.msc and hit enter to launch it (if it's available). You're looking for Local Policies > Security Options > User Account Control: Behavior of the elevation prompt for administrators in Admin Approval Mode > Prompt for consent for ono-Windows binaries. The default option is "Elevate without prompting". Windows Servers has a similar option that doesn't mention "Admin Approval Mode" but it does the same thing.


But if your edition of Windows doesn't include secpol.msc you will have to do some registry hack to enable it.

Monday, September 10, 2018

SP Online version

Open SharePoint Online Management Shell or Windows PowerShell ISE in Administrator mode.

Run the below command to install the module.

Install-Module SharePointPnPPowerShellOnline

After running the above command, you will get a prompt for entering your credentials.


Click "Yes to All", when you see a message as shown below.


Once installation is completed, you will see as shown in the below screen.


Run the below Commands to get the Server Version.

Connect-PnPOnline https://mytenant.sharepoint.com

Get-PnPContext

You will see the ServerVersion (as shown below). This will be the SharePoint Online Version.


SharePoint Online - New Site Collection / Sub-site / Library

To create a New (Private) Site Collection, use the below 2 options (This activity is for SharePoint Administrators only).

1. from the  classic SharePoint admin center >> site collections >> New >> Private Site Collection

2. from Microsoft 365 admin center >> Resources >> Sites >> Add a site, 

Title: "Development" Use a meaningful name as per your requirement.

Web Site address: "/sites/" is commonly selected. We used 'dev' instead of 'Development' [short URLs are recommended].
Select a language: English 
Select a template: Team site (classic experience) 

[You can change any of the above options as per your requirements.]


You will see a message "Your Site Collection is being created. It can take 15 minutes or longer to complete this task.", which will disappear in few seconds (as shown below).


From classic SharePoint admin center >> site collections or from Microsoft 365 admin center >> Sites, You can only see site collections created with Template "Team site (classic experience)".


From modern SharePoint admin center >> sites >> Active sites, You can see all site collections created with all templates .


You can use tools like Share-gate or SharePoint Online Management Shell to view all the Site Collections created with all templates.

classic SharePoint admin center >> https://tenant-admin.sharepoint.com/_layouts/15/online/SiteCollections.aspx

modern SharePoint admin center >> https://tenant-admin.sharepoint.com/_layouts/15/online/AdminHome.aspx#/home
_______________________________________________________________________

Create a Subsite (This activity is for SharePoint Administrators, Site Collection Administrators and users with Full Control permissions)


Go to Site contents from the Quick Launch (Left Menu) or Settings wheel icon on the top-right side.


Site contents >> New >> Subsite


Title: Any meaningful title
Description: Any meaningful description.
Web Site Address: We used 'tt' instead of 'Team Training' [short URLs are recommended].
Select a language: English
Select a template: selected Team site (classic experience)
User permissions: selected Use unique permissions

Selecting Use same permissions as parent site will provide option to select existing groups from the parent dev site (we created in the above example)


Selecting Use unique permissions will provide option to create new groups linked to this new site. (you still have option to use an existing group)


Navigation & Navigation Inheritance: These two options are  self explanatory and are based on the business requirement.


Once completed all the above fields (as per requirement), Click on Create, will create a new Subsite.
________________________________________________________________________________

Create a Document library (This activity is for SharePoint Administrators, Site Collection Administrators and Users with Full Control permissions)


Go to Site contents from the Quick Launch (Left menu) or Settings wheel icon on the top-right side.


Site contents >> New >> Document library


Name: whatever entered here will be part of URL [short URLs are recommended].
Description: Any meaningful description (is Optional).
Show in site navigation: Check this box to show the library in the Quick launch (Left menu).


Click Create, will create a new Document library with ttd as Name.
_____________________________________________________________________________________

Users won't prefer having short names for the libraries. We can change the Document Library Name after it is created.


Go to Wheel icon >> Library settings.


Under General Settings >> List name, description and navigation >> enter meaningful Name (here, we entered Team Training Documents).


You can also change Description and Navigation if needed.


Once completed, Click Save.

The Quick launch (Left menu) and Document library name were updated with the new name. But the URL still shows the short name (as recommended).


By default the Document library will inherit permissions from the parent site.


Click on "Stop Inheriting Permissions" to update specific permissions for this Document library.

Wednesday, June 6, 2018

Migration from SharePoint 2013 to SharePoint Online

Permissions, Assessment and Reports are the common prerequisites for any Migration. In my case, we used Share-gate Migration Tool and completed the migration from SharePoint 20103 to SharePoint Online successfully.


Recommended Permissions
Here are the recommended SharePoint permissions to use with the following features:

Copy Structure: Site Collection Administrator rights are recommended both on the source and the destination site collections in order to take advantage of all the copy options. If you are copying site collections from the web application, Farm Administrator rights are recommended both on the source and the destination Farm. For migration of managed metadata and objects where copying this data is necessary, term store administrator access is also needed.

Copy Content: Full Control permissions on both the source and destination Sites (if applicable) as well as on the selected list or library are recommended to be able to take advantage of all the copy options. Term store administrator permission is necessary for the proper migration of all managed metadata.

Management features: In order to fully exploit all of the Management module's capabilities the following permission sets are also required: Farm administrator, site collection administrator as well as full control on the web application.

Note: For OneDrive for Business operations, it is important to note that the user being used when connecting to either the source or destination server must also be set up as an administrator for every user's MySite.

Copy User Alerts: In order to copy User Alerts the permission "Manage User Alerts" must be granted to the user doing the migration at the source and destination sites. The server extension must be installed on the source and destination sites.

Remove read-only Site Collection Lock: The Read-only lock should be removed on your source Site Collection before running a migration action. Some SharePoint services do not respond correctly when the Site Collection is on read-only mode (even if they are only used to read information), and the requests will not be processed as intended.

Not removing the read-only lock will mostly affect the structural parts of your environment, like Web Parts and Site settings, but the behavior is unpredictable and is may affect more overall.


Assessment
Microsoft is providing the SharePoint Assessment and Identity Management tool (free of cost) for SharePoint 2013 servers to assist in migration to SharePoint online.

Find more details in the below link.
https://docs.microsoft.com/en-us/sharepointmigration/migrate-to-sharepoint-online
Even if you're technically migrating from one version of SharePoint to another, they aren’t exactly the same. First, you have to take into consideration that there are different plans you can subscribe to and each with a set of features available. In my case, we were going with Office 365 E3 plan which includes SharePoint Online.

I did research and check to make sure the features we were using in SP 2013 are still available in our new Office 365 E3 plan.

Microsoft has a very detailed article which shows every single feature in a complete Edition Comparison Chart of SharePoint 2013, both On-Premises, Online and Office 365.

Please go thru SharePoint Online Limits as per Microsoft (below link).
https://technet.microsoft.com/en-us/library/mt842345.aspx

Share-gate Migration Tool
In my case, we were using Share-gate Migration Tool to migrate from SharePoint 2013 to SharePoint Online. It has many built-in reports and we can also create custom reports. We have Inventory option to generate inventory report.

We need to run the the below given reports and make sure everything is cleared.

  • Orphaned User Report (we need to go thru and clean Orphaned users) 
  • Checked Out Documents Report (We need to check in all the Checked out Documents before starting Migration) 
  • Unused Site Report (discuss with Owners and delete unwanted sites) 
  • Large Document Report (keep an eye on these files after migration too) 
  • Limited Access Report (run a report and clean them)


There is a new feature in Share-gate called Insights, where you can run it on a specific farm and get some info about Missing Administrators and missing Site Owners.


Once all the above prerequisites are completed, We started the migration of Content from SP 2013 to SharePoint Online using the steps given in below link.

https://support.share-gate.com/hc/en-us/articles/115000640388-Walkthrough-Copy-Content

Tuesday, June 5, 2018

Microsoft Support and Recovery Assistant for Office 365

Microsoft introduced a new Tool called "Support and Recovery Assistant for Office 365" that helps users troubleshoot and fix issues with various Office 365 apps and services. This Tool diagnoses common Outlook issues like account setup, connectivity issues, password issues, or Outlook stops responding or crashes,to identify the root cause of these issues.

https://testconnectivity.microsoft.com/

Using the above link, you can run few tests related to Exchange Server, Skype for Business, Office 365.


In 'Office 365' or 'Client' tab, you can see "Support and Recovery Assistant for Office 365", download and install it.

Friday, June 1, 2018

Activity Alerts in Office 365 for SharePoint Online

Go to Office 365 Security & Compliance >> Search >> Audit log search

Direct link >> https://protection.office.com/#/managealerts
Click "Turn on Auditing" for the first time.
Click on Yes.
It will take a while preparing the Office 365 audit log.
After sometime, you will see the 'New Alert Policy' activated. Click on 'New Alert Policy'.

1. Enter Name, Description, select Alert type: Custom. When you click on 'Send this alert when...', you will see many options below where you can select them (as shown below).

You will see many options related to SharePoint as listed below:
  • Site permissions activities
  • Site administration activities
  • Microsoft Teams activities (Back end is SharePoint)
  • Microsoft Flow activities (will be used in SharePoint)
  • Microsoft Stream video activities (Back end is SharePoint)
  • Microsoft Stream group channel activities (Back end is SharePoint)
  • Microsoft Stream general activities (Back end is SharePoint)

2. Leave Users blank (it will send alerts for all users). Type your name in Recipients and click on Save.
3. You will see the saved alerts and will receive Notifications where selected activities were performed by any users.