SharePoint (2003 thru Online)

Wednesday, February 26, 2020

Integration - CRM Online & SharePoint Online

The main reason for this Integration is to use SharePoint Online as Document Repository. All the Documents upload in CRM Online will be stored in SharePoint Online.

NOTE: In the below steps, we used our development tenant. Please change the tenant while copying URLs.

For this, first create a Site Collection in SharePoint Online.

https://gurram.sharepoint.com/sites/CRM

Created a sub site for current usage.

Go to Dynamics 365 > Settings > Document Management (under System).

https://gurram.crm.dynamics.com/main.aspx?settingsonly=true#640309862

Click on 'SharePoint Sites'


Click on 'New', to create a new SharePoint Site record.


Enter the below Required fields.


First, we need to create a Parent Site record filling only Absolute URL with SPO Root Site.
'List Component is installed' should be unchecked (for SharePoint Online).
'Allow Embedding of the Power BI Reports' is Optional.


then, we need to create a Site record filling parent Site and Relative URL.
'List Component is installed' should be unchecked (for SharePoint Online).
'Allow Embedding of the Power BI Reports' is Optional.


Select Active SharePoint Sites created and click on 'Activate'


Again, go to Dynamics 365 > Settings > Document Management (under System).

https://gurram.crm.dynamics.com/main.aspx?settingsonly=true#640309862


Click on 'Enable Server-Based SharePoint Integration' Follow the below steps to Complete Validation.


Active SharePoint Sites created are 'Valid' for usage.

Go to Dynamics 365 > Settings > Document Management (under System) > Document Management Settings

https://gurram.crm.dynamics.com/main.aspx?settingsonly=true#640309862
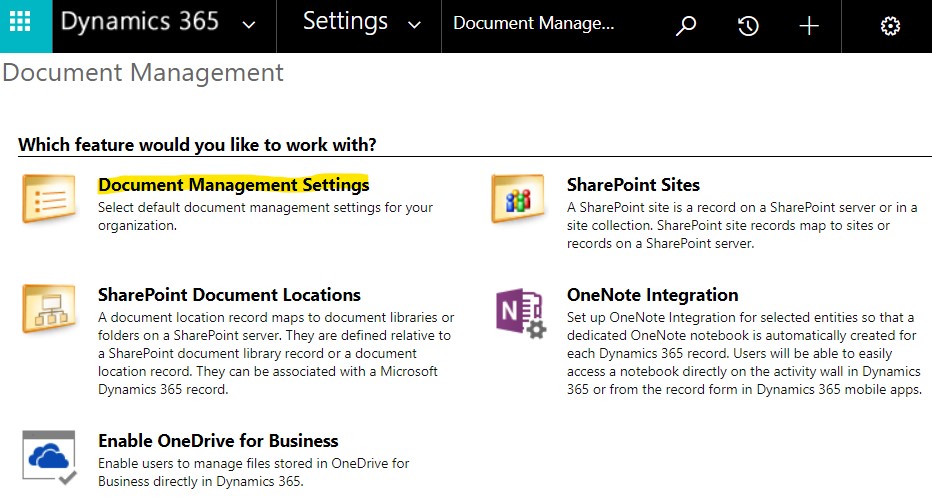

Select all required entities. Provide the SharePoint Online Company One URL > Next


Check Based on Entity > Select from drop-down. We selected Account > Next


Once Succeeded, Click Finish.


Go to Site Contents of the SharePoint Online Company One. You should see all the newly created Document Libraries.

Thursday, February 20, 2020

MSFT Authenticator mobile App, not receiving Notifications for 2nd step Verification.

Multi factor Authentication (MFA) Setup was done successfully. I was using the Microsoft Authenticator App on mobile to approve/reject the Notifications for 2nd step Verification.

After a couple of months, I formatted my mobile after getting a couple SMiShing messages. Installed the Microsoft Authenticator App, couldn't add my work account as it was asking to scan QR code or enter code manually. How to achieve this?

To perform the following steps, you should be Global Admininstrator of your tenant.

Click on the below link.
https://account.activedirectory.windowsazure.com/UserManagement/MultifactorVerification.aspx


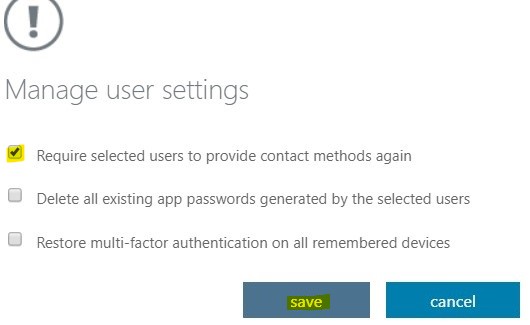
Select the user and Click on Manage user settings.

Select 'Require selected users to provide contact methods again' and Click Save.

'Delete all existing app passwords generated by the selected users'. This option can be used issues with app passwords.
"Restore multi-factor authentication on all remembered devices". This option can be used when users are using more than 2 devices.


Install Microsoft Authenticator app on your mobile Android or iPhone
Click on https://www.office.com/ and enter your credentials. You will see a message as shown below. Click Next,


Select Receive notifications for verification, Click Set up

Open Microsoft Authenticator app on your mobile. Click + on the right-top corner and choose "Work or school account"


Follow Instructions 2, 3 on this screen.

Scan the QR Code image (Shown above).


Your account gets added and you will receive notification for verification, Approve it.

Once Verification successful, Click on Done.

Tuesday, February 11, 2020

SMiShing - New Scam targets Customers


Last week, I did a purchase on Amazon and got SMS message to my phone. It was "Please view the invoice of your recent purchase on Amazon". We usually get Amazon notifications thru App and email. It was first time as SMS. The link looked suspicious. Did some research and gathered below information useful to everyone. 

SMiShing is the term that many in the security industry are using to describe a social engineering technique that exploits its victims using SMS, or text messaging. Where phishing uses email as the entry point of attack, SMiShing uses text messages as its point of entry.

SMiShing is new trend and is particularly alarming. Most of us aren't aware of the threat that's presented in our cell phone's text message inbox and therefore, we tend to trust text messages more than we do emails, even from unknown senders. This elevates the probability that we will click on a malicious item sent to us via text. Hackers know this too, and that's why they're using SMiShing attacks at an increasing rate.

What does a SMiShing message look like?

The link will be very authentic and might lead to submit your information form thru fake Amazon site, the person behind the scam will either keep your information to use in other fraudulent acts or they will sell it on the dark web to other criminals in the market for stolen identities. Many cases, they request Credit card information to steal your money.

Identified SMiShing messages

FedEx Tracking codes
Amazon Invoices
Amazon Rewards
Costco Rewards
Free Rewards / WhatsApp links for Free Rewards
Group Messages


Protecting yourself against SMiShing attacks:

  • Watch out for things that are “too good to be true,” like “free” rewards that need your credit card number for some reason.
  • Don’t download and install any software sent you to via a text message or email.
  • Treat "you-must-act-now" messages with great suspicion. This is a warning sign of a social engineering attempt.
  • Banks won't send you texts asking to update your account or confirm your card numbers. If you get a message like this that appears to be coming from your bank. Don't click anything. Call your bank directly and report fraud.
  • Regarding your purchases, though you opt for SMS, but still some might be SMiShing messages. Please use vendor's trusted app on mobile or login thru their website to verify your purchases.
  • Look for suspicious numbers such as "5000" numbers. These numbers are tied to email-to-text services, which social engineers use to avoid using their personal phone numbers for the attacks.
  • Look at the source of the text message. For example, if Amazon always texts you a delivery alert from a specific number and a new message arrives in that conversation, that suggests it’s real. However, scammers can fake (spoof) the number a text message is from, just as they can fake caller ID on a phone (known as Vishing).
  • Be alert for anything suspicious. If you receive a delivery alert from a new number—especially if you weren’t expecting a delivery—that alert is potentially suspect. We recommend you avoid opening the links in any potentially dangerous text messages.

Thursday, February 6, 2020

Coronavirus Phishing Attacks

Coronavirus....Yup!, another count to it. In worldwide health scare situation, the bad guys are on it like flies on $#!+We are seeing a new malicious phishing campaign that is based on the fear of the Coronavirus. 

The message is obviously not from the Center for Disease Control and Prevention (CDC). There are very few local cases in America. Obviously, the target will be mostly Asian countries. People are more cautious and curious to know. Bad guys take advantage of that.

You might receive in personal or official emails.

Here is a sample of the message that is being used. Don't click on any link or attachments. Users should delete the message if they receive it. There will be many other social engineering attacks using this same scare. This is a screen shot of the real attack:

Thursday, January 30, 2020

Beware! This spoofed Apple phone call looks so convincing

Apple warned its customers to beware of spoofed calls that look like they’re coming from Apple.

If you see the following messages or alerts on your phone, computer or other device, and you didn’t initiate the customer service call, it’s likely a scam. Read on to learn how these spoofed calls are designed to deceive you and what you can do to protect yourself.

Apple spoofed call can look so legitimate

This time, they’re spoofing Apple’s real support number 1-800-MY-APPLE (800-692-7753) to dupe unsuspecting iPhone owners into thinking that there was a data breach.

But don’t be fooled! It’s just another mass robocall that’s out to get you.
As usual, calling the supplied phone number on the voicemail will connect the victim to a fake Apple Support call center, where someone will try and convince you to give out your personal information, banking details and even control your computer remotely.

Why is this spoofed call displaying Apple’s information?

The interesting thing about this spoof is that, in some cases, it will display Apple’s actual logo, address and phone number on its contact information page.

How come? Remember MobileMe, Apple’s old cloud syncing service and iCloud’s predecessor? Chances are, if you ever used MobileMe and were already using an iPhone before 2011, you will have Apple’s contact card saved by default in your contact list.

This means that if you were an early iPhone adopter and you get a call that’s spoofing Apple’s support number (800-692-7753), it will actually display Apple’s logo, address and phone number as its contact information (the default data saved in your contact list.)

Go ahead, check your iPhone’s contact list now and see if you have Apple’s old MobileMe contact information. If you do, you may want to delete it to prevent getting duped by spoofed calls like this.

What is caller ID spoofing?

Caller ID or phone number spoofing is a growing plague that’s not only annoying, but it is also equally dangerous, too.

With this scheme, criminals are using VOIP (voice-over-IP) and phone spoofing software to impersonate a phone number’s caller ID. This means they could make any call show up on your phone as if it is coming from a familiar person, company or organization.

In fact, these Caller ID phone phishing scams (also known as vishing) are getting so sophisticated and professionally handled that they’re fooling even the most tech-savvy people around.

How to protect yourself against phone phishing scams

This Apple phone phishing scam may look convincing to some people but at the end of the day, it’s just another garden-variety phone spoofing scam.

To protect yourself against phone spoofing calls in general, here are some suggestions:

  • If you receive an unsolicited phone call that purports to be from Apple (or any other legit company) and requests you to give out personal information, hang up or ignore the call/voicemail.
  • Remember, Apple does not make unsolicited support phone calls. If you get an unexpected call from someone who claims to be from Apple, it’s most likely a scam.
  • If you do need to contact Apple (or any other company), initiate the call yourself. If you don’t know their customer phone numbers, look for them on the company’s website itself. (Note: Don’t rely on search results on Google. Always get the phone numbers directly from the company’s official website.)
  • Treat all unsolicited phone calls with skepticism. Do not provide any personal information.
  • Go to Apple’s support page to learn how to report the spoofed call to them.

Tuesday, January 21, 2020

site collection features - SharePoint Online

SharePoint Online lets you enable and disable site collection features that determine everything that should be available to users. Most site collection features are turned off by default.

To enable or disable a site collection feature


On any SharePoint sites, select Site contents in the top menu bar and then click Site settings.


On some sites, click Settings (Wheel icon - top right side) and then click Site Settings. If you don't see Site settings, click Site information and then click View all site settings.


On the Site settings page, click Site collection features under the Site Collection Administration heading.


Do one of the following on each site collection feature you want to enable or disable:


Click Activate to enable the site collection feature.
Click Deactivate to disable the site collection feature.
_______________________________________________________________________
When you activate SharePoint Server Standard Site Collection features, the below features will be activated.
Community Site Infrastructure
Display Templates for Search and Content Web Parts
Document Routing Resources
Item Form Recommendations
Portal Layouts Feature
Record Resources
Search Server Web Parts and Support Files
SharePoint Portal Server Local Site Directory Capture Control
Web Part Adder default groups
_______________________________________________________________________
When you activate SharePoint Server Enterprise Site Collection features, the below features will be activated.
Access Services
Chart Web Part
Community Site Infrastructure
Display Templates for Search and Content Web Parts
Document Routing Resources
Excel Services Application View Site Feature
Excel Services Application Web Part Site Feature
InfoPath Forms Services
Item Form Recommendations
Portal Layouts Feature
Record Resources
Search extensions
Search Server Web Parts and Support Files
SharePoint Portal Server Business Applications Content Type Definition
SharePoint Portal Server Local Site Directory Capture Control
Visio Web Access
Web Part Adder default groups
_______________________________________________________________________
When you activate SharePoint Server Publishing Infrastructure, the below features will be activated.
Asset Library

Display Templates for Search and Content Web Parts
Document Routing Resources
Enhanced Theming 
Enterprise Wiki Layouts

Html Design

Media Web Part
Mobile and Alternate Device Targeting
Page Layouts and Master Pages Pack
Portal Navigation
Publishing Prerequisites
Publishing Resources
Ratings
Record Resources
Search Server Web Parts and Support Files
Translation

New Roles and administrators - O365 vs Azure Active Directory


Roles in O365Roles in Azure Active DirectoryRoles Description
Groups AdminGroups administratorMembers of this role can create and manage groups, create and manage group settings like naming and expiration policies, and view groups activity and audit reports. It is important to understand that assigning a user to this role gives them the ability to manage all the groups in the tenants across various workloads like Teams, SharePoint, and Yammer in addition to Outlook. Also, the user will be able to manage the various group settings across various admin portals like Microsoft Admin Center and the Azure Portal, as well as workload specific ones like Teams and SharePoint admin centers.
Office apps adminOffice apps administratorUsers in this role can manage Office 365 apps cloud settings. This includes managing cloud policies, self-service download management and the ability to view Office apps related report. This role additionally grants the ability to manage support tickets, and monitor service health within the main admin center. Users assigned to this role can also manage communication of new features in Office apps.
Power Platform adminPower platform administratorUsers in this role can create and manage all aspects of environments, PowerApps, Microsoft Flows, and Data Loss Prevent policies. Additionally, users with this role have the ability to manage support tickets and monitor service health.

Groups admin Permissions

Manage all
Read and configure ‎Azure Service Health‎
Create and manage Azure support tickets
Read and configure Service Health
Create and manage ‎Office 365‎ service requests

Create
Create groups in ‎Azure Active Directory‎

Delete
Delete groups in ‎Azure Active Directory‎

Modify
Assign product licenses to groups for group-based licensing in ‎Azure Active Directory‎
Reprocess license assignments for group-based licensing in ‎Azure Active Directory‎
Restore groups in ‎Azure Active Directory‎
Update basic properties on groups in ‎Azure Active Directory‎
Update members of a group in ‎Azure Active Directory‎
Update owners of a group in ‎Azure Active Directory‎
Update settings of groups in ‎Azure Active Directory‎

Read
Read hidden members of a group (groups.hiddenMembers property) in ‎Azure Active Directory‎
Read ‎Office 365‎ usage reports

Read basic properties on all resources in ‎Microsoft 365‎ admin center
__________________________________________________
Office apps admin Permissions
Manage all
   Read and configure ‎Azure Service Health‎
   Create and manage Azure support tickets
   Read and configure Service Health
   Create and manage ‎Office 365‎ service requests
   Manage all aspects of end-user communication settings
Read
   Read messages in Message Center
   Read ‎Office 365‎ usage reports
   Read basic properties on all resources in ‎Microsoft 365‎ admin center
___________________________________________________
Power Platform admin Permissions
Manage all
   Read and configure ‎Azure Service Health‎
   Create and manage Azure support tickets
   Manage all aspects of ‎Dynamics 365‎
   Manage all aspects of ‎Flow‎
   Read and configure Service Health
   Create and manage ‎Office 365‎ service requests
   Manage all aspects of ‎PowerApps‎
Read
   Read ‎Office 365‎ usage reports
   Read basic properties on all resources in ‎Microsoft 365‎ admin center


For other roles info, click below links

Global reader (Azure role)
Roles and administrators - O365 vs Azure Active Directory

Thursday, December 19, 2019

Updated Feature: Email notifications for comments and @mentions in Word, PowerPoint, and Excel

MSFT will be updating email notifications for comments and @mentions in Excel, PowerPoint, and Word.
We'll be gradually rolling this out in mid-January 2020
The roll out will be completed worldwide by the end of February 2020

This message is associated with Office 365 Roadmap ID 51538.

How does this affect me?
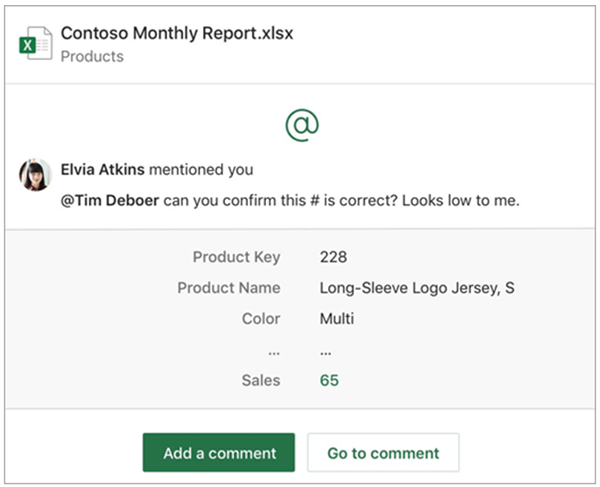
Currently, when a user comments on a document, presentation, or spreadsheet and adds the @ sign with someone's name (an @mention), that person may receive an email with a link to that comment. By clicking on the link, the mentioned person opens the document comment and enters that conversation.

With this update, when a user gets an email notification that someone has @mentioned them or who has replied to their comment, the email may now show both the comment thread and the surrounding document context without requiring them to open the document. In addition, users who receive the email will be able to reply to the comment without needing to open the document.

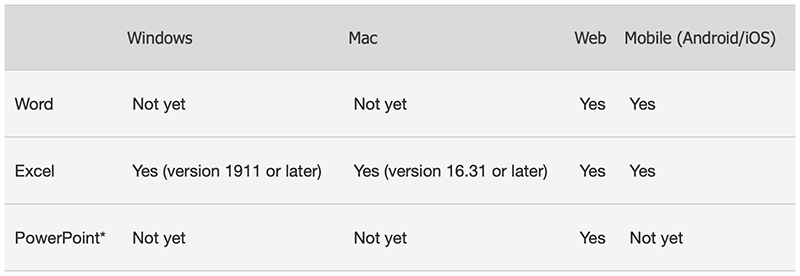
This update applies to these versions of Excel: Windows (version 1911 or later), Mac (version 16.31 or later), mobile, and web.
For Word, this update applies only to mobile and web versions.
For PowerPoint, this update applies only to the web version.
We will add additional support for PowerPoint and Word in 2020 and will notify you of those updates at that time.


Sometimes users may get email notifications that do not include the comment thread, context, or ability to reply from the email. This can happen:
When the file is marked sensitive via rules supporting Data Loss Prevention;

If the file is Rights Protected; or
Kathy > is there a better link?

If the person who left the comment is using a version of Office that does not yet support this feature.

Additional information

Wednesday, December 18, 2019

Updated Feature: Image resizing in the modern SharePoint experience

MSFT is introducing the ability to resize an image in the modern SharePoint experience. 
We'll be gradually rolling this out to Targeted Release customers in early January 2020.
The roll out will be complete by the beginning of February 2020.

This message is associated with Office 365 Roadmap ID 57812.

How does this affect me?
The modern SharePoint site is comprised of web parts, the building blocks of the page. The Image web part lets an editor insert an image on a page, whether from their SharePoint site, their computer, or an external web location.

With this update, page editors will also be able to resize images in the image web part.


What do I need to do to prepare for this change?
There is no action you need to take to prepare for this change, but you might consider updating your user training and notifying your help desk.

Tuesday, December 17, 2019

Updated Feature: Exchange Online - FindTime, updating back-end service

MSFT is updating how FindTime stores polling data.

• MSFT will be gradually rolling this out to targeted release customers in mid-December 2019.
• The rollout will be completed by the end of March 2020.

This message is associated with Microsoft Office 365 Roadmap ID 58210.

How does this affect me?

FindTime is an Outlook add-in that helps your users quickly find time to meet with others by simplifying group scheduling via a poll. Customers have asked that FindTime store application data at the organization’s location. To address this, the new FindTime service will now store collected data in the meeting organizer’s Exchange mailbox.

The new FindTime service will be supported in Outlook on the web, Outlook for Windows 2016 version 2016.0.7828.100 and above, and Outlook for Mac 2016.

What do I need to do to prepare for this change?

If you have not enabled FindTime for your organization, this update does not apply to you.

If you have enabled FindTime for your organization:

• For your users who have a supported version of Outlook, their FindTime polling data will be stored in their Exchange mailbox.

• For your users who have a non-supported version of Outlook, their FindTime polling data will be stored in a North America server.


Install FindTime for everyone in my organization

As a tenant admin, you can install Office apps for your Office 365 users using the Exchange admin portal.

1. In the EAC, navigate to Organization > add-ins.

2.  Click , and then choose the right option.

Add from the AppSource

Note: Access to the AppSource isn’t supported for mailboxes or organizations in specific regions. If you don’t see Add from the AppSource as an option in the Exchange admin center under Organization > add-ins >  Icon, you may be able to install an App for Outlook from a URL or file location. For more information, contact your service provider.

Add from URL. In URL, enter the full URL for the app manifest file that you want to install.


Add from file. Select Browse, and then navigate to the location of the app manifest file that you want to install.
We go with 'Add from the AppSource' option. 

This opens a new tab redirecting to MSFT appsource site, select the app you want to install (look for FindTime app), 


and then click GET IT NOW.
 Click 'Continue'
 Click 'Yes'
 You will see the FindTime icon under Home tab of the Mailbox and under Message tab of the opened e-mail.
Click on  Reply with Meeting Poll - FindTime icon, Click on 'Link Now'

Sign in for the first time
Once connected, select the Meeting time(s) and Click 'Next'
 

Update the Location and click on 'Insert to email'
You will see the email as shown below.