SharePoint (2003 thru Online): 2024

Wednesday, September 25, 2024

Uninstall All Powershell Modules

The script uses the Get-InstalledModule cmdlet to identify all installed PowerShell modules. It then employs the -match operator to find modules whose names include "Microsoft". For these identified modules, the script executes the Uninstall-Module cmdlet with the -Force option to guarantee their removal. Essentially, the script is designed to remove any PowerShell module that contains "Microsoft" in its name. 

Another variable -notmatch is targeted to remove any PowerShell module that does not contain "Microsoft" in its name. 

Additionally, there's a variable, $excludedModules, which is an array holding the names of modules that you wish to keep. By using the condition -and $excludedModules -notcontains $_.Name, the script ensures it only removes "Microsoft" named modules that are not specified in the exclusion list. 

You can customize this list by substituting "ModuleName1" and "ModuleName2" with the names of the modules you'd like to exclude from being uninstalled.

# List of modules to exclude

$excludedModules = @("ModuleName1", "ModuleName2")

Get-InstalledModule | ForEach-Object {

   # Use this line uninstalls all PowerShell modules that have "Microsoft" in their name.

   if ($_.Name -match "Microsoft") {

    # Use this line uninstalls all PowerShell modules that do not have "Microsoft" in their name.

    #if ($_.Name -notmatch "Microsoft") {

        # Use this line uninstalls all PowerShell modules that have "Microsoft" in their name and exclude above List of modules.

        #if ($_.Name -match "Microsoft" -and $excludedModules -notcontains $_.Name) {

         Uninstall-Module -Name $_.Name -Force

}

 }


NOTE: In PowerShell, the # symbol is used to add comments. Comments are lines or parts of lines that are not executed as part of the script. They are used to provide explanations or notes about the code, making it easier to understand.

Thursday, August 29, 2024

Modification of Teams URL in Microsoft 365 Admin Center

Introduction

Microsoft has recently restructured how administrators can modify Teams URLs. Previously managed through the SharePoint admin center, this function has now transitioned to the Teams & Groups section within the Microsoft 365 admin center. This change aims to streamline administrative tasks and provide a more integrated user experience.

Background

The SharePoint admin center traditionally housed various features for managing team sites and associated URLs. However, as Microsoft's suite of tools has evolved, the need for a more cohesive approach to administrative functions became apparent. This led to the migration of Teams URL management to the Microsoft 365 admin center under the Teams & Groups section.

Steps to Modify Teams URL in Microsoft 365 Admin Center

To ensure a smooth transition and ease of use, follow these detailed steps to modify Teams URLs within the new location:

Accessing the Microsoft 365 Admin Center

·        Navigate to the Microsoft 365 admin center and logging in with your administrator credentials. Once logged in, you will see a navigation panel on the left-hand side of the screen.

Locating Teams & Groups

·        In the navigation panel, scroll down and select the "Teams & groups" option. Select "Active teams & groups".

Modifying the Teams URL

·        Find the specific team whose URL you wish to modify from the list of available teams. Click on the Name of the Team to open its settings and details.

·        Locate the Site address. Click the "Edit" button down to it.

·        Enter the desired new SharePoint site address and confirm the changes by clicking "Save".


Verification

·        After saving the changes, ensure that the new URL is functional by accessing the team through the updated link.

·        If any issues arise, verify the changes in the admin center and consult Microsoft support if necessary.

Conclusion

The relocation of Teams URL modification to the Teams & Groups section of the Microsoft 365 admin center represents a strategic move towards a more unified administrative environment. By following the outlined steps, administrators can efficiently manage Teams URLs and ensure seamless access for their organization.

For further assistance or detailed guidance, please refer to the official Microsoft documentation or contact support.

Thursday, June 20, 2024

Sensitivity labels Properties of all files in a Document library

Copilot is a big deal on Microsoft 365 these days. Lots of people are using it, and Sensitivity labels are getting more popular too. I had to run a PowerShell Script to get the Properties of all files in a Document library, including their Sensitivity labels. PnP PowerShell made it easy for me.

I ran the script using the PowerShell extension in Visual Studio Code.

# Connect to the SharePoint site
$siteURL = "https://gurram.sharepoint.com/sites/dev"
Connect-PnPOnline -Url $siteURL -Interactive

# The name of the document library
$libraryName = "test1"

# Retrieve all list items in the document library
$items = Get-PnPListItem -List $libraryName

# Loop through each item and retrieve FieldValuesForEdit
foreach ($item in $items) {
    # Retrieve the FieldValuesForEdit property of the list item
    $fieldValuesForEdit = Get-PnPProperty -ClientObject $item -Property "FieldValuesForEdit"
    Write-Host "Item ID:" $item.Id
    Write-Host "FieldValuesForEdit:"
    $fieldValuesForEdit.FieldValues.FileRef #FileReferenceLink
    $fieldValuesForEdit.FieldValues._IpLabelId #Label ID
    $fieldValuesForEdit.FieldValues._DisplayName #Label Display Name
}

Below screenshot shows the result.


Monday, June 10, 2024

Apply Sensitivity label to all Site collections in SharePoint admin center

With E3 license, we have to label everything manually, which is very time-consuming when we deal with many site collections.

For our project, I used a PowerShell Script to automate the process of applying Sensitivity labels to all Site Collections.

#Run the Get-Label command to retrieve the list of available labels:
Connect-IPPSSession -UserPrincipalName spadmin@gurram.onmicrosoft.com
Get-Label |ft Name, Guid, ContentType
#Copy the required label GUID
Disconnect-IPPSSession
--------------------------------------------------------------
#Connect to PnP PowerShell
Connect-PnPOnline -Url "https://gurram-admin.sharepoint.com" -Interactive

#Get All Site collections - Include Only: Team site (no M365 Group), Team site (classic experience), Project Web App site and Team sites
$Sites = Get-PnPTenantSite | Where-Object { $_.Template -eq "STS#3" -or $_.Template -eq "STS#0" -or $_.Template -eq "PWA#0" -or $_.Template -eq "GROUP#0" }

#For each site in the Site collections
ForEach ($site in $Sites) {
    #Required Label GUID from the above Script
    $LabelId = "abc123de-45f6-7g89-hi12-34j56789jk12"  
    $ctn = Connect-PnPOnline -Url $site.URL -Interactive
    $label = Get-PnPSiteSensitivityLabel -Connection $ctn

   if ($label.DisplayName -eq "") {
   #Add sensitivity Label to site
   Set-PnPTenantSite -Identity $site.URL -SensitivityLabel $LabelId
  } else {
    Write-Host $site.URL,"Not Blank"
  }
   $Object = [PSCustomObject]@{
    URL = $site.URL
    Sensitivitylabel= $label.DisplayName
    }
    $List += $Object
    #Write-Host $site.URL
    }
#Disconnect
Disconnect-PnPOnline

Apply Sensitivity Label to all Document Libraries in a Site collection

E3 ($249) and E5($449) licenses have a big price gap, and E5 license has the advantage of auto labelling. Without it, we have to label everything manually, which is very time-consuming when we deal with many site collections and a lot of content.

For our project, I used a PowerShell Script to automate the process. I applied Sensitivity labels to all Site Collections first. 

Then, using the below PowerShell Script, I applied Sensitivity labels to Document libraries in each site collection. This way, the Office files that are uploaded or updated will get the label from the Document Library. However, we still need to label other file types manually.

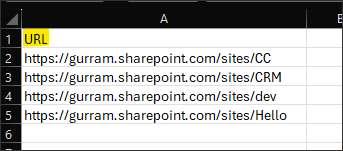
List all the sites in a CSV file with URL as Header (As shown below).


symbol in PowerShell script is used for comments.

# Import the CSV file
$sites = Import-Csv -Path "D:\Dev_Sites_FilesWise.csv"

# Loop through each site
foreach ($site in $sites) {
    # Connect to the SharePoint site
    Connect-PnPOnline -Url $site.Url -Interactive

# The GUID of the 'Internal Use' sensitivity label
$Label = "Internal Use"

# Retrieve all document libraries (Except Style Library) from the site
$libraries = Get-PnPList | Where-Object {
  $_.BaseTemplate -eq [Microsoft.SharePoint.Client.ListTemplateType]::DocumentLibrary
    -and $_.Title -ne "Style Library"}

# Apply the sensitivity label to each document library if it doesn't already exist and print the name
foreach ($library in $libraries) {
 # Retrieve the current sensitivity label of the document library
 $currentLabel = (Get-PnPList -Identity $library.Id).DefaultSensitivityLabelForLibrary
   
  # Check if the sensitivity label is empty
  #if ($currentLabel -eq $null) {
      if ([string]::IsNullOrWhiteSpace($currentLabel)) {
      Set-PnPList -Identity $library.Id -DefaultSensitivityLabelForLibrary $Label
      Write-Host "'Internal Use' applied to: " $library.Title
    }
  else {
      Write-Host "Sensitivity label already exists on: " $library.Title
    }
}
}
# Disconnect the session
Disconnect-PnPOnline

Thursday, May 9, 2024

Add/Remove sites (bulk list) from Search Index thru PowerShell

 We need to remove 150 sites from Search Index. We have to make sure they don't show up in search results by turning off that option for each site. The normal way of doing this is too slow for so many sites. We use a faster PowerShell script method to handle 150 sites at once.

Regular method

By default, the option Allow this site to appear in Search results is set to Yes for all Site collections in Sharepoint online. This means the site content can show up in search results.

On the site, select Settings (Wheel) icon., and then select Site settings. If you don't see Site settings, select Site information, and then select View all site settings.

Under Search, click Search and offline availability.

In the Indexing Site Content section, under Allow this site to appear in Search results, select Yes to allow the content of the site to appear in search results.


If you don't want the content to show up in search results, choose No.

NOTE: Search results are always security trimmed, so users will only see content they have permission to see.


PowerShell Script Method

List all the sites in a CSV file with URL as Header (As shown below).


# symbol in PowerShell script is used for comments.

# Connect to Admin Center
$adminSiteUrl = "https://gurram-admin.sharepoint.com/"
$adminConnection = Connect-PnPOnline -Url $AdminSiteUrl -Interactive

$CSVImport = "D:\Sites.csv"
$SitesCollections = Import-CSV -Path $CSVImport
 
ForEach($Site in $SitesCollections)
   {
         $siteCollectionConnection = Connect-PnPOnline -Url $Site.URL -Interactive
         Set-PnPSite -Identity $Site.URL -DenyAndAddCustomizePages $false
         $Web = Get-PnPWeb -Connection $siteCollectionConnection
         #Indexing Site Content = Yes(false), = No(true)
         $Web.NoCrawl = $false
         $Web.Update()
         Invoke-PnPQuery
         #To unlock the site (-LockState Unlock), To lock the site (-LockState ReadOnly)
         #we did not use the below option, because we want to delete sites later
         Set-PnPSite -Identity $Site.URL -LockState ReadOnly
         #to know the completed site
         write-host $Site.URL
    }


This script completed successfully in less than 10 minutes.

Monday, May 6, 2024

Add/Remove SharePoint sites (bulk list) to Retention Policy thru PowerShell.

We have a requirement to add 150 sites to the exclusion list of our retention policy. While we have traditionally accomplished this by manually editing the retention policy and adding the sites, this method is not feasible for such a large number of sites.

NOTE: 
Excluding sites from policy requires time, ranging from 10 minutes to 24 hours, to take effect.

Edit Retention Policy > Click on Edit (under Excluded) and add the sites.


Instead, we would like to use a PowerShell script to automate the process. This will allow us to add all the sites quickly and efficiently.

List all the sites in a CSV file with URL as Header (As shown below).

NOTE: I had to exclude 150 sharepoint sites from the retention policy, but it only allows 100 at a time. So I split them into two CSV files, one with 100 and one with 50. Then I ran the Powershell Script for each CSV file separately.


Below is the PowerShell Script.
NOTE: This activity requires certain permissions, such as Compliance Admin or Global Admin.
____________________________________________________________________________________
#Variables
$PolicyName = "FilesRetentionPolicy"
$CSVPath = "D:\DEV_Sites.csv"

#Get the CSV file contents, column URL to the array.
[array]$excludesites = Import-CSV -Path $CSVPath | Select -ExpandProperty URL

#Connect to Compliance Center through Exchange Online Module
Connect-IPPSSession -UserPrincipalName spadmin@gurram.onmicrosoft.com

#Get the Policy
$Policy = Get-RetentionCompliancePolicy -Identity $PolicyName

#Add SPO Sites (array) to Retention Policy
Set-RetentionCompliancePolicy -Identity $Policy.Name -AddSharePointLocationException $excludesites

----------------Use Remove when needed----------------
#Remove SPO Sites (array) from Retention Policy
Set-RetentionCompliancePolicy -Identity $Policy.Name -RemoveSharePointLocationException $excludesites
---------------------------------------------------------------------

#Disconnect the Exchange Online Module
Disconnect-ExchangeOnline
____________________________________________________________________________________
After running the PowerShell Script successfully, you can manually verify the added sites in Retention Policy.


Click on Edit in the above screen. You will see as shown below.


Thursday, February 22, 2024

Unblock Multiple Files in the Same Folder (Windows 11)

 In Windows 11, To unblock multiple files in the same folder, go to the folder and right click, you will see the menu as shown below.


Select Open in Terminal

Copy/paste the following command and press Enter: dir | Unblock-File


It works like charm!